Smokinlicious is proud to be a F2C company- meaning a manufacuter to Consumer Sales Organization

Smokinlicious is proud to be a F2C company


SMOKINLICIOUS® IS AN F2C

listen to our blog


In today’s age of selling products and services, there are acronyms that are common to marketing and sales strategies. First, there is B2B which refers to business to business relationships. This means that a product or a service is sold from one business to another. An example of each would be windshield wiper fluid being sold to gas stations and attorney services to large corporations.

B2C is shorthand for business to consumer. This is selling a product or service directly to a customer that is not necessarily a business.

Now, you may automatically assume that SmokinLicious® would fall under both these sales types, and you would be right. But there is another acronym you likely aren’t familiar with: F2C.

F2C- Making a Better Connection

F2C refers to factory to consumer or more specifically, manufacturer to consumer. There are many reasons why this is a plus to both businesses and consumers doing business with a specific manufacturer. Let’s examine the major advantages from the perspective of doing business with SmokinLicious®:

Advantage #1 Details

As the manufacturer of all the products sold under the brand SmokinLicious®, we can provide the specifics on where the hardwood comes from, the age of the wood, the handling of the product, the treatment the wood is exposed to, and the details on packaging. You don’t have to wait on answers to your product questions like with a supplier who is simply a re-seller of the wood. We give answers immediately!

Advantage #2 Intimate Knowledge

When you are committed to manufacturing a specific product, you tend to know that product thoroughly. For SmokinLicious®, that equates to us knowing not only about wood fired cooking techniques like hot smoking, ember cooking, and cold smoking but we know the science behind hardwood; molecular biology of the wood as well as for combustion. We know why smoke gives flavor and how to respect and control it.

Advantage #3 Availability

We aren’t simply selling a product to move it out of inventory. As a manufacturer, we are committed to answering questions whether on email, via phone, or social media platforms. No, we don’t operate the phones 24/7. But we do get back to anyone who contacts us, usually within 24 hours. We are available to everyone!

Advantage #4 Passion

Sometimes I feel the word “passion” is overused but that word really does describe the people who make up the SmokinLicious® Team. We are passionate about cooking with fire and the smoke it produces. We simply love to offer our perspective on cooking with wood. Remember, just because someone sells a specific product doesn’t mean it was a dream of theirs. It simply may be the “thing” to do with no real commitment. Who wants to commit to that type of supplier!

Advantage #5 Skilled

We have a test kitchen/patio and we use it – all the time! That’s the only way you can know all the different applications for the product we manufacture and sell. We possess the skills to guide you on what might be causing bitter flavors, poor color, equipment failures, and so much more. Plus, we offer daily postings on recipes, tips, techniques, and the science behind cooking with fire and smoke.

Advantage #6 Global

We can be everywhere because we know our commodity and the regulations that relate to our products. We don’t cut corners because we are as concerned about our environment and forests as the agricultural agencies around the world. You won’t ever need to worry about having your supply cut off because a regulation or law wasn’t followed.

Advantage #7 Exclusivity

You’re purchasing smoking wood to cook with. That means, food is exposed to the wood’s components. Don’t you want assurance that it’s clean? We only sell hardwoods for cooking and culinary use! That’s it! We don’t take waste product from some other wood process and sell it off under a new label or brand. We don’t buy woods from anyone who can’t document on paper where the smoker wood is from and if exposure to chemicals is possible. SmokinLicious® is exclusively a culinary wood product!

These are just some of the advantages to working directly with and purchasing directly from a manufacturer, or F2C. When you want assurances that any question you have can be answered, that any product need can be met, that your equipment will be protected, then seek a direct manufacturer first and eliminate a middle man that may only be in it for dollars and cents. Or one day you could simply find they’re no longer in business or they no longer can ship product throughout North America or other continents, leaving your Company with a big problem.

Purchase products:

Wood Chips- Grande Sapore®

Wood Chunks- Double and Single Filet

Smoker Logs- Full & Quarter Cuty

More Related reading on "What Wood for Smoking" and other great smoking and grilling tips and techniques

More Related reading on “What Wood for Smoking” and other great smoking and grilling tips and techniques

Additional reading:

-SMOKIN’ DUST®: A SPICE FOR YOUR EQUIPMENT

-WHAT’S IN THE SMOKINLICIOUS® WOOD CHUNK BOX?

-WHEN A FLOP COULD HAVE BEEN A SUCCESS!

Our primary focus is on the consumer of our products. Our culinary team provides support to all chefs!

Our primary focus is on the consumer of our products. Our culinary team provides support to all chefs!
Alto-Shaam® logo

Alto-Shaam®

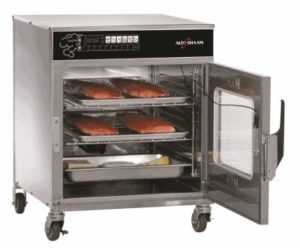
Alto-Shaam® oven with open door viewing the cooking trays

Guest Blog Post

listen to our blog

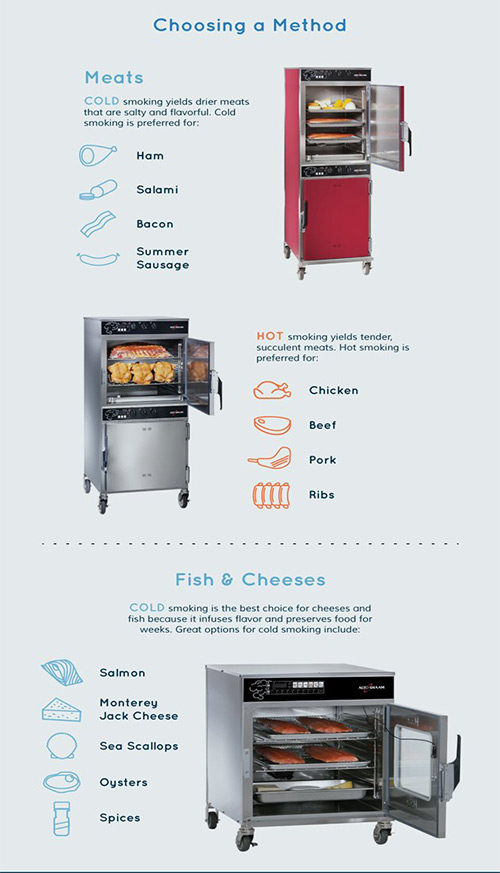
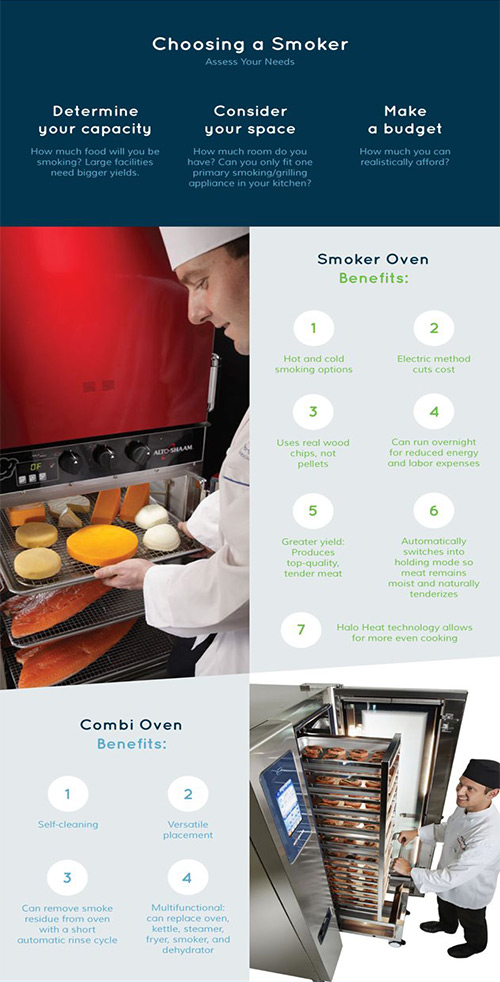
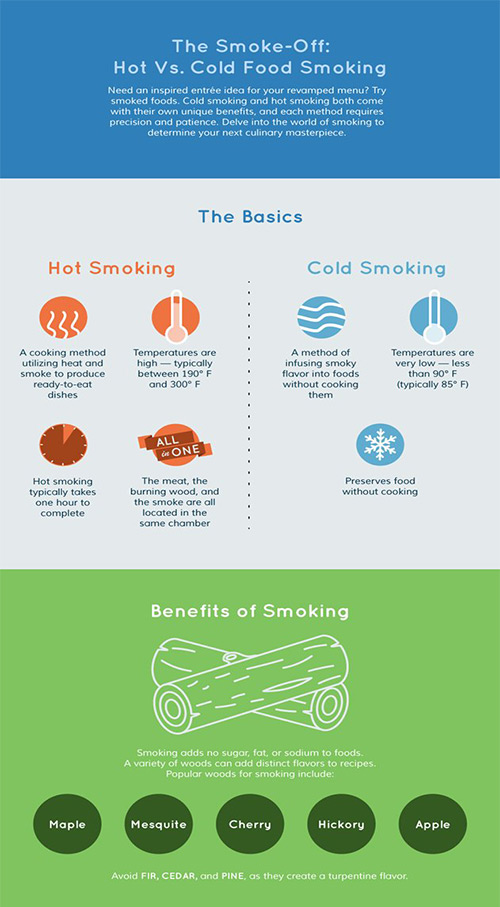
Smoked foods can lend an inspired touch to the menu of almost any restaurant, regardless of the type of cuisine it serves. Today, it’s easier than ever to smoke food quickly and efficiently whether in a restaurant setting or at home. The first step is to choose a hot or cold smoker. Both types of smoking devices come with their own benefits, and each is ideally suited for different types of food. Both hot and cold smoking can be used to infuse foods with different flavors; and both can be used to preserve otherwise perishable foods. The infographic below can help you decide whether hot smoking, cold smoking, or a combination of the two is right for you

Discussion of hot vs. cold smoking techniques

Chosing a method for meats, poultry, fish and cheeses

Choosing a smoker

Sources

Alto-Shaam®

Originally posted this on January 11, 2017 on their web site. The Alto-Shaam® Social Marketing Team made a request to have us post this to our Blog. We felt the content was a great value to our readers/followers! Please note that the wood chips outlined in this article are limited to only those that Alto-Shaam® has available. SmokinLicious® produces 8 species of smoker wood chips compatible to the Alto-Shaam® equipment. (Note: we do not produce Mesquite or Apple).

Purchase products:

Wood Chips- Grande Sapore®

Dr Smoke- "We like the Alto-Shaam equipment especially when cooking/smoking with wood chips."

Dr Smoke- “We like the Alto-Shaam equipment especially when cooking/smoking with wood chips.”

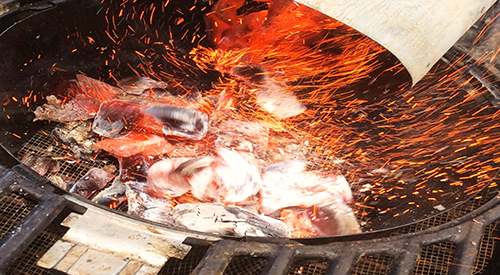
Building the perfect fire for cooking! Our chimney starter full of flaming hot charcoal being poured into our kettle grill.

Building the perfect fire for cooking! Our chimney starter full of flaming hot charcoal being poured into our kettle grill.

Listen to the audio of this blog

In Part I of our series on lighting an outdoor fire for cooking, I addressed fire production for the outdoor fireplace or fire pit cook, known as open fire appliances. In Part II, I’ll address the needs for kettle, drum and box grills’ fire set up.

The Wood-Fired Environment

There are many choices in equipment for working with a wood fire but each has different material components that determines how much work would be involved to cook on the unit. Here is the primary point when you’re selecting equipment for live fire: how will you cook on that equipment?

If your plans are to always do indirect cooking whereby the source of heat (fire, coals) will be on one side and you will cook on the non-heat side (in my opinion, the preferred method for all cooking), then know that most any equipment selected will work. However, the time for the equipment to heat up may play a factor, as the heating time is directly related to the insulation of the grill. Plus the amount of radiant heat it can hold.

If a unit is manufactured from heavy metal, brick, clay, or ceramic housing, then it will perform exceptionally by giving radiant and retained heat. Why is that important? Because producing retained and radiant heat means less fuel consumption and even cooking results.

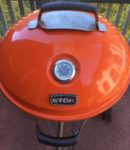
Our orange Stok kettle grill was used for our demonstration.The Kettle Grill

For thinner material grills like the traditional kettle grill which are very popular, low cost, and preferred

by many, you can compensate for the potential heat loss and improve efficiency by adding fire bricks to the walls and floor of the grill. You will simply start your live fire directly on the fire bricks rather than the charcoal grate. Fire bricks will work well in any grill that could improve on its insulation.

Drum/Barrel Grill

The overall cooking space in a drum/barrel grill is larger than that of a kettle grill. However, just like any metal material, there are different grades so quality can be variable. Same rule applies to these grills: if the insulation is not great, add fire brick to improve the performance.

Box Grills

These units are traditionally made of high heat metal with a deep, metal charcoal pan that includes grid and vents. A grilling grate is suspended above and there often is a lid to the unit.

Fire Set Up

As I’ve stressed before, a good fire needs 3 elements: fuel (wood, charcoal), oxygen (air intake vents), and heat. As with any fire cooking, a small, hot fire is ideal.

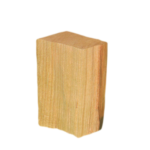
Our bark free Double Filet smoker wood chunk is the perfect size for the small kettle grill and box grills.

Double Filet Wood Chunk

To start your fire in one of these pieces of equipment, first open the air intake vents at the base of the charcoal firebox area. This will ensure that oxygen can stimulate the start of the fire. Since this is an enclosed firebox area, the size of the wood pieces may need to be adjusted from what you would commonly use in a fireplace or fire pit/fire ring.

I like to use the log cabin method of starting a fire with this equipment. Lay 2 longer pieces of hardwood parallel to each other with about 3 inches of air space between them. Lay 2 more hardwood pieces on top perpendicular to the first pieces. Place the last 2 in position to match the base woods’ alignment. In the center, add a pile of tinder which can be hardwood chips, pine cones, even newspaper if need. Again, I like to use wood in its natural form as much as possible. Pile some kindling size wood pieces on top of the tinder pile. You can drizzle vegetable oil on top of the kindling and tinder to assist with ignition which proves helpful if you plan to light with a long wooden match. I prefer to lite my fire using a MAP torch.

Don’t Rush It

It is imperative that you allow the fire to go through the full stages of combustion before you introduce foods to the cooking grate. Too much flame and smoke will ruin the foods. The ideal is to wait until the fire burns down to glowing embers. If your equipment has the room in the firebox, rake or shovel some of the hot embers to one side and add just a small quantity of additional hardwood to keep the heat steady. The rest of the hot embers are what will be used to cook with.

Position the foods based on the heat needed for the cooking. Meats will require more of the heat while vegetables and one pot dishes will take the medium to low heat. An infrared thermometer will aide with knowing heat levels in your equipment or you can use the hand test: hold your hand over the coals the distance your foods will be. If you can only hold your hand for a count of 2 seconds before you need to pull it away, that is high heat. 3-4 seconds is medium-high, 5-6 seconds is medium and 7-8 seconds is low heat.

Be sure you visit Part I of this series so you can view the list of recommended tools to have when you wood-fire cook.

I hope you gained some new information on lighting a fire. Whether you plan to cook over/in your kettle, barrel or box grill. Leave us a comment and subscribe so you don’t miss anything concerning wood fired cooking, flavors, and the science behind the fire.

Purchase products:

Wood Chunks- Double & Single Filet

Wood Chips- Grande Sapore®

More Related reading on this subject

More Related reading on this subject

Related reading:

-OPEN PIT COOKING FIRE BUILDING: PART I

-EMBER FIRED FRESH ZUCCHINI

-BEYOND PRICING: THE TOP THINGS TO CONSIDER WHEN PURCHASING COOKING WOOD


Dr Smoke says "The key to any success in grilling and smoking outdoors is building the fire with the proper materials and patience to develop the right base before you attempt to cook the food."

Dr Smoke- “The key to any success in grilling and smoking outdoors is building the fire with the proper materials and patience to develop the right base before you attempt to cook the food.”

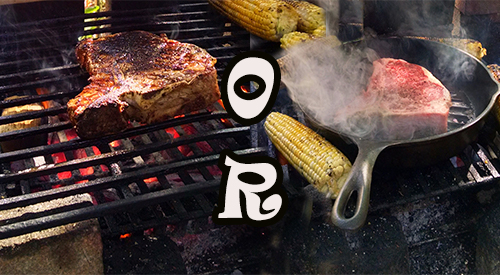
Cooking steak on the grill or in the grill pan is a universal question. Read more below to understand some of the techniques for cooking the perfect steak.

Cooking steak on the grill or in the grill pan is a universal question. Read more below to understand some of the techniques for cooking the perfect steak.

A GUIDE FOR COOKING THE PERFECT STEAK

Being able to successfully cook a steak is a skill that most people aspire to have. Pay attention to these details and you’ll see that it’s not that difficult to pull off.

To begin, you need to understand the basics of the different cuts of beef and how to choose the right one. From there, we’ll get into how to cook it to your desired level of doneness.

Choosing a Steak

Examining the butcher shop cases can be overwhelming. There are so many different cuts available—big steaks, skinny steaks, huge roasts, small roasts, and more. If your goal is to cook a good steak at home, I recommend sticking with the rib-eye, T-bone, New York strip, or Filet Mignon. These are the most expensive cuts, but in steaks, you get what you pay for and these are the most tender when grilled or pan-fried. The differences in tenderness come from the cow having stability muscles (think the lower back), which are less powerful and thus tender, and load-bearing muscles, which are tough. Price is directly correlated to these qualities. A tender steak will cost a lot more than a tough steak (though with the right treatment, you can successfully turn a tough cut like brisket into a tender, flavorful meal).

If the sheer volume of beef cuts still overwhelms you, check out our easy-to-read guide to steaks and their tenderness, price, and ideal preparation.

The seasoning requirements differ based on the cut. A tougher steak requires more seasoning because your eating experience is mostly about tasting the seasoning, rather than enjoying the tenderness of the cut. For example, you can get away with simple salt and pepper on a perfectly cooked filet mignon, while a flank steak used for fajitas should have some sort of spicy rub all over.

Tips for Cooking the Perfect Steak

So, you’ve purchased steaks that fall on the tender side and you’re ready to cook them. First, let them rest at room temperature for about 30 minutes to take the chill off. This results in more even cooking. Pro tip: If you are cooking for someone who likes a well-done steak and you like yours rare, leave yours in the fridge until the absolute last minute; your steak will cook less than your guest’s in a similar amount of time.

If you’ll be cooking on the stovetop, a cast iron or stainless-steel pan will work best. Nonstick coating can’t handle the high heat required for cooking a steak. Before you place the skillet over high heat, lightly season the steaks with a mild rub or just salt and pepper. While the skillet is warming, pour in a few tablespoons of peanut, canola, or other high-smoke-point oil. When the oil is shimmering and the pan is hot, place the steaks in the pan and loosely cover it with foil to prevent oil from splattering. Now is also the time to turn on any kitchen fans, as this will generate some smoke. If your steak is less than 1 inch thick, you can plan on cooking it in the pan the entire time. If your steak is thicker than an inch, do the searing on the stovetop and then move the entire pan to a preheated, 400-degree oven to finish cooking it without overly charring it.

When the steak hits the hot pan, start your timer. In general, 2 to 5 minutes per side is sufficient for medium doneness on a hot skillet. This range is flexible because, among other variables, everyone’s heat is slightly different, as is the steak’s starting temperature (depending, for example, on when you pull it from the fridge). For a thickness of an inch or less, I like to sear for about 3 minutes on each side, after which you should let it rest. If you have a thicker steak, you would put it in the preheated oven after the two 3-minute turns and let it cook for another 2 to 5 minutes until you achieve the desired doneness.

When you are finished cooking the steak, add a tablespoon of salted butter on top and a fresh herb – thyme works well – to get that expensive steakhouse-style flavor pop.

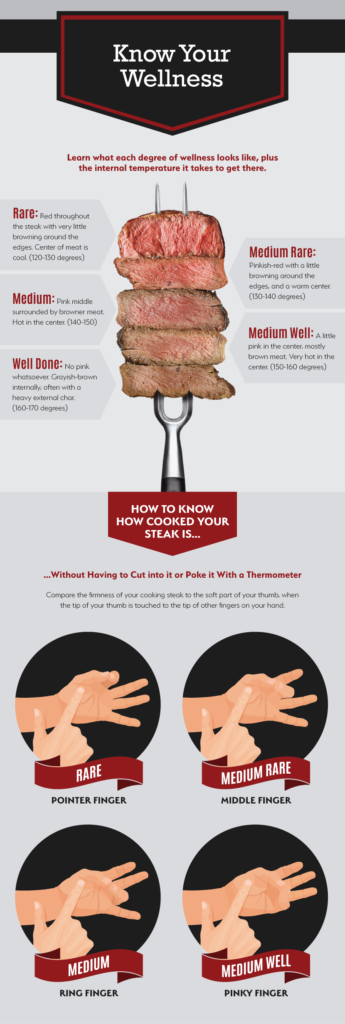
You have two methods for determining doneness. One is to use an accurate digital cooking thermometer. If you are aiming for a rare steak, you’ll need to pull it off the heat when the internal temperature is between 120 and 130 degrees F. On the opposite end of the spectrum, if you want a well-done steak, you should pull it off the heat when the internal temperature is between 160 and 170 degrees. The illustration below shows varying levels of doneness. The steaks will continue to cook slightly while resting, so take that into account as well.

Is this all a bit much to remember? Bookmark our illustrated guide to steak doneness and keep those temperatures in mind next time you’re trying to achieve the perfect level of doneness.

Don’t have a fancy digital cooking thermometer? No problem—you can use your hand! By positioning your thumb and fingers in various ways, you can mimic what a steak should feel like at various levels of doneness. The tenderness of a steak will roughly correlate to the feeling of the thick part of your palm, below the thumb, when your thumb sequentially touches the index, middle, ring, and pinky finger. Touch that part of your hand with the index finger of your other hand while moving your fingers from index to pinky, and you’ll feel that part of your palm getting firmer. If this seems daunting at first, simply use both methods. Get used to using a thermometer and at the same time touch the steak and see what it feels like. Don’t understand what we mean? Check out this guide to using your fingers to check a steak for doneness.

Is this all a bit much to remember? Bookmark our illustrated guide to steak doneness and keep those temperatures in mind next time you’re trying to achieve the perfect level of doneness. Also practice touching the meat, as we show below, and learn to feel your way to the perfect steak using your touch and chef’s intuition.

Grilling Tips for Cooking the Perfect Steak

Would you rather cook your steaks on the grill? You can easily apply most of the above methods to a hot grill, cooking the steaks directly on the grate. The same searing times apply, and if you have a steak that is thicker than 1 inch, simply finish cooking it over indirect heat (so in an area with no charcoal or with the gas burner turned off). You should get the same great results, but with the added bonus of grilled, smoky flavor.

To sum up, successfully preparing a steak is all about cut selection and cooking time. If you stick with a tender cut of beef and cook on high heat, then you can confidently start with the 2 to 5 minutes of sear time on each side and then finish it off in the oven.

Remember to hit it with a little bit of butter and a fresh herb, and you’ll find that you can easily prepare a fancy steakhouse-quality dinner at home.


Author: John Thomas

Source: eReplacementParts Blog


Dr. Smoke- hope you enjoyed our guest blog on cooking the perfect steak!

Dr. Smoke- hope you enjoyed our guest blog on cooking the perfect steak!


The grand ole tree beech hardwood adds a very European flavor to smoked foods, especially sausage style products.

The grand ole tree beech hardwood adds a very European flavor to smoked foods, especially sausage style products.

Listen to the audio of this blog

With 10-13 Beech varieties available throughout the world, this is a hardwood tree that can age to some 300 years. Visually, they are quite impressive often with distinct “root feet” and gray, smooth bark. The scientific name is Fagus Grandifolia but in North America, we know this as American Beech.

(more…)

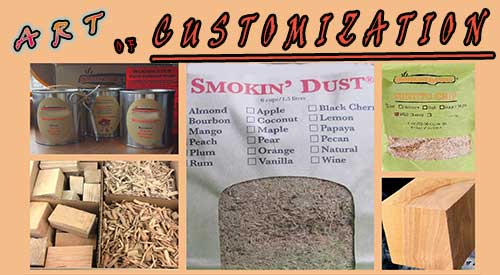
Customizing your cooking experience with our diverse selection of Smokinlicious Smoking Wood Products that Make a Difference with Equipment Efficiency and Taste

Customizing your cooking experience with our diverse selection of Smokinlicious Smoking Wood Products that Make a Difference with Equipment Efficiency and Taste

THE ART OF CUSTOMIZING YOUR COOKING EXPERIENCE

Listen to the audio of this blog

Why Not Build Your Own Wood-fired Ingredient Box?

I remember the days when purchasing a new car was very limited in terms of customizing. You didn’t get the opportunity to choose much more than the exterior color and even those choices were limited to a few! Today, you can go online and literally build your own car from the type of engine and fuel it will use, to the color, texture, and material of your interior and everything in between. This got me thinking about customizing when it comes to the wood-fired cooking experience. Why should cooking woods be any different than the car industry? Why not build your own wood-fired ingredient box when it comes to the smoking wood?

Since SmokinLicious®inception, we have offered a level of customization to the user purchasing our products that has been unmatched by any other company. We provide options that empower the user to combine various products as you would the ingredients to a homemade stew.

Why is this option of value and importance?

There are times that you need different products on hand to simply do specific functions. For instance, Grande Sapore® Wood Chips are a means of bringing the temperature of some equipment up quickly. Smokin’ Dust® provides for a sudden burst of smoke vapor due to its lower moisture level. Double filet smoker wood chunks tend to be the ideal sizing to place on diffusers/flavor bars of LP grills and achieve smoke vapor around foods being cooked.

I think one of the primary reasons that smoking wood should have a level of customer choice is that most of us don’t own just one piece of equipment. I think I’m safe to assume that all of us have a conventional stove top. That gives the opportunity to do stove top smoking. Many of us have newer models of LP grills that allow for the placement of woods chunks and/or wood chips. Then there are those that have the conventional stove top, the LP grill, the charcoal grill, and a dedicated smoker. Wouldn’t it be great to source all the products need for these different types of equipment from one supplier and even get the chance to purchase a combination of products for one price?

And the icing on the cake – Now that’s customization at its best!! That’s SmokinLicious®!

So now it’s time to make your wood-fired cooking experiences uniquely your own by starting with SmokinLicious® and our wide array of species and flavor options just waiting for your hand and imagination to take your wood-fired cooking memories to new heights! We hope you enjoyed the article- Customizing your Cooking Experience

For related reading:

THE TOP 8 MISTAKES TO AVOID WHEN COOKING & GRILLING WITH WOOD

SMOKE SIGNALS: LEARN WHAT THE COLOR MEANS WHEN COOKING WITH WOOD

Purchase products:

Wood Chunks- Double & Single Filet

Smoking Wood Chips- Grande Sapore®

Wood Chips- Minuto® & Piccolo®

Follow us on: Instagram, Twitter, Facebook, Pinterest, YouTube, Flipboard, Google+, Reddit, Medium, Blogger, BuzzFeed, Bloglovin’

Dr Smoke- “Don’t limit your cooking experience to one product; mixing and matching can only enhance your culinary flavoring. That’s why we provide a very diverse product base.”

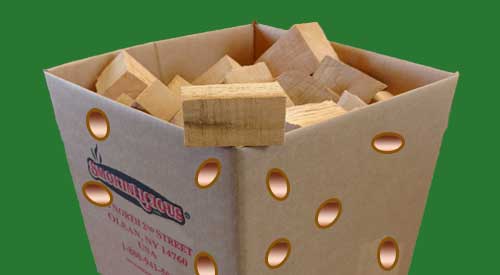
Smoker wood storage summer or as the winter months approach, you should pop some holes in the box to circulated the air!

Smoker wood storage summer or as the winter months approach, you should pop some holes in the box to circulated the air!

Smoker wood storage for chips or chunks Share on X

Listen to the audio of this blog

SmokinLicious® has the luxury of manufacturing every wood product we offer for sale. That means, our moisture rich wood is ready to use immediately. We certainly are not firewood as we work only with the heartwood of the hardwood trees and need proper storage to maintain our clean, fresh state. Plus, we want you to have a pleasant outcome to smoking your foods which is a direct result of the moisture level.

It’s Serious Business- Smoker Wood Storage!

We take wood storage seriously! Which is why when you purchase our products, you’ll receive a card educating you on the best storage containers and conditions. Simply put, any container that encourages air flow is ideal. We have found that some plastic containers can actual cause mold spores which is why materials made from wood, cardboard or metal are preferred. If you should encounter wood that has begun to develop evidence of mold, you may follow these steps to sanitize the wood for cooking:

1. Dilute 1 part white vinegar to 3 parts water (or 1.5 ounces of white vinegar to 3 gallons of water). Be sure the wood is completely submerged in the vinegar mixture.


2. Let the wood soak in the solution for a minimum of 2 minutes.


3. Remove the wood from the vinegar mixture and allow to air dry.


4. Store the wood as recommended above.


Prevent Sunburn

Just like your skin, wood can get too much sun and become sunburned, especially given we are bark-free product. It is best to select a location for storage that is away from direct sunlight. A cool, dry location is ideal. If you select a garage or basement area, be sure you don’t place any cardboard container directly on the cement surface or moisture will be drawn in through the carton to the wood and could result in appearance and aroma changes. If you do see the outside of the wood turn a bit gray, that likely is the result of some sun exposure.

Temperature and Humidity for Smoker Wood Storage

As a last point, keep temperature and humidity in mind when you select a storage location. Since our hardwoods are native to New York State, they are accustom to certain conditions including 4 seasons. Wood can be stressed especially when traveling in a truck to your location. Be sure to follow our directive sticker on the carton advising to get the carton open immediately upon delivery. Air is crucial to your wood remaining in the great condition it is in when we packaged it.

For those wanting to know if refrigeration is an option, our study shows refrigeration certainly doesn’t hurt the wood but you do need to rotate any unused wood periodically to prevent mold potential. Freezing the wood is not suggested. When you plan to use the wood for wood-fired cooking, be sure to remove the wood from a cold location and allow to come to room temperature in order to prevent a lengthy time waiting for combustion to take hold which is what produces smoke vapor.

More Related reading on this subject- More Related reading on this subject of cooking & Grilling with wood

More Related reading on smoker More


Products

Dr. Smoke- Smoker Wood Storage is an important part of your grilling practices! Follow our advice to get the most out of your wood purchase

Dr. Smoke- Smoker Wood Storage is an important part of your grilling practices! Follow our advice to get the most out of your wood purchase


Second Test Kitchen Results

The Smokinlicious®Test Kitchen conducted an additional test using the Technique® Cast Iron Skillet and Smoker which many of you purchased from QVC as the Special of the Day. This time, we used our flavor-infused wood product called the Woodscuit ® on the stovetop.

What We Cooked: Boneless Pork Tenderloin

How We Cooked: on the stovetop using medium-low heat on the gas range

What Wood We Used: Bourbon Flavored Woodscuit ® – 3 pieces

Length of Cook Time: 2-1/2 hours

Findings: Again, as our previous test cooks have demonstrated, the Technique® Cast Iron Skillet and Smoker provides for a very moist product. This time, we lined our drip pan in foil to decrease the amount of elbow-grease needed to clean up. Since our Woodscuit ® product has a moisture content of ~45 percent, these wood pieces did not display the charred look like the woods used in the previous test cooks (both the Wood Chips and Smokin’ Dust® were black by the end of the cooking time). However, once the tenderloin was finished, our panel of tasters did not find any significant smoke flavor to the end product. For those pieces that had been more to the center of the cast iron skillet, the tasters noted slightly more smoke flavor but overall, there was no distinguishable smoke flavor infused in the food.

Currently, our Test Kitchen has found that the Wood Chips used on the stovetop, provide for the greatest flavor infusion of the wood used. As always, we will continue to test this cast iron skillet with a plan to see if adding water to the smoke pan with the wood product, helps to keep the flavor infusion going.

Stay tuned!

Fingerling Potatoes are Next

Dr. Smoke- Cast iron skillet cooking and smoking is easy, affordable & offers great flavor results!

Dr. Smoke- Cast iron skillet cooking and smoking is easy, affordable & offers great flavor results! When using the Technique® Cast Iron Skillet, coupled our quality cooking wood, you can’t go wrong!

More Related reading on stove top smoking featuring a cast iron skillet:

For more reading on the Technique® Cast Iron Skillet & Smoker and how you can do stove top smoking from your own kitchen, check out these articles:

A Guide to Cooking the Perfect Steak

Infusing Wood Flavor to Brussels Sprouts Using a Cast Iron Skillet

The Kitchen Find – Easy, Convenient & Affordable Stove Top Smoking!

Thanks for the question regarding Mango wood.  Although limited in the
areas they can grow (India, Florida, Caribbean, Hawaii, etc.), Mango wood
is very popular for upper end wood products like bowls, vases, and even
some furniture.  However, you are correct.  Mango wood contains a sap
that is located at the base of the stem, branches, and trunk. As a result,
a recommendation is made never to burn mango wood as it emits a smoke
that is full of potent irritants.  Plus, Mango trees are highly
suseptible to a number of diseases and pest infestations,
including the fruit fly, black twig borer, sooty mold, and
southern green stink bug to name a few. Pesticide application
is generally necessary to maintain the health of these trees.
Because of the chemical application, Mango wood does not make
for good BBQ!
Stick to forest producing products for the safest woods for BBQ!
Use Smokinlicious® Mango Smokin' Dust®  instead!
Follow us on: Instagram, Twitter, Facebook, Pintrest, YouTube, Flipboard, Google+, Reddit, Medium, Blogger, BuzzFeed

  
The SmokinLicious® Story

The SmokinLicious® Story

THE SMOKINLICIOUS® STORY


This is the The Smokinlicious® Story and the birth of the cleanest USA manufactured hardwoods specifically for cooking.

Listen to the audio of this blog

We all have dreams. I can seriously tell you that one of mine did not include owning a cooking wood company. It just happened. The short story is, my husband and co-founder of SmokinLicious®, agreed to take over a wood products business that required a more skilled leader. For two years, I let him tackle this venture alone until his vision saw more potential.

Just a few years ahead of this, we had another dream of owning a lake property. We managed to make that dream a reality in 1999 when we lucked out finding our ideal property. It needed a lot of work. A LOT! We jumped off the cliff that year and continued working on this project for the next 12 years adding various out buildings. The fourth building to be built would turn out to be one of the most used and bring to life our cooking wood company – our outdoor kitchen.

The Outdoors Brings Clarity- The SMOKINLICIOUS® Story

We brought in larch logs to stand majestically as pillars on the countertop surround. We brought in stone from a local quarry and built a beautiful outdoor fireplace with an elevated hearth. And we outfitted the kitchen with a small refrigerator, sink, prep area, and loads of under counter cabinets. When it was done, we began cooking and creating and dreaming some more. You see, we are blessed with mountains all around us that harbor the best hardwoods for cooking. And we owned a wood company!

Here’s where life got interesting.

We would entertain friends and family, always cooking in that outdoor kitchen when we could. The questions started pouring in! “What did you do to these short ribs? I’ve never tasted anything so good! How is it possible that my 7-year old, who won’t ever eat my steaks, is asking for 3rd helpings of yours?”

Have you ever experienced one of those moments? I call it karma.

We had plentiful hardwoods so we never paid attention to what other people had for cooking supply. Until that moment.

Make It Like No Other- The SMOKINLICIOUS® Story

We scoured the stores and online sites looking at what was available for cooking wood. We didn’t like what we saw. The packaged wood looked dry, dirty, inconsistent in sizing, loaded with bark, not something enticing to cook with. And that was our moment.

We knew we could produce a better product line then what was currently available. We made our list of issues we could see with the current product offerings. Then we launched into our plan.

If you’re like me and you understand that you control your own fortune in life, then you’ll understand that I could see what I wanted in this product, I believed I could make this product and company a reality. I just didn’t know the how. That is generally the pattern for all success in business.

Belief Becomes Reality- The SMOKINLICIOUS® Story

SmokinLicious® started business by providing a handful of products to meet the initial needs of those who wanted to smoke with hardwood. We tested our products on the competitive barbecue circuit throughout North America, we studied the equipment that most competitors and home users used, and we studied the wood. Over the past 13 years, we’ve been listening to our customer’s comments, listening to the needs of our potential and existing commercial customers, visiting commercial smokehouse operations, and analyzing what’s missing in the market. We’ve gone from one size of wood chips to over eight options, three offerings of wood chunks, five sizes of heartwood logs, and over 15 flavors of our Smokin’ Dust® product, making SmokinLicious® the most innovative cooking wood supplier who also happens to manufacture every product.

If the equipment to make our dream real didn’t exist, we made it. If writing how to guides didn’t prove enough, we offered videos. Additionally, if photos couldn’t prove the differences in our products from others, then we offered up molecular analysis.

This is The Smokinlicious® Story or at least our story to this point. There is so much more to come. Join us and experience a rebirth when it comes to wood fired cooking techniques and get the perfect partner for your needs. You can be part of the rest of The Smokinlicious® Story!

Purchase products:

Smokin’ Dust

Wood Chips- Grande Sapore®

Wood Chunks- Double and Single Filet

Smoker Logs- Full & Quarter Cut

More Related reading on this subject

More Related reading on this subject

Additional reading:

-WOOD SUPPLIER- ARE YOU GETTING WHAT YOU PAID FOR?

-SMOKINLICIOUS® IS AN F2C

-IT’S A MATTER OF PRIORITY! DON’T PUT US LAST!

-JOIN OUR ‘WEIRD’ CLUB AND GET RESULTS FROM YOUR WOOD CHIPS!


Doctor Smoke-The Smokinlicious® Story

Doctor Smoke- The Smokinlicious® Story

« Previous Page