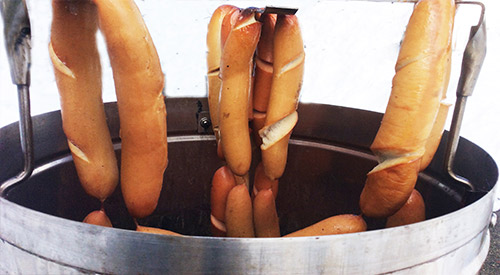
Bratwurst in the Orion Smoker Cooker nicely cooked plump and Juicy

Bratwurst in the Orion Smoker Cooker nicely cooked plump and juicy!

WELCOME TO OUR BRAT PARTY-BRATWURST IN THE ORION

SMOKER/COOKER

listen to our blog


I believe that wood fired foods can be enjoyed 365 days of the year regardless of the temperature/conditions outside. To ease the challenges of wood cooking outdoors when the conditions may not be optimal, I look to my equipment options and make a selection that ensures the cooking is quick and as easy as possible.

I want to have bratwurst party! Unfortunately, I’ve chosen a -2° day to do just that. No problem! I simply rely on my Orion Cooker to provide a fast, high heat method of cooking with my SmokinLicious® Minuto® Wood Chips.

Bratwurst in the Orion Smoker Cooker- There’s Nothing To It!

Preparing your bratwurst for the Orion Cooker couldn’t get any simpler than making a few cross cuts in the skins to ensure they don’t burst while cooking.

The reason bratwurst is so popular for entertaining and for summer days is just how quick it is to prepare. When you smoke a casing containing product, you want to ensure that the juices don’t cause a pressure build up and result in your brats exploding all over the smoker. I make 3 shallow knife cuts in each brat to ensure they can plump up without exploding out of their casing. These German brats are made with a combination of pork and veal and have an all-natural casing meaning the casing is made from the intestine of an animal. I specifically purchased brats that were on an uninterrupted casing line so I could hang my brats on the Orion Cooker rib hooks to ensure smoke vapor envelopes each link completely, just like commercial smokehouses do.

Before smoking my German bratwurst, I’ve prepared the Orion Cooker by adding SmokinLicious® Minuto® Wood Chips in Wild Cherry to inside of the cooker. The wood chips are placed in the space between the cooker’s wall and the drip pan. I’ve lite a chimney starter full of briquettes which when grayed over will be poured into the fuel pan. 12 briquettes are also lit in the smaller fuel pan at that top of the unit. I’ve loaded my strings of bratwurst to the rib hooks of the unit. Next, place the lid on and let these cook and smoke for 45 minutes untouched.

Done Before You Know It-BRATWURST IN THE ORION SMOKER COOKER

Here’s why I love cooking with the Orion Cooker. On a -2° winter day, I can still use the convection heat from the Orion Cooker to finish the German bratwurst in just 45 minutes. In fact, I don’t use a full fuel tray of briquettes for this smoke. Just one chimney starter full of coals plus about 15 unlit briquettes placed on top of the lit coals. Great smoke flavor is added using Minuto® Wood Chips in wild cherry from SmokinLicious®. I’ve hung over 24 brat links on the three rib hooks of this unit so I can feed plenty of hungry people.

Fix It Your Way

Now comes the best part! Fixing your bratwurst the way you love it. Put out a variety of toppings to stimulate creativity at the brat table. I’ve included raw chopped onion, sweet pickle relish, sauerkraut, hot Hungarian pepper rings, BBQ sauce, beer brat mustard, kimchi, horseradish sauce, just to name a few choices. Whether you slice your brat down the middle or leave it whole, anything goes. German bratwurst done over SmokinLicious® wild cherry wood chips and hung on the hooks of the Orion Cooker, for that old school, smokehouse flavor. Bratwurst in the Orion Smoker Cooker!

Purchase products:

Wood Chips- Minuto®

More Related reading on "What Wood for Smoking" and other great smoking and grilling tips and techniques

More Related reading on “What Wood for Smoking” and other great smoking and grilling tips and techniques

Additional reading:

-GIVING AN EDGE TO SMOKY COCKTAIL SAUCE

-SMOKED BEEF SHORT RIBS

 

Dr Smoke "If you're looking for something different to cook on your Orion, brats are perfect and yummy!"

Dr Smoke “If you’re looking for something different to cook on your Orion, brats are perfect and yummy!”
The history of fire cooking part I

THE HISTORY OF FIRE COOKING: PART I

Grill fire

the fire

listen to our blogthe history of fire cooking part I


For thousands of years, it was the only way to cook. Many believe that this discovery separated man from the other animals. Fire.

Estimated to have been discovered some 2 million years ago, the discovery of fire and more importantly, the discovery of how to tame fire, resulted in man’s brain development, value of food, changes in our body, and social structure. It gave us survivability. It extended our life by improving daily calories and nutritional needs by allowing us to cook poisonous plants and meats.

So how did fire cooking get discovered? That is the million dollar question. Here are some of the hypotheses out there regarding the discovery of fire for cooking:

The History of Fire Cooking Part I- Nature Provides Ignition

There are some scientists who believe that fire cooking was found by accident. A lightning strike or grass fires that sprung up due to the excessive dry conditions exposed to the hot sun. Many don’t feel man did anything to “discover” fire other than observe the characteristics of fire: it produces abundant heat, light, and when it traps an animal within its flames, it produced a more tender meat, easier to digest food source, and more pleasing aroma to the meat.

Tool Construction

There are others who believe that early humans realized the importance of tools. By sharpening stones to produce spears, cutting tools, etc., these early beings observed spark. Either through intention or perhaps with Mother Nature’s assistance, these sparks caught twigs, brush, fruit, and/or grains on fire. Remember, early human life did not involve a developed brain. A discovery of fire, however, would help advance not only our brains, but our bodies into the erect beings we are today.

The Earliest Cave Cooking

In South Africa’s Northern Cape province, a dwelling known as Wonderwerk Cave, contains the earliest evidence that our ancestors and apelike ancestors were using fire. Compacted dirt showed evidence of ashes, carbonized leaf and twig fragments, and burnt bits of animal bones. Scientists were then able to analyze this material and determine that the fragments were heated between 750 and 1300°F, which is the heat level of a small fire made of twigs and grasses.

If indeed our earlier species learned to harness fire for cooking, this would account for the advancement of our brains and our ability to become erect beings walking on two legs. Cooking on fire allowed for easier chewing and digestion and produced extra calories to fuel our brains. Fire also warded off nighttime predators, allowing for sleep on the ground or in caves rather than in the trees.

It’s All About Energy

Raw food diets have been popularized as a method of losing weight and of being healthier. However, only a fraction of the calories in raw starch and protein are absorbed by the body via the small intestine. As a result, the remainder passes into the large bowel, where it is broken down by the organ’s high population of microbes, which consume the majority for themselves. However, cooked food is mostly digested by the time it enters the colon. For the same amount of calories ingested, the body gets roughly 30 percent more energy from cooked oat, wheat or potato starch as compared to raw, and as much as 78 percent from the protein in an egg. In experiments, animals given cooked food gain more weight than animals fed the same amount of raw food.

Cooking breaks down collagen (connective tissue in meat) & softens the plants’ cell walls to release their storage of starch & fat. The calories to fuel the bigger brains of successive species of hominids came at the expense of the energy-intensive tissue in the gut, which was shrinking at the same time. If you look at early imagery of apes, you’ll see how we morphed into narrow-waisted Homo sapiens.– the history of fire cooking part I

Coming up in The History of Fire Cooking: Part II, learn more about why cooking foods by fire made us who we are today. In conclusion, did we provide you with new information you didn’t know? Additionally, leave us a comment and subscribe as we bring recipes, tips, techniques, and the science behind the fire and smoke.

Purchase products:

Wood Chips- Grande Sapore®

Wood Chunks- Double & Single Filet

More Related reading on "What Wood for Smoking" and other great smoking and grilling tips and techniques

More Related reading on “What Wood for Smoking” and other great smoking and grilling tips and techniques

Additional reading:

-OPEN PIT COOKING FIRE BUILDING: PART I

-GRILL-BUILDING THE PERFECT COOKING FIRE- PART II

-IS WOOD-TAR CREOSOTE THE ‘MONSTER’ TO WOOD-FIRED COOKING

I hope you enjoyed the the history of fire cooking part I

I hope you enjoyed the history of fire cooking part I

Cooking steak on the grill or in the grill pan is a universal question. Read more below to understand some of the techniques for cooking the perfect steak.

Cooking steak on the grill or in the grill pan is a universal question. Read more below to understand some of the techniques for cooking the perfect steak.

A GUIDE FOR COOKING THE PERFECT STEAK

Being able to successfully cook a steak is a skill that most people aspire to have. Pay attention to these details and you’ll see that it’s not that difficult to pull off.

To begin, you need to understand the basics of the different cuts of beef and how to choose the right one. From there, we’ll get into how to cook it to your desired level of doneness.

Choosing a Steak

Examining the butcher shop cases can be overwhelming. There are so many different cuts available—big steaks, skinny steaks, huge roasts, small roasts, and more. If your goal is to cook a good steak at home, I recommend sticking with the rib-eye, T-bone, New York strip, or Filet Mignon. These are the most expensive cuts, but in steaks, you get what you pay for and these are the most tender when grilled or pan-fried. The differences in tenderness come from the cow having stability muscles (think the lower back), which are less powerful and thus tender, and load-bearing muscles, which are tough. Price is directly correlated to these qualities. A tender steak will cost a lot more than a tough steak (though with the right treatment, you can successfully turn a tough cut like brisket into a tender, flavorful meal).

If the sheer volume of beef cuts still overwhelms you, check out our easy-to-read guide to steaks and their tenderness, price, and ideal preparation.

The seasoning requirements differ based on the cut. A tougher steak requires more seasoning because your eating experience is mostly about tasting the seasoning, rather than enjoying the tenderness of the cut. For example, you can get away with simple salt and pepper on a perfectly cooked filet mignon, while a flank steak used for fajitas should have some sort of spicy rub all over.

Tips for Cooking the Perfect Steak

So, you’ve purchased steaks that fall on the tender side and you’re ready to cook them. First, let them rest at room temperature for about 30 minutes to take the chill off. This results in more even cooking. Pro tip: If you are cooking for someone who likes a well-done steak and you like yours rare, leave yours in the fridge until the absolute last minute; your steak will cook less than your guest’s in a similar amount of time.

If you’ll be cooking on the stovetop, a cast iron or stainless-steel pan will work best. Nonstick coating can’t handle the high heat required for cooking a steak. Before you place the skillet over high heat, lightly season the steaks with a mild rub or just salt and pepper. While the skillet is warming, pour in a few tablespoons of peanut, canola, or other high-smoke-point oil. When the oil is shimmering and the pan is hot, place the steaks in the pan and loosely cover it with foil to prevent oil from splattering. Now is also the time to turn on any kitchen fans, as this will generate some smoke. If your steak is less than 1 inch thick, you can plan on cooking it in the pan the entire time. If your steak is thicker than an inch, do the searing on the stovetop and then move the entire pan to a preheated, 400-degree oven to finish cooking it without overly charring it.

When the steak hits the hot pan, start your timer. In general, 2 to 5 minutes per side is sufficient for medium doneness on a hot skillet. This range is flexible because, among other variables, everyone’s heat is slightly different, as is the steak’s starting temperature (depending, for example, on when you pull it from the fridge). For a thickness of an inch or less, I like to sear for about 3 minutes on each side, after which you should let it rest. If you have a thicker steak, you would put it in the preheated oven after the two 3-minute turns and let it cook for another 2 to 5 minutes until you achieve the desired doneness.

When you are finished cooking the steak, add a tablespoon of salted butter on top and a fresh herb – thyme works well – to get that expensive steakhouse-style flavor pop.

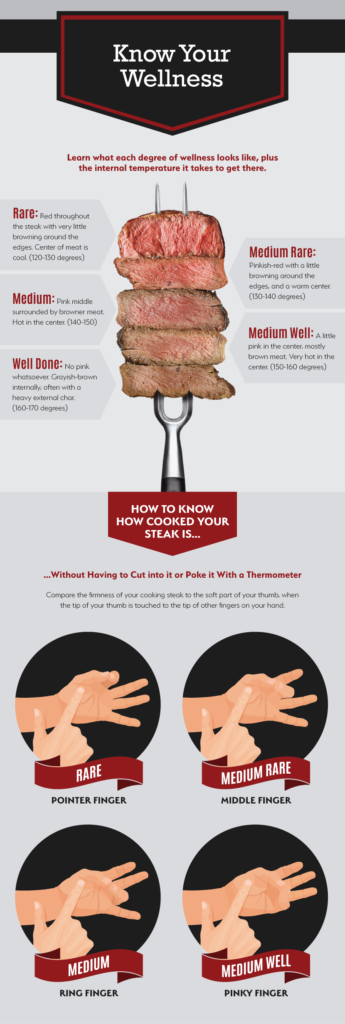
You have two methods for determining doneness. One is to use an accurate digital cooking thermometer. If you are aiming for a rare steak, you’ll need to pull it off the heat when the internal temperature is between 120 and 130 degrees F. On the opposite end of the spectrum, if you want a well-done steak, you should pull it off the heat when the internal temperature is between 160 and 170 degrees. The illustration below shows varying levels of doneness. The steaks will continue to cook slightly while resting, so take that into account as well.

Is this all a bit much to remember? Bookmark our illustrated guide to steak doneness and keep those temperatures in mind next time you’re trying to achieve the perfect level of doneness.

Don’t have a fancy digital cooking thermometer? No problem—you can use your hand! By positioning your thumb and fingers in various ways, you can mimic what a steak should feel like at various levels of doneness. The tenderness of a steak will roughly correlate to the feeling of the thick part of your palm, below the thumb, when your thumb sequentially touches the index, middle, ring, and pinky finger. Touch that part of your hand with the index finger of your other hand while moving your fingers from index to pinky, and you’ll feel that part of your palm getting firmer. If this seems daunting at first, simply use both methods. Get used to using a thermometer and at the same time touch the steak and see what it feels like. Don’t understand what we mean? Check out this guide to using your fingers to check a steak for doneness.

Is this all a bit much to remember? Bookmark our illustrated guide to steak doneness and keep those temperatures in mind next time you’re trying to achieve the perfect level of doneness. Also practice touching the meat, as we show below, and learn to feel your way to the perfect steak using your touch and chef’s intuition.

Grilling Tips for Cooking the Perfect Steak

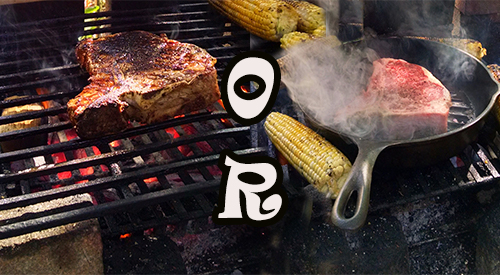
Would you rather cook your steaks on the grill? You can easily apply most of the above methods to a hot grill, cooking the steaks directly on the grate. The same searing times apply, and if you have a steak that is thicker than 1 inch, simply finish cooking it over indirect heat (so in an area with no charcoal or with the gas burner turned off). You should get the same great results, but with the added bonus of grilled, smoky flavor.

To sum up, successfully preparing a steak is all about cut selection and cooking time. If you stick with a tender cut of beef and cook on high heat, then you can confidently start with the 2 to 5 minutes of sear time on each side and then finish it off in the oven.

Remember to hit it with a little bit of butter and a fresh herb, and you’ll find that you can easily prepare a fancy steakhouse-quality dinner at home.


Author: John Thomas

Source: eReplacementParts Blog


Dr. Smoke- hope you enjoyed our guest blog on cooking the perfect steak!

Dr. Smoke- hope you enjoyed our guest blog on cooking the perfect steak!


« Previous Page