Our outdoor kitchen guest blog is authored by Mike Cahill

Our outdoor kitchen guest blog is authored by Mike Cahil

Listen to the audio of this blog

Mike is part of the Content Marketing team and enjoys applying market insights to provide valuable content on all things real estate. Mike’s dream home would be mid-century modern style near the water.

As days get warmer and summer approaches we’re all looking for more ways to spend time outside. Whether it be biking, running, hiking, or walking we can all agree that being outside is one of the best ways to spend time during the summer. So why not cook outside too? Having an inviting outdoor space that can double as a beautiful kitchen is a great way to be outside and create memories to be cherished for years to come. For that, we reached out to the experts from Yolo to Palm City to provide our readers with a few tips for creating the Ultimate Outdoor Kitchen.

Make it your own Outdoor Kitchen

The trend of outdoor design is experiencing a dramatic shift today. Landscape designers are moving away from traditional masonry-built structures to waterproof cabinets equipped with storage, trash receptacles and even vegetable and herb potting areas providing a whole new experience. Moya Living and Urban Bonfire offer two creative and functional products that bring color and extreme functionality into the design and provide the structure with every ability to create the perfect outdoor kitchen. Whether the homeowner desires a smoker from Kalamazoo, a pizza oven from Lynx, or Versa Powder Cooker from Alfresco, the options are endless in the design creation. Outdoor kitchen design now takes front and center focus when planning a remodeled home and now is simply an extension from the indoor to the outdoor so that every space of the home is utilized. – Annette Reeves

Find a proper grill

The focus of any outdoor kitchen is the grill. At Chicago Outdoor Living we believe a grill’s value shouldn’t be based solely on price. Features such as design, quality of materials, and functionality, combined with price, play an important role in choosing the grill that is right for you. It is also important to be aware of the manufacturer’s warranty. Chicago Outdoor Living carries a variety of high-quality grills to fit everyone’s grilling needs and budget – Chicago Outdoor Living

Grilling burgers on the grill

Our Authors image of cooking burgers

Choose complimentary finishes

Leather finish granite countertops are my go-to countertop surface for outdoor kitchens. It looks matte enough to feel like it belongs outdoors but is cleanable and ages well. – Attainable Form

Utilize misting systems

During sweltering summer days that are hot enough to have you fantasizing about moving to Antarctica, it can be difficult to enjoy your outdoor kitchen while you are feeling sweaty and scorched. With our misting systems that cool the air by up to 30 degrees without getting anyone drenched, you’ll be able to elevate your lifestyle and enjoy your outdoor kitchen in comfort all you want. – Advanced Misting Systems

Incorporate patio heaters

Enjoying your outdoor kitchen can be extremely difficult during winter days that are so cold it feels like you could chip a tooth from shivering. With our outdoor patio heaters that emit radiant heat to keep an area warm, you’ll have your own patio encased in a bubble of warmth, allowing you to enjoy your patio and outdoor kitchen while the neighbors are stuck indoors. – Gas Outdoor Patio Heaters

Storage is key in your Outdoor Kitchen

You can never have enough storage outside. The key is drawers: paper plates, utensils, corn on the cob holders, grill grates…. Keep them at your fingertips and you will be much happier. Drawer cabinets have to be fully enclosed to avoid creatures from crawling in for a vacation. – Cowgirl Q

If you love wood-fired flavors to foods cooked outdoors then be sure to consider wood storage when designing your outdoor kitchen. Pizza ovens, ceramic or clay ovens/smokers, traditional smokers and gas/hybrid grills all allow for the addition of charcoal, charwood, and/or hardwood to bring flavor essence to favorite cuts of protein, vegetables and fruit. Include in your design wood storage that allows for good air circulation to the wood as well as storage placed close to the equipment. Mesh bins or small wood crates work well for smaller pieces of wood that can fit on shelving under the counter or design open shelving in metal, stucco or concrete material that allow larger pieces of wood to remain dry, nonreactive and at the ready. – Smokinlicious

Don’t forget about the island

The best way to start creating your own Ultimate outdoor Kitchen is by getting ideas of different types of islands and kitchens. Researching will help you brainstorm an idea of your own (shape, size, color, components, etc). The next step is to find out where your Island will be placed. After finding a perfect fit, take a few measurements to see how the unit will be laid out. Over the years, KoKoMo has created various Outdoor Kitchen models with all kinds of different designs. A good example is our custom sports bar. This unit is fully stocked with all of our most popular components and accessories. This kitchen has a beautiful white-looking stone that covers the base, with a nice steel-looking tile to go with it. We used a large 15×15 aluminum shade cover with two giant TVs to entertain both sides of the island. – KoKoMo Grills

Keep it comfortable

Outdoor kitchens draw people in, whether it’s your guests gathering to offer help or little ones looking for a snack before the big meal. Make everyone comfortable with our thick, high-density cushions. Bonus tip: all our cushions are covered in water-resistant fabric, making rain and spills the least of your worries. And at the end of the party, if you need a special type of cover for your furniture or grill, we’ve got you covered with custom-made covers! – Classic Accessories

Get a personalized rub kit

Whether you’re grilling or smoking, when you’re cooking outdoors, having your own personalized “rub kit” at the ready is critical. A rub kit should include staples like lemon pepper, garlic pepper, and all-purpose seasoning salt. Round out your kit with your favorite rubs for the big four – beef, chicken, pork and seafood. – Savory Spice Shop

Picture of all the fixings being cut for the grill

We love this image from the author!

Consult with a pro for the Ultimate Outdoor Kitchen

For homeowners who want to build a fully functional outdoor kitchen area in their homes, I always recommend consulting with a designer, in addition to the outdoor kitchen company themselves. One thing I have learned with my experience in the business, is one layout for a kitchen does not necessarily work for every future buyer of the home — so the key is: versatility and simplicity. Most buyers these days are not so focused on decking, they want to see more grass. So artificial grass is a great alternative to decking, plus easy to maintain. Keep your dining area separate, and not built-in, should someone in the future want to change it, or if you entertain and need a different layout for a specific event. – Jenny Okhovat Homes

Originally published on Redfin

More Related reading on smoker More Related reading on Outdoor Kitchen essentials and other design ideas.

More Related reading on smoker More Related reading on Outdoor Kitchen essentials and other design ideas.

Related reading:

-Outdoor kitchen location tips

-Does Outdoor Kitchen Stainless Steel Rust

-6 TIPS FOR A HEALTHY OUTDOOR COOKING SEASON


Dr. Smoke- has an Outdoor Kitchen for grilling, smoking and entertainment, follow these great tips from our guest blogger!

Dr. Smoke- has an Outdoor Kitchen for grilling, smoking and entertainment, follow these great tips from our guest blogger!

Discusses How to keep a Bundt cake from Sticking

Discussing How to keep a Bundt cake from Sticking

Listen to the audio of this blog


Introducing to you Peggy Hatfield, the Bella Cupcake Couture’s resident dessert couturier, and baker. Peggy became passionate about baking when she was 9 years old. She served freshly- baked treats in her small town in Alabama for 28 years before her home bakery and café was closed. But with the Bella Cupcake Couture website, she was able to share her expert reviews on the best baking tools, equipment, accessories, and the latest trends, including the know-how of baking. Bella Cupcake Couture is pleased to present to you the expert baker’s how-to guides, expert tips, and hacks for baking and dessert making.

While there are other techniques in cooking, baking is considered one of the most critical types. Baking requires precision and dedication to the entire process. If you forgot one or add too many ingredients, you can ruin the entire dish. Also, cooking a baked item for longer than the required time will also result in a big problem. That is why, in baking, you need to have lots of patience to succeed with your product.

Bundt Cake- Making A Cake

At some point, people tend to become excited when removing a just baked cake, forgetting to be more careful after the baking process is complete. The last part of the baking, which is removing your cake from the pan, requires the same level of care as was used in mixing the batter. This article provides the key tips in keeping a bundt cake from sticking to your pan.

Bundt Cake- Prevent from Sticking

The more careful you are in the cooking part, the more cautious you need to be removing your cake from the pan. It is frustrating when you spend your time, effort, and money , then all of a sudden, your cake decides to remain stuck in your pan, ruining your efforts.

Hey! Don’t worry because here are the effective ways to prevent your bundt cake from sticking.

For more pro baking guides and DIY tips, check out Bella Cupcake Couture at www.bellacupcakecouture.com!

Bundt Cake- Use a Simple and Nonstick Heavy Bundt Cake Pan

This step is one of the highly recommended ways on how you can prevent a cake from sticking. If you are wondering about its efficiency, you can look for reviews online to have an idea on the brand of bundt cake pan with the best value and rating for your purchase.

To maintain the pan’s efficiency, you should put extra care into cleaning it. Avoid using strong dish washing liquid and abrasive sponges because these can cause damage to the pan’s coating. The most efficient way to take care of your nonstick pan is to wash with mild soap, dry it with a soft towel, and avoid using any metal cooking tools or abrasive brushes.

Bundt Cake- Use Grease

Take note that using just any grease can also affect the quality of your nonstick pan. Nonstick cooking sprays contain chemicals that can degrade your pan’s nonstick coating. Butter may affect the quality of your cake due to the milk properties which can bind your cake to the pan. One of the highly recommended types of grease that proves best for baking is melted shortening.

Bundt Cake- Loosen the Edges

You cannot and should not forcefully remove your cake from a pan. You need to slowly and carefully loosen the edges and let the cake sit for 5 minutes before turning it upside down on a cooling rack. The use of a plastic spatula is a must to avoid scratching your nonstick pan and cutting into your cake.

Bundt Cake- Get Your Cake Upside Down

Once the pan is upside down on a cooling rack, let it sit for another five minutes before lifting from the cake completely.

Final Notes

Removing the cake from your baking pan is critical to the final result. Following our simple steps above will ensure a perfect bundt cake. Making the investment in high-quality baking equipment adds insurance for the best product results. If it happens that your cake still sticks in your pan, don’t give up! Try and try again until you flawlessly achieve the perfection of your cake.

More Related reading on baking in a smoker bundt cake and more!

More Related reading on baking in a smoker bundt cake and more!

Related reading:

-WHY TWO-ZONE COOKING METHOD LET’S YOU WALK AWAY FROM THE GRILL

FOIL PAN FOR SMOKING IS INDISPENSABLE

-Coffee Smoked Foods: A New Flavor Craze

Dr. Smoke- our guest blogger discusses Bundt cake tips!

Dr. Smoke- our guest blogger discusses Bundt cake tips!

Guest Blog- Kylee Harris on Coffee Smoked Foods!

Guest Blog- Kylee Harris on Coffee Smoked Foods!

Kylee Harris on Coffee Smoked Foods– At one point, all foods had an element of smoke; everything was cooked over an open fire before gas and electric stoves came about. It’s thought that the smell and imparted taste of smoke is programmed into mankind as a result, which is why smoked foods are popular all over the globe. Meat, seafood, and even smoky desserts like fruit pies, are still flavored with a variety of wood smoke. Recently, professional and home cooks alike have begun to wonder about the hidden potential of another thing close to their hearts: coffee. Smoking food with a combination of wood and coffee beans could be the next big taste revolution.

Coffee Smoked Foods- Coffee Varieties for Smoking

Just as there is a variety of options when it comes to smoking food with wood, there are a few choices in coffee as well. For flavor profile, darker and richer bean varieties pair best with red meat, while more mild varieties are better sampled with poultry and seafood. There’s also the question of regular or decaffeinated types of coffee. No, smoking with coffee won’t caffeinate your food (though wouldn’t that be interesting), but there can be a difference in flavor here as well. Regular has a higher level of acidity and thus bitterness, while decaf is less so. Rule of thumb: if you like the bitter tang of a certain coffee, then you will probably like the flavors it lends to smoked food.

Coffee Smoked Foods- Beans, Grounds, and Pellets

Of course, flavor is one thing- this is open to individual tastes- but what about what works best for the actual smoking process? Ground coffee is great as a marinade or rub for meat, but it burns up too quickly to be very useful for smoking. Coffee beans are better for the process, as they can burn more slowly. A combination of wood chips with coffee beans (a 3:1 ratio) is a good balance, allowing the coffee beans to add their subtle flavors without becoming too smoky and overpowering. There’s also the option of coffee pellets, which are coffee grounds and saw dust pressed into compact pellets used as a fuel for both cooking and heating. These are said to have a much more subtle flavor when used for cooking and work particularly well, according to fans, for flavoring smoked corned beef.

Coffee Smoked Foods- Pre-Roasted vs. Green Coffee Beans

While both grounds and pellets have their place, most people prefer smoking food with whole coffee beans, which then poses the question: raw and green, or already roasted? The answer really depends on personal preference, once again. Green coffee beans will give off much more smoke, which can be a good thing if that’s the flavor you’d like to try. Pre roasted, on the other hand, will smoke less, but may need to be soaked in water first in order to be able to smolder for a longer time to produce a sustained smoking processes.

As you can see, there are quite a few choices you can make to customize your coffee-smoked food experience. Experimenting with flavors and methods is what really makes cooking the art form that it so clearly is. The options are plentiful, and the vision (or taste, as it is) is all up to you.

More related reading on Applewood and other orchard woods see our smoking & Grilling tips and technique see our directory on previous blogs!
More related reading on our smoking & Grilling tips and technique see our directory on previous blogs!

Other blogs you might enjoy:

Great Sustainable Wines To Pair With Your Smoked Meat

How To Maintain A Safe Kitchen Environment

Himalayan Salt Blocks: Benefits, Uses, and Tips

Dr. Smoke-
Dr. Smoke- Kylee Harrris discusses Coffee Smoked Foods
Wines to pair with your smoked Meat is important but not easy!

Wines to pair with your smoked Meat is important but not easy!

Great Sustainable Wines To Pair With Your Smoked Meat Guest blog by — Kylee Harris is an events planner and writer who is a strong advocate of allergy awareness.

listen to our blog

listen to our blog regarding wood chips for smoking

Introduction of our Guest Blogger

She has also expanded her mission to stress the importance of food safety not just in events, but in her community. She also has a great eye for current interests and finds great ways to tie wood fired foods and sustainable food practices together.

Back in 2015, only 6% of consumers said that their first choice of wine would be a bottle that is produced in a sustainable way. This figure has been steadily rising. The 2018 American Wine Consumers Survey even showed that customers are willing to pay $3 more for a sustainable option. They want an environmentally-conscious wine that has been made from ethically grown grape varieties. The farming process is pesticide free and even bottling the wine is done in a way that won’t cause harm to the environment. It has even been suggested (although not proved as yet) that sustainable, organic wine can prevent a hangover. You’re more than welcome to test out this theory – and even better, you can pair the wine with some delicious smoked meat.

Wines to Pair- Maple-Smoked Pork Chops

Pairing your wine with smoked meat, is all about complimenting the delicate smoky flavor of the wood used. Maple-smoked meat will naturally have a slightly sweet and fragrant taste. This can be achieved by using maple woodchips in your barbecue or smoker. In order to contrast the sweet maple taste and the white umami flavor of pork, you should pair your meal with a sharp and zingy white wine. Benziger Family Winery

Benziger Chardonnay-Coelo Chardonnay
Coelo Chardonnay

in Sonoma county have a few delicious and fresh Chardonnay options, including the Coelo Chardonnay and the West Rows Chardonnay. Perfect for a barbecue on a hot summer’s day with friends and family. Don’t forget you can also buy sustainable wines by the can – this makes it so easy to keep cool when you’re having a garden party. Everyone can help themselves.

Wines to Pair- White Oak Smoked Venison

The strong and almost pungent aromas of white oak are best paired with a dark, gamey meat that can hold its own. Duck breast, pigeon and venison are good choices. The white oak adds a complimentary bitterness that balances well with the rich flavors. A hearty sustainable red wine is a good option with smoked white oak. Silver Oak Vineyard in Napa Valley have a fruity and dark Cabernet Sauvignon that pairs beautifully with White Oak smoked dark meat. New York’s sustainable Red Tail Ridge Winery offer a tangy Teroldego,

2012 Teroldego bottle -Red Tail Ridge winery
Teroldego

which is similar to Syrah that is a great partner to White Oak smoked venison.

Wines to Pair- Alder-Smoked Seabass

The mild flavor profile of alder makes it the perfect wood choice to smoke fish with – particularly slightly salty seabass. The taste of the alder itself adds a slightly sweet taste to the fish, even if it is only smoked for a short amount of time. Pairing alder with a sustainable wine is easy. A good Prosecco or sparkling wine will work well – look for something dry and fresh. Left Coast Cellars in Oregon have a lively Blanc de Noir

Left Coast Cellars Blanc de Noir sparkling wine
Left Coast Cellars

that is perfect with alder. It adds citrus notes of lemon and pineapple, which complement the taste of the smoke and the fish well.

There are an increasing number of vineyards and suppliers in America offering truly sustainable wine. Pair something tasty and delicious with your smoked meat and enjoy a great meal.

More related reading on Wines to pair with Smoking & Grilling meat, plus other tips and techniques- see our directory on previous blogs!

More blogs you may enjoy:

Sip ‘Em If You Got ‘Em: Smoked Whiskey Cocktails And Meat

-HOW TO MAKE THE BEST SMOKY COCKTAILS

How To Maintain A Safe Kitchen Environment

Dr. Smoke- Kylee did a great job on the wines to pair with your Smoked meat!

Charcoal Grilled Asparagus

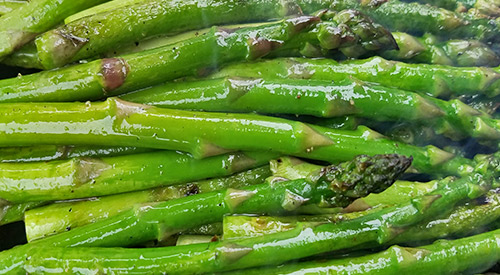
Our asparagus after seasoning and ready to become Charcoal grilled Asparagus!

Our asparagus after seasoning and ready to become Charcoal grilled Asparagus!

Guest Blogger

By Chef C. V. Calle Guest Chef in Residence, SmokinLicious Kitchens

By Chef C. V. Calle Guest Chef in Residence, SmokinLicious Kitchens


listen to our blog

Nothing in the vegetable word represents late spring-early summer than fresh local asparagus but the window for fresh local asparagus is a short one. The growing season in our area (Western New York State) typically begins mid to late May and lasts until mid to late June all depending on the weather. Buying your asparagus at a Farmers Market or a Farm Stand provides the highest quality asparagus.

Luckily asparagus season corresponds to the beginning of outdoor grilling season and that is a good thing. If you have never prepared asparagus on the grill read this and you may never want to boil or steam asparagus again.

Fortunately for me, my good friends Terry and Donna Grant, owners of SmokinLicious® in Olean, New York provided me with their locally manufactured charwood product for grilling. Try it and you will never go back to charcoal briquettes again. SmokinLicious® all-natural charwood, adds flavor as well as the high heat needed for proper grilling. Remember, cooking with wood is not just a heat source because when you grill with high-quality wood products like SmokinLicious® you add substantial and delicious flavor to whatever is on the grill.

This is a simple recipe and takes just minutes to prepare.

Charcoal Grilled Asparagus- Ingredients: (serves 2 to 4 persons as a side dish)

1 pound local farmer’s market asparagus

high-quality extra virgin olive oil (EVOO)

salt & pepper

Procedure for Charcoal Grilled Asparagus:

Asparagus on the charcoal grill

  1. Wash and break off the tough bottom two inches of each asparagus spear
  2. Toss with EVOO and lightly sprinkle with salt and pepper to taste
  3. Place asparagus on a hot grill top
  4. Cook 3-10 minutes; depending on the size of the stems and until lightly charred on the outside but the stems remain firm and crisp (al dente). Tasting a spear or two while cooking will let you know when they are ready to eat
  5. Remove from grill, add salt and pepper to taste and you are ready to go
  6. Optional plating technique: top with fresh Parmesan Reggiano cheese and drizzle with a high-quality balsamic glaze

Charcoal grilled Asparagus with Parmesan Reggiano cheese


Charcoal Grilled Asparagus- Chef’s Recommendation:

The above recipe is suitable for anyone including vegans. If you are a meat eater, always grill your asparagus after you finish grilling your meat. While the beef, pork, lamb or chicken rests you can complete this process. Place asparagus spears on the grill where the meat was located, and the small amount of fat left on the grill top adds to the flavor of the natural wood. (This recipe can also be used on a gas grill with wood chunks placed on the heat shields).

Purchase products:

Charwood

Additional reading:

-WHY CHAR-WOOD IS THE BETTER OPTION OVER CHARCOAL

-EMBER FIRED ASPARAGUS ON THE HIBACHI

-Flank Steak Pinwheels with Ember Roasted Asparagus

-Crostini with Smoked Asparagus

Thank you, Chef Calle, for this Charcoal Grilled Asparagus recipe- It was yummy!

Thank you, Chef Calle, for this Charcoal Grilled Asparagus recipe- It was yummy!

Smoked Whiskey Cocktails are great libations for drinking!

Smoked Whiskey Cocktails are great libations for drinking!

Guest blog- Kylee Harris, an events planner and writer.

Let's Smoke the Whiskey for our cocktails Share on X

There are over 550 annual barbeque competition events in the United States. Originally constrained to the Southern states, barbeque is now ubiquitous in most parts of the country. Thanks to the popularity of all things vintage, craft cocktails have made a huge comeback, and although it may not seem so at first glance, these two are a match made in heaven. As creative as barbeque pitmasters can get with their rubs and sauces, so, too, can you with specialty cocktails featuring smoked whiskey to pair with smoked meats.

Smoked Whiskey Manhattan- A Classic Match

You don’t need a pull-behind trailer rigged with the latest smoking equipment to make your own delicious smoked meats. As long as your kitchen is equipped with a stove, you can get in on this delicious food preparation. While you can purchase stovetop smokers, it’s fairly easy to DIY a smoker yourself with household products you probably already own. No matter what you’re serving, a Manhattan will pair beautifully with your meat.

Classic Manhattan

Classic Manhattan- for our smoked whiskey cocktails
Classic Manhattan (up)

Ingredients:

  • Ice
  • 2 oz. whiskey
  • ½ oz. sweet vermouth
  • dash of Angostura bitters
  • orange peel
  • Maraschino cherry

Shake whiskey, vermouth, and bitters with ice; strain into lowball glass. Rub the rim of your glass with the orange peel and garnish with cherry. Substitute vermouth with 1 oz. of agave nectar and use chocolate bitters and Jim Beam Devil’s Cut (barrel aged whiskey) for an alternate take on this classic.

A Smoked Whiskey Summer Treat

Take this simple, two-ingredient cocktail and kick it up a notch by infusing it with a smokey flavor that matches your menu. With a smoking gun (available for around $100, or you can make your own with some inexpensive tubing and a small-mouthed container), you can “rinse” your chilled glasses with smoke, or even smoke your entire concoction, using the same wood you use for your meat. The tartness of the grapefruit juice will cut the richness of the meat and is perfect for a backyard, al fresco dinner.

Jack Honey

Jack honey cocktail
Jack Honey cocktail

Ingredients:

  • 2 oz. Jack Daniels Tennessee Honey
  • 3 oz. fresh-squeezed grapefruit juice

Pour over ice into collins glass.

Something Truly Special

If your skills as a pitmaster aren’t the only thing you want to show off, here is a very special cocktail that will wow your guests. The smokey flavor and touch of cinnamon gives the classic whiskey sour a brand new twist that will leave your guests in awe. You’ll need to plan ahead for this one, as it requires two different, homemade syrups, but if you’re looking to win for best bartender, this one can’t lose.

Smokey Sour

classic whiskey sour
Classic whiskey sour

Ingredients:

  • Ice
  • 2 oz. whiskey
  • ¾ oz. fresh lemon juice
  • ½ oz. cinnamon bark syrup (.3 oz cinnamon bark, 1 cup Turbinado sugar, 1 cup water; bring ingredients to a boil and simmer over low heat for 2 minutes, let sit for 2 hours, strain and keep refrigerated)
  • ¼ oz. Lapsang souchong tea syrup (3-4 tea bags, 1 cup Turbinado sugar, 1 cup water; bring ingredients to a boil and simmer over low heat for 2 minutes, let sit for 2 hours, strain and keep refrigerated)
  • 1 egg white

Add all ingredients to a shaker and shake until frothy. Strain into a coupe glass.

The bold, rich flavor of whiskey is the perfect complement to a rich, smoked meat dish; both American traditions trace their roots back to the South. If you are looking to skip the same old beer next time you smoke meat for your guests, you can’t go wrong with whiskey cocktails, either made-to-order or batched for a larger group. Let the elements of barbequing guide you to experiment with new techniques and flavors and take your pairings to a new level.

SmokinLicious® products:

Wood Chips- Minuto® & Piccolo®

More related reading on how Smokinlicious® reduces the risks of Microbial bacteria in our wood products
More related reading on smoked Whiskey Cocktails & Grilling tips and technique see our directory on previous blogs

More related blogs:

-How To Maintain A Safe Kitchen Environment

-HOW TO MAKE THE BEST SMOKY COCKTAILS

-SMOKY BOURBON CRANBERRY COCKTAIL

Dr. Smoke- Thank you Kaylee for another very informative article!
Dr. Smoke- Thank you Kylee for another very informative article!
Maintaining a safe Kitchen

Maintaining a safe Kitchen

Maintaining a Safe Kitchen should be your primary attention! Share on X

Guest Blogger Kylee Harris
Guest Blogger Kylee Harris on safe kitchen
Listen to the audio of this blog
Introducing Kylee Harris as our Guest Blogger

Foodborne illnesses and allergies are common problems that affect many Americans. The CDC estimates that Americans acquire roughly 9.4 million food related illnesses each year, and more than 19 million people were diagnosed with allergies in 2017 alone. Between one and three percent of beef may contain toxic strains of E. coli, which sicken as many as 265,000 Americans each year. Fortunately, the high temperatures involved with smoking meats can help protect your family from E. coli infection. Since the kitchen is a haven for germs and irritants that can make you and your family sick, knowing how to maintain a safe kitchen with a sanitary environment can make the difference between a healthy family and one who becomes ill frequently.

Eliminating Mold for a Safe Kitchen

Although mold doesn’t grow quite as readily in the kitchen as it might in the bathroom, without proper attention, your kitchen can become an ideal home for types of mold that could be aggravating or even causing allergies in the younger members of your family. The heat and humidity that is the result of cooking in a kitchen provides an optimum environment for mold. Kitchen sink leaks may also lead to the development of mold if left undetected as well as garbage cans and disposals. Turning on kitchen fans and opening windows in the kitchen and in the whole house will lower the level of humidity in the kitchen while also allowing fresh air to enter. If you live in a humid climate, purchasing a dehumidifier will be the best bet for preventing humidity related mold growth. Checking for leaks regularly, as well as keeping your kitchen environment clean, including the regular sanitation of cupboards and drawers will also help to eliminate mold growth in the kitchen.

Safe Kitchen- Preventing Food borne Illnesses

Another common way that an unclean kitchen can lead to illness is through foodborne illnesses, due to incorrect preparation or spoiled food. Proper handling of foods, particularly raw meat, can prevent your family from making that list. Smoking meat and other delicious foods can have rewarding results, but if food is not handled properly, unfortunate consequences may result. Washing hands for 20 seconds with warm, soapy water both before and after preparing food is the first line of defense against foodborne illness. Washing hands immediately after coming into contact with raw meat, as well as any surfaces the meat might have touched with hot, soapy water will help you have peace of mind that your meal will not make you sick. Proper food handling, like cooking meat to the correct temperature, will allow you to fully enjoy a delicious steak, possibly smoked with hickory chips.

Making sure to create a clean and safe environment, free from mold, germs and various contaminants, will allow your family to maintain the high levels of health we all strive for. Be sure to always follow proper food safety guidelines, and check for mold regularly, as not doing so could negatively affect your family.

More related reading on how Smokinlicious® reduces the risks of Microbial bacteria in our wood products
More related reading on smoking & Grilling tips and technique see our directory on previous blogs!

More blogs like this one:

-Outdoor kitchen location tips

-Does Outdoor Kitchen Stainless Steel Rust

THE WOMAN’S GUIDE TO ‘MAN’-ING THE GRILL

Dr. Smoke- Food Safety begins with a safe Kitchen with a sanitary environment
Dr. Smoke- food Safety begins with a sanitary Kitchen

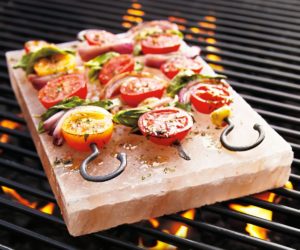
Himalayan Salt Blocks used for grilling

Himalayan Salt Blocks used for grilling! – #himalayansaltblock

Himalayan Salt Blocks: Benefits, Uses, and Tips

Jeffrey Lewis (Bio)

Hey there, friends! I’m Jeffrey. I’m a blogger at Ittefaq Salt. Thank you for joining me, as I share different aspects of my life. I’m so thrilled you stopped by! I love to create a beautiful, thriving life around me and helping others to do the same. I love writing about nature, health, food and nutrition-related topics.

You must be aware of the importance of salt for our body. It is required for the proper functioning of many body functions. But have you ever heard about using Himalayan salt blocks for cooking? Well, this is becoming a trend among those who want to add a wow factor to their cooking. The idea of cooking on these salt blocks is itself very fascinating. But there are more benefits that you can get from these incredible salt blocks as well.

Keep on reading to know more about these amazing salt blocks.

What Are Himalayan Salt Blocks?

As the name suggests, these are the big Himalayan salt slabs that are hand mined from Khewra salt mines in Pakistan. These are hand carved into different sizes and thickness. Click here to know more about these salt blocks.

These salt blocks are made of pink hued Himalayan salt crystals that are locked up in mountains for over 250 million years. This salt is unrefined, unprocessed and free from contaminations. This is to be the purest salt due to the extreme pressure that it has experienced over a long period of time.

Himalayan salt provides a number of health related benefits due to which it is being widely used as an alternative to regular table salt. It contains 84 minerals that fulfill our body’s mineral requirement. It is said to be helpful in maintaining the body’s pH level, regulating blood pressure and reducing water retention.

So, these Himalayan salt blocks have all the goodness of this salt.

Benefits:

  • These salt blocks are heat resistant and can hold temperature for a long time which makes them really useful. These are good for both high and low temperature and can be used for cooking and chilling the food.
  • Cooking on a salt block means you are adding flavor along with 84 minerals of Himalayan salt to your food.
  • Salt blocks have moisture retention and low absorbency properties which make them anti-bacterial. Because of this, these blocks are an amazing choice for serving and presenting food.

Seafood resting on top of salt block

#saltblocks

Uses:

Himalayan salt blocks are so versatile in their usage due to their tendency of temperature. These blocks are hand carved into different sizes so that they can be used for various purposes.

  • You can cook and grill different kinds of food on these blocks such as meat, vegetables etc. This will make your grilling more fun and exciting. It not only gives a very subtle saltiness to your food but also imparts minerals to the food.
  • Salt blocks can also be used for curing of some food items such as salmon fish. It will increase the shelf life of the fish.
  • Due to its ability to hold temperature for a long time it can also be used for chilling the food.
  • Another amazing use of this block is to use it for serving a variety of foods. It will make the food more presentable.

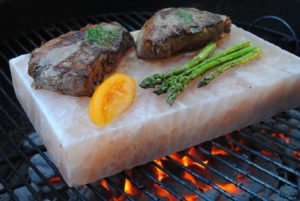
salt block on grill with food on top

#Himalayansalt

Tips for Using Salt Blocks:

  • First of all, you need to choose the salt block that has right size and thickness according to your need.
  • Salt block needs to be tempered before using it for the first time. For this, you need to heat it slowly at a low temperature in an oven, then increase the temperature gradually until you reach 500°C. After that, cool it down to room temperature. This process will improve the cooking surface and strength.
  • If you want to use it for cooking, you always need to pre-heat it. It will make cooking and grilling easy.
  • It is also very easy to maintain and clean a salt block. After using it, cool it down and wipe with any damp cloth. Then let it air dry and store in a cool and dry place.

Himalayan salt blocks are not just pretty with their pink hues but also add flavor and nutritional value to the food along with so many other uses. These all natural blocks are a must have cooking tool in any kitchen to add uniqueness and creativity to the cooking. These will not only add to the beauty of your kitchen but also a unique and creative way to cook the food. So, next time if you want to impress your guests, grill and serve food on these blocks.

Outdoor kitchen location tips

Wonderful article on Outdoor kitchen location tips

Wonderful article on Outdoor kitchen location tips

Guest Blog – Brown Jordan Outdoor Kitchens

Outdoor Kitchen Location Tips

by Phil Zaleon

When you are going through the steps of installing an outdoor kitchen, you’ll quickly find that deciding where to set it up is one of the most difficult and impactful decisions of the process. Since you have multiple options, it can be hard to figure out exactly where to put it. We’ve come up with a list of things to consider to help you decide!

Be Conscious of Sun and Shade

Summer is prime time for outdoor kitchen use. So, when planning your outdoor kitchen, bank on warm temperatures and lots of sun, and take reactive measures. Placing your outdoor kitchen under existing shade, or planning to add new sources of shade will provide you and your guest’s comfort year-round.

Natural shade from trees and vines is best because they ventilate easily. As an added bonus vines and trees “transpire,” evaporate moisture to cool themselves, creating their own natural misting system.

There are plenty of man-made shade options as well, such as pergolas, or trellises. The growing popularity of transition rooms provides an even more permanent and durable option for your outdoor kitchen.

Leverage Your Natural Space

Do you have a pool or hot tub in your yard? A beautiful garden? When choosing where to add your outdoor kitchen, take note of any existing structures or features that you want to complement. Also be wary of design overlap. The last thing you want is for your outdoor kitchen covering to inadvertently shade your vegetable garden.

In addition, when planning the placement of your outdoor kitchen, it’s important to consider the relationship between the indoor and outdoor versions, and how they will be used together when cooking or entertaining. If you have a large outdoor space to work with, it may prove prudent to place your outdoor kitchen in closer proximity to your indoor kitchen to create a seamless transition between indoors and outdoors.

Consider the View

Another crucial element to consider when you’re placing your outdoor kitchen is your views and sight lines. You can have the most beautiful outdoor kitchen in the world, but when your guests sit down to eat at the table, if they’re facing a brick wall or the old shed in your backyard, that’s what they’re going to remember. So, be sure to consider the view when you’re trying to find the perfect location for your stainless steel outdoor kitchen.

Another key consideration is the location that will provide the most privacy from neighbors. Screening views with trees and shrubbery will provide privacy while also providing a noise buffer for your close neighbors.

Don’t Forget Utilities

When planning your outdoor kitchen layouts, keep in mind the best practical placement or installation of the necessary gas, water, and electrical supply. Note where your water, gas and electric lines are, and design your kitchen accordingly.

Furthermore, when placing your grill or smoker, think about the natural flow of wind – make sure that smoke from the grill will be carried away from dining and living areas. You should also think about making sure the kitchen area is located a safe distance from doors and entryways to keep foot traffic away from potential hazards.

Additionally, make sure to place all outdoor cooking appliances away from areas where children play or where people play sports. You’ll want to avoid basketballs or soccer balls bouncing over onto a hot grill.

Don’t Shy Away From the Roof

When one thinks “outdoor kitchen,” the tendency is to think of backyards – but that doesn’t have to always be the case. Especially if you have a small or nonexistent lawn space, building your stainless outdoor kitchen on the roof can prove a very viable design option.

If you are choosing this option though, pay special attention to restrictions and codes. They vary by municipality, so check with your town’s building department to find out rules about setbacks, fire safety, and what kind of permits you’ll need to file. We recommend working with a general contractor so you are up to code and all safety requirements are included.

Fit Your Needs

The right spot to place an outdoor kitchen will vary from homeowner to homeowner. You may like the idea of an outdoor cooking area just outside the back door of your house or a freestanding pavilion near your pool area.

At the end of the day, there’s no one “right” spot for your outdoor kitchen. But by using these outdoor kitchen location tips, you’ll ensure you make an excellent choice.

Are you ready to build your dream luxury outdoor kitchen?


Call Brown Jordan Outdoor Kitchens on 203-871-3804 today to get started!

Related Reading:

-Electric Smoker Guy-HOW TO CHOOSE THE BEST ELECTRIC SMOKER

-Does Outdoor Kitchen Stainless Steel Rust

Dr. Smoke- things you should consider on Outdoor kitchen location tips

Dr. Smoke- things you should consider on Outdoor kitchen location tips

Electric Smoker Guy is our guest blogger discussion how to select the best electric smoker

Electric Smoker Guy is our guest blogger

Electric-Smoker Guy Guest blogger

HOW TO CHOOSE THE BEST ELECTRIC SMOKER

Summary:

Tips from the Electric-Smoker Guy about electric smokers, reviews and how to choose the best unit. Read this and his blog to guide you in looking for a good quality smoker, purchasing electric smokers, analog smokers or digital smokers!

Listen to the audio of this blog


You don’t have to be an expert to prepare a perfectly smoked meat if you have the best electric-smoker by your side. Now, you have to be aware that you can’t just come into the store and ask for the best electric-smoker because that doesn’t exist.

The best unit for me and for you doesn’t have to be the same model and that is why it is important to know what to look for. You don’t have to be modest, there are many electric units on the market which means that you can adjust almost every part of the smoker to your needs.

If you don’t know where to start, let me guide you through the process of picking one for you.

#1 Choose the Capacity of an “Electric-Smoker”

The size of the smoker is the most important feature you can adjust because there is no need for buying a big electric smoker if you are smoking only for your family. If you want to smoke for your family and friends, go with the medium smoker and if you want to smoke for a large group of people, then I would suggest you take a look at the commercial-grade electric models.

#2 Choose the Place for Your “Electric-Smoker”

An electric smoker has to be outside and you can’t smoke in the kitchen if you don’t have a special ventilation, which most homes don’t. Choose a place for it and see if it can stay there all the time. That place should be protected from the wind, the rain and under a roof. If you don’t have that place, buy a smoker with wheels so you can take it out of the garage to smoke it and store it again when you are done.

#3 Choose the Features for Your “Electric-Smoker”

schematic of an electric smoker

If this is your first smoker, choose the one that has a window on the doors so you can see the smoking process. That is very important, especially for rookies who aren’t sure what smoking does to the meat and how long it takes for the meat to be done. If you are constantly opening the door of the smoker you will lose smoke and the heat. That will prolongate the smoking process a lot. The window on the door should be from tempered glass to withstand the heat and it mustn’t be easy to break.

#4 Choose the Controller

The electric smoker can be analog and digital. The analog smoker shows you the temperature on a temperature gauge and it is not so easy to control it. The electric units, on the other side, are easier to control. You have to set the time and the temperature you want and the smoker will maintain the same temperature through the entire smoking process.

As you can see, smoking is not just picking the first smoker you see in the store and buying it. If you buy a good quality smoker you will be able to control the heat and the smoke better when using smoking wood chips, chunks, logs or dust and that will result in a good smoked meat. If you choose the best electric smoker you won’t have to do anything, the smoker will do most of the hard work. But, if you want to learn more about these electric units you can visit the site about them called the Electric-Smoker Guy:

More Related reading on electric smoker and others

More Related reading on this subject

Additional reading:

-ELECTRIC SMOKERS: WHEN IS A WOOD CHIP DEAD?

-HOW MUCH WOOD TO ADD WHEN SMOKING

-SALT FREE SPICE RUBS- HEALTHY CHOICES

-Does Outdoor Kitchen Stainless Steel Rust

Dr. Smoke loves guest blogs

Dr. Smoke-Read more from the Electric Smoker Guy on choosing the best electric smoker!

our guest blogger is linda colon discuss outdoor kitchen stainless steel

Outdoor Kitchen

Does Stainless Steel Rust

& What Does it Mean for Your Outdoor Kitchen?

listen to our blog


outdoor kitchen photo from Brown Jordan Outdoor Kitchens

Outdoor kitchen photo courtesy of Brown Jordan Outdoor Kitchens

Outdoor Kitchen Units & Appliances:

Does stainless steel rust? This is a common question asked by many.

by Linda Colon

Our Guest blogger discusses Stainless Steel, does stainless steel rust in outdoor appliances. Tips on how to care for stainless steel outdoor kitchen units. She explains active metals and passive metals in stainless steel grill and to avoid hard water, wire brushes, steel pads and only use non-abrasive cleaning tools.

Myth: Stainless steel does not rust.

Myth Busted: Unfortunately, stainless steel is susceptible to rusting.

Here is a little background to help you understand why this myth has created confusion for the metals world.

First, let’s take a look at the difference between active and passive metals. Metals such as iron and steel easily corrode – showing yellow or orange rust – within the natural environment and are called active metals.

The two grades of stainless steel most referenced in relation to outdoor environments are 304 and 316L, also known as marine-grade stainless steel. Their numbers are determined by their alloy composition. Unlike the active metals mentioned above, stainless steel is referred to as passive because it contains other metals including chromium. For a material to be considered stainless steel, at least 10.5% of the make-up must be chromium. Additional alloys typically include nickel, titanium, aluminum, copper, nitrogen, phosphorous, selenium and molybdenum. The key difference between the 304 and the 316L is the addition of molybdenum in the 316L. It is the molybdenum that enhances corrosion resistance in environments rich in salt air and chloride – giving 316L the moniker of “marine grade” stainless steel.

It is also important to note that stainless steel is not stain proof; it’s stainless. As such, regardless of whether you use 304 or 316L exposed stainless-steel cabinetry and appliances requires maintenance. The addition of molybdenum (in marine grade stainless steel) only delays corrosion, it does not stop it.

The chromium contained within stainless steel creates an invisible passive film covering the steel surface and shielding against corrosion. As long as the invisible film – or passive layer – remains intact, the metal remains stainless and corrosion resistant.

However, three things can break down this film:

  1. Mechanical abrasion – steel pads, wire brushes and scrapers will scratch the steel surface.
  2. Water – depending on where you live, your water can be hard or soft. Hard water may leave spots and, when heated, leave deposits behind. These can break down the passive layer leaving the stainless steel to rust. Be sure to remove deposits from food preparation and service.
  3. Chlorides – are found everywhere including in water, food and table salt. Household and industrial cleaners contain some of the worst chlorides!

There are many types of corrosion that affect stainless steel metals. Corrosion mechanisms fall into five different categories; pitting corrosion, crevice corrosion, galvanic corrosion, stress-corrosion Cracking, and general corrosion.

  • Pitting corrosion happens to stainless steel when it is exposed to environments that contain chlorides.
  • Crevice corrosion is triggered when oxygen levels are low in a crevice.
  • Galvanic corrosion happens when dissimilar metals come into contact with another.
  • Stress corrosion cracking is when tensile stresses combine with environmental conditions.
  • General corrosion happens when the stainless steels pH is less than 1.

So, does stainless steel rust?

The answer: Yes, how quickly is determined by the type of stainless steel the outdoor appliances and cabinets are made of.

By keeping the stainless steel surfaces free from food and other debris, following these cleaning tips for outdoor kitchen cabinets will help maintain your cabinets integrity and reduce the risk of rusting and corrosion:

  • Use only alkaline, alkaline-chlorinated or non-chloride cleaners
  • Avoid hydrochloric acid (muriatic acid) on your stainless steel
  • Always use a non-abrasive cleaning tool such as a soft cloth or plastic scouring pad
  • Avoid steel pads, wire brushes, and scrapers
  • Always clean in the direction of the polishing marks by locating the lines or grain and scrub in a motion parallel to them
  • If you do end up using a chlorinated cleaner, be sure to rinse thoroughly and dry it, immediately
  • Air dry your equipment

Remember, our stainless steel equipment is not stain-proof, it is stainless.

For any additional questions or advice on a stainless steel outdoor kitchen project, reach out to our in-house design team at 203-889-9640!

Dr. Smoke- Great Article by Linda Colon!

Dr. Smoke- Great Article by Linda Colon!