Bratwurst in the Orion Smoker Cooker nicely cooked plump and Juicy

Bratwurst in the Orion Smoker Cooker nicely cooked plump and juicy!

WELCOME TO OUR BRAT PARTY-BRATWURST IN THE ORION

SMOKER/COOKER

listen to our blog


I believe that wood fired foods can be enjoyed 365 days of the year regardless of the temperature/conditions outside. To ease the challenges of wood cooking outdoors when the conditions may not be optimal, I look to my equipment options and make a selection that ensures the cooking is quick and as easy as possible.

I want to have bratwurst party! Unfortunately, I’ve chosen a -2° day to do just that. No problem! I simply rely on my Orion Cooker to provide a fast, high heat method of cooking with my SmokinLicious® Minuto® Wood Chips.

Bratwurst in the Orion Smoker Cooker- There’s Nothing To It!

Preparing your bratwurst for the Orion Cooker couldn’t get any simpler than making a few cross cuts in the skins to ensure they don’t burst while cooking.

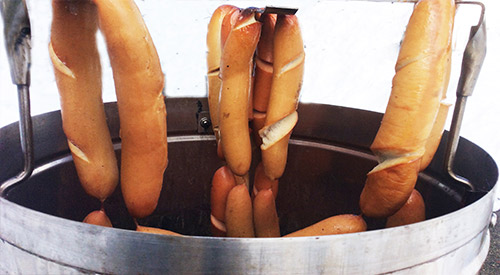
The reason bratwurst is so popular for entertaining and for summer days is just how quick it is to prepare. When you smoke a casing containing product, you want to ensure that the juices don’t cause a pressure build up and result in your brats exploding all over the smoker. I make 3 shallow knife cuts in each brat to ensure they can plump up without exploding out of their casing. These German brats are made with a combination of pork and veal and have an all-natural casing meaning the casing is made from the intestine of an animal. I specifically purchased brats that were on an uninterrupted casing line so I could hang my brats on the Orion Cooker rib hooks to ensure smoke vapor envelopes each link completely, just like commercial smokehouses do.

Before smoking my German bratwurst, I’ve prepared the Orion Cooker by adding SmokinLicious® Minuto® Wood Chips in Wild Cherry to inside of the cooker. The wood chips are placed in the space between the cooker’s wall and the drip pan. I’ve lite a chimney starter full of briquettes which when grayed over will be poured into the fuel pan. 12 briquettes are also lit in the smaller fuel pan at that top of the unit. I’ve loaded my strings of bratwurst to the rib hooks of the unit. Next, place the lid on and let these cook and smoke for 45 minutes untouched.

Done Before You Know It-BRATWURST IN THE ORION SMOKER COOKER

Here’s why I love cooking with the Orion Cooker. On a -2° winter day, I can still use the convection heat from the Orion Cooker to finish the German bratwurst in just 45 minutes. In fact, I don’t use a full fuel tray of briquettes for this smoke. Just one chimney starter full of coals plus about 15 unlit briquettes placed on top of the lit coals. Great smoke flavor is added using Minuto® Wood Chips in wild cherry from SmokinLicious®. I’ve hung over 24 brat links on the three rib hooks of this unit so I can feed plenty of hungry people.

Fix It Your Way

Now comes the best part! Fixing your bratwurst the way you love it. Put out a variety of toppings to stimulate creativity at the brat table. I’ve included raw chopped onion, sweet pickle relish, sauerkraut, hot Hungarian pepper rings, BBQ sauce, beer brat mustard, kimchi, horseradish sauce, just to name a few choices. Whether you slice your brat down the middle or leave it whole, anything goes. German bratwurst done over SmokinLicious® wild cherry wood chips and hung on the hooks of the Orion Cooker, for that old school, smokehouse flavor. Bratwurst in the Orion Smoker Cooker!

Purchase products:

Wood Chips- Minuto®

More Related reading on "What Wood for Smoking" and other great smoking and grilling tips and techniques

More Related reading on “What Wood for Smoking” and other great smoking and grilling tips and techniques

Additional reading:

-GIVING AN EDGE TO SMOKY COCKTAIL SAUCE

-SMOKED BEEF SHORT RIBS

 

Dr Smoke "If you're looking for something different to cook on your Orion, brats are perfect and yummy!"

Dr Smoke “If you’re looking for something different to cook on your Orion, brats are perfect and yummy!”

Alto-Shaam® logo

Alto-Shaam®

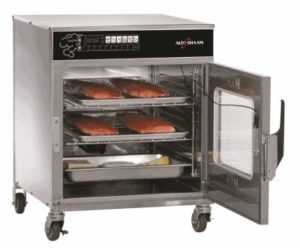
Alto-Shaam® oven with open door viewing the cooking trays

Guest Blog Post

listen to our blog

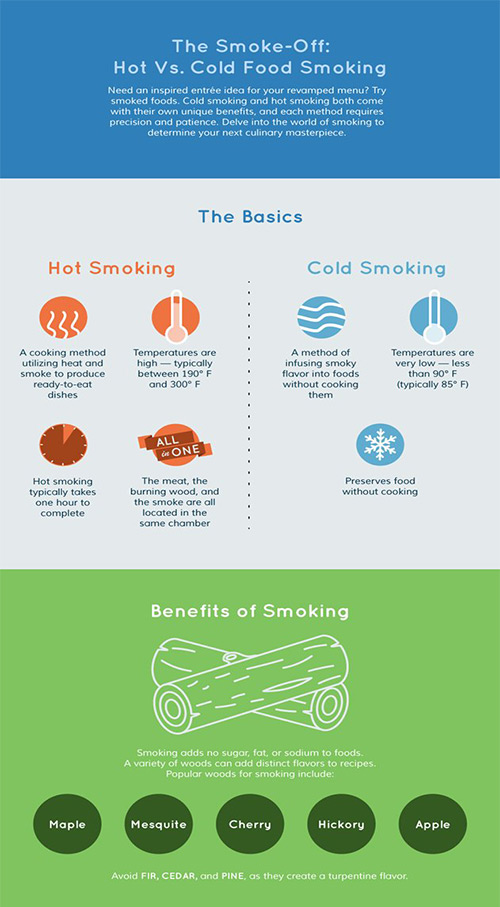
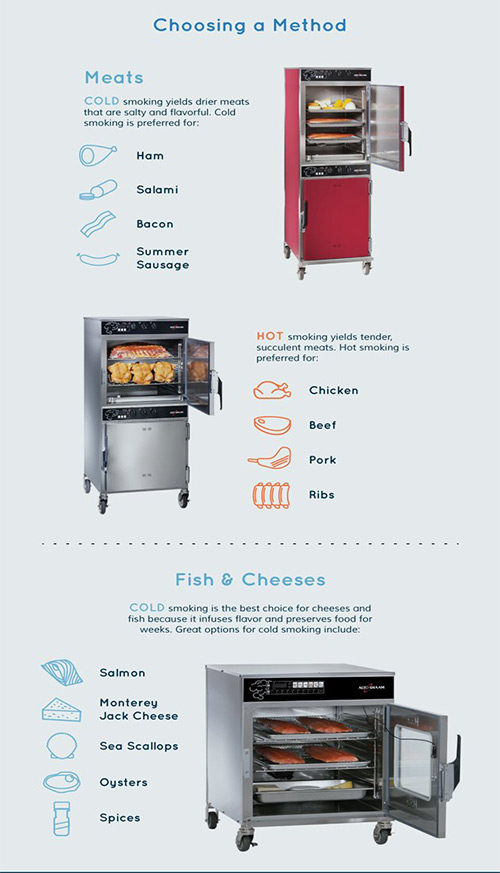
Smoked foods can lend an inspired touch to the menu of almost any restaurant, regardless of the type of cuisine it serves. Today, it’s easier than ever to smoke food quickly and efficiently whether in a restaurant setting or at home. The first step is to choose a hot or cold smoker. Both types of smoking devices come with their own benefits, and each is ideally suited for different types of food. Both hot and cold smoking can be used to infuse foods with different flavors; and both can be used to preserve otherwise perishable foods. The infographic below can help you decide whether hot smoking, cold smoking, or a combination of the two is right for you

Discussion of hot vs. cold smoking techniques

Chosing a method for meats, poultry, fish and cheeses

Choosing a smoker

Sources

Alto-Shaam®

Originally posted this on January 11, 2017 on their web site. The Alto-Shaam® Social Marketing Team made a request to have us post this to our Blog. We felt the content was a great value to our readers/followers! Please note that the wood chips outlined in this article are limited to only those that Alto-Shaam® has available. SmokinLicious® produces 8 species of smoker wood chips compatible to the Alto-Shaam® equipment. (Note: we do not produce Mesquite or Apple).

Purchase products:

Wood Chips- Grande Sapore®

Dr Smoke- "We like the Alto-Shaam equipment especially when cooking/smoking with wood chips."

Dr Smoke- “We like the Alto-Shaam equipment especially when cooking/smoking with wood chips.”

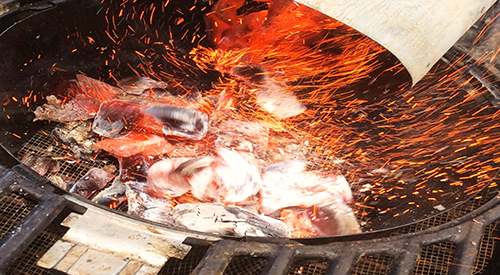
Building the perfect fire for cooking! Our chimney starter full of flaming hot charcoal being poured into our kettle grill.

Building the perfect fire for cooking! Our chimney starter full of flaming hot charcoal being poured into our kettle grill.

Listen to the audio of this blog

In Part I of our series on lighting an outdoor fire for cooking, I addressed fire production for the outdoor fireplace or fire pit cook, known as open fire appliances. In Part II, I’ll address the needs for kettle, drum and box grills’ fire set up.

The Wood-Fired Environment

There are many choices in equipment for working with a wood fire but each has different material components that determines how much work would be involved to cook on the unit. Here is the primary point when you’re selecting equipment for live fire: how will you cook on that equipment?

If your plans are to always do indirect cooking whereby the source of heat (fire, coals) will be on one side and you will cook on the non-heat side (in my opinion, the preferred method for all cooking), then know that most any equipment selected will work. However, the time for the equipment to heat up may play a factor, as the heating time is directly related to the insulation of the grill. Plus the amount of radiant heat it can hold.

If a unit is manufactured from heavy metal, brick, clay, or ceramic housing, then it will perform exceptionally by giving radiant and retained heat. Why is that important? Because producing retained and radiant heat means less fuel consumption and even cooking results.

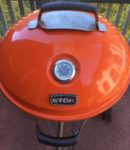
Our orange Stok kettle grill was used for our demonstration.The Kettle Grill

For thinner material grills like the traditional kettle grill which are very popular, low cost, and preferred

by many, you can compensate for the potential heat loss and improve efficiency by adding fire bricks to the walls and floor of the grill. You will simply start your live fire directly on the fire bricks rather than the charcoal grate. Fire bricks will work well in any grill that could improve on its insulation.

Drum/Barrel Grill

The overall cooking space in a drum/barrel grill is larger than that of a kettle grill. However, just like any metal material, there are different grades so quality can be variable. Same rule applies to these grills: if the insulation is not great, add fire brick to improve the performance.

Box Grills

These units are traditionally made of high heat metal with a deep, metal charcoal pan that includes grid and vents. A grilling grate is suspended above and there often is a lid to the unit.

Fire Set Up

As I’ve stressed before, a good fire needs 3 elements: fuel (wood, charcoal), oxygen (air intake vents), and heat. As with any fire cooking, a small, hot fire is ideal.

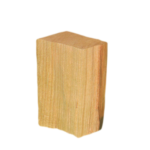
Our bark free Double Filet smoker wood chunk is the perfect size for the small kettle grill and box grills.

Double Filet Wood Chunk

To start your fire in one of these pieces of equipment, first open the air intake vents at the base of the charcoal firebox area. This will ensure that oxygen can stimulate the start of the fire. Since this is an enclosed firebox area, the size of the wood pieces may need to be adjusted from what you would commonly use in a fireplace or fire pit/fire ring.

I like to use the log cabin method of starting a fire with this equipment. Lay 2 longer pieces of hardwood parallel to each other with about 3 inches of air space between them. Lay 2 more hardwood pieces on top perpendicular to the first pieces. Place the last 2 in position to match the base woods’ alignment. In the center, add a pile of tinder which can be hardwood chips, pine cones, even newspaper if need. Again, I like to use wood in its natural form as much as possible. Pile some kindling size wood pieces on top of the tinder pile. You can drizzle vegetable oil on top of the kindling and tinder to assist with ignition which proves helpful if you plan to light with a long wooden match. I prefer to lite my fire using a MAP torch.

Don’t Rush It

It is imperative that you allow the fire to go through the full stages of combustion before you introduce foods to the cooking grate. Too much flame and smoke will ruin the foods. The ideal is to wait until the fire burns down to glowing embers. If your equipment has the room in the firebox, rake or shovel some of the hot embers to one side and add just a small quantity of additional hardwood to keep the heat steady. The rest of the hot embers are what will be used to cook with.

Position the foods based on the heat needed for the cooking. Meats will require more of the heat while vegetables and one pot dishes will take the medium to low heat. An infrared thermometer will aide with knowing heat levels in your equipment or you can use the hand test: hold your hand over the coals the distance your foods will be. If you can only hold your hand for a count of 2 seconds before you need to pull it away, that is high heat. 3-4 seconds is medium-high, 5-6 seconds is medium and 7-8 seconds is low heat.

Be sure you visit Part I of this series so you can view the list of recommended tools to have when you wood-fire cook.

I hope you gained some new information on lighting a fire. Whether you plan to cook over/in your kettle, barrel or box grill. Leave us a comment and subscribe so you don’t miss anything concerning wood fired cooking, flavors, and the science behind the fire.

Purchase products:

Wood Chunks- Double & Single Filet

Wood Chips- Grande Sapore®

More Related reading on this subject

More Related reading on this subject

Related reading:

-OPEN PIT COOKING FIRE BUILDING: PART I

-EMBER FIRED FRESH ZUCCHINI

-BEYOND PRICING: THE TOP THINGS TO CONSIDER WHEN PURCHASING COOKING WOOD


Dr Smoke says "The key to any success in grilling and smoking outdoors is building the fire with the proper materials and patience to develop the right base before you attempt to cook the food."

Dr Smoke- “The key to any success in grilling and smoking outdoors is building the fire with the proper materials and patience to develop the right base before you attempt to cook the food.”

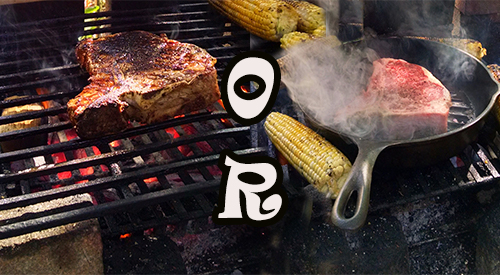
Cooking steak on the grill or in the grill pan is a universal question. Read more below to understand some of the techniques for cooking the perfect steak.

Cooking steak on the grill or in the grill pan is a universal question. Read more below to understand some of the techniques for cooking the perfect steak.

A GUIDE FOR COOKING THE PERFECT STEAK

Being able to successfully cook a steak is a skill that most people aspire to have. Pay attention to these details and you’ll see that it’s not that difficult to pull off.

To begin, you need to understand the basics of the different cuts of beef and how to choose the right one. From there, we’ll get into how to cook it to your desired level of doneness.

Choosing a Steak

Examining the butcher shop cases can be overwhelming. There are so many different cuts available—big steaks, skinny steaks, huge roasts, small roasts, and more. If your goal is to cook a good steak at home, I recommend sticking with the rib-eye, T-bone, New York strip, or Filet Mignon. These are the most expensive cuts, but in steaks, you get what you pay for and these are the most tender when grilled or pan-fried. The differences in tenderness come from the cow having stability muscles (think the lower back), which are less powerful and thus tender, and load-bearing muscles, which are tough. Price is directly correlated to these qualities. A tender steak will cost a lot more than a tough steak (though with the right treatment, you can successfully turn a tough cut like brisket into a tender, flavorful meal).

If the sheer volume of beef cuts still overwhelms you, check out our easy-to-read guide to steaks and their tenderness, price, and ideal preparation.

The seasoning requirements differ based on the cut. A tougher steak requires more seasoning because your eating experience is mostly about tasting the seasoning, rather than enjoying the tenderness of the cut. For example, you can get away with simple salt and pepper on a perfectly cooked filet mignon, while a flank steak used for fajitas should have some sort of spicy rub all over.

Tips for Cooking the Perfect Steak

So, you’ve purchased steaks that fall on the tender side and you’re ready to cook them. First, let them rest at room temperature for about 30 minutes to take the chill off. This results in more even cooking. Pro tip: If you are cooking for someone who likes a well-done steak and you like yours rare, leave yours in the fridge until the absolute last minute; your steak will cook less than your guest’s in a similar amount of time.

If you’ll be cooking on the stovetop, a cast iron or stainless-steel pan will work best. Nonstick coating can’t handle the high heat required for cooking a steak. Before you place the skillet over high heat, lightly season the steaks with a mild rub or just salt and pepper. While the skillet is warming, pour in a few tablespoons of peanut, canola, or other high-smoke-point oil. When the oil is shimmering and the pan is hot, place the steaks in the pan and loosely cover it with foil to prevent oil from splattering. Now is also the time to turn on any kitchen fans, as this will generate some smoke. If your steak is less than 1 inch thick, you can plan on cooking it in the pan the entire time. If your steak is thicker than an inch, do the searing on the stovetop and then move the entire pan to a preheated, 400-degree oven to finish cooking it without overly charring it.

When the steak hits the hot pan, start your timer. In general, 2 to 5 minutes per side is sufficient for medium doneness on a hot skillet. This range is flexible because, among other variables, everyone’s heat is slightly different, as is the steak’s starting temperature (depending, for example, on when you pull it from the fridge). For a thickness of an inch or less, I like to sear for about 3 minutes on each side, after which you should let it rest. If you have a thicker steak, you would put it in the preheated oven after the two 3-minute turns and let it cook for another 2 to 5 minutes until you achieve the desired doneness.

When you are finished cooking the steak, add a tablespoon of salted butter on top and a fresh herb – thyme works well – to get that expensive steakhouse-style flavor pop.

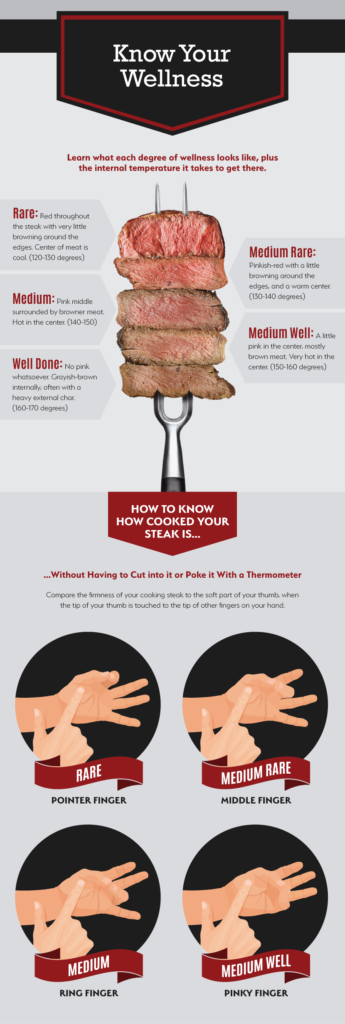
You have two methods for determining doneness. One is to use an accurate digital cooking thermometer. If you are aiming for a rare steak, you’ll need to pull it off the heat when the internal temperature is between 120 and 130 degrees F. On the opposite end of the spectrum, if you want a well-done steak, you should pull it off the heat when the internal temperature is between 160 and 170 degrees. The illustration below shows varying levels of doneness. The steaks will continue to cook slightly while resting, so take that into account as well.

Is this all a bit much to remember? Bookmark our illustrated guide to steak doneness and keep those temperatures in mind next time you’re trying to achieve the perfect level of doneness.

Don’t have a fancy digital cooking thermometer? No problem—you can use your hand! By positioning your thumb and fingers in various ways, you can mimic what a steak should feel like at various levels of doneness. The tenderness of a steak will roughly correlate to the feeling of the thick part of your palm, below the thumb, when your thumb sequentially touches the index, middle, ring, and pinky finger. Touch that part of your hand with the index finger of your other hand while moving your fingers from index to pinky, and you’ll feel that part of your palm getting firmer. If this seems daunting at first, simply use both methods. Get used to using a thermometer and at the same time touch the steak and see what it feels like. Don’t understand what we mean? Check out this guide to using your fingers to check a steak for doneness.

Is this all a bit much to remember? Bookmark our illustrated guide to steak doneness and keep those temperatures in mind next time you’re trying to achieve the perfect level of doneness. Also practice touching the meat, as we show below, and learn to feel your way to the perfect steak using your touch and chef’s intuition.

Grilling Tips for Cooking the Perfect Steak

Would you rather cook your steaks on the grill? You can easily apply most of the above methods to a hot grill, cooking the steaks directly on the grate. The same searing times apply, and if you have a steak that is thicker than 1 inch, simply finish cooking it over indirect heat (so in an area with no charcoal or with the gas burner turned off). You should get the same great results, but with the added bonus of grilled, smoky flavor.

To sum up, successfully preparing a steak is all about cut selection and cooking time. If you stick with a tender cut of beef and cook on high heat, then you can confidently start with the 2 to 5 minutes of sear time on each side and then finish it off in the oven.

Remember to hit it with a little bit of butter and a fresh herb, and you’ll find that you can easily prepare a fancy steakhouse-quality dinner at home.


Author: John Thomas

Source: eReplacementParts Blog


Dr. Smoke- hope you enjoyed our guest blog on cooking the perfect steak!

Dr. Smoke- hope you enjoyed our guest blog on cooking the perfect steak!


The grand ole tree beech hardwood adds a very European flavor to smoked foods, especially sausage style products.

The grand ole tree beech hardwood adds a very European flavor to smoked foods, especially sausage style products.

Listen to the audio of this blog

With 10-13 Beech varieties available throughout the world, this is a hardwood tree that can age to some 300 years. Visually, they are quite impressive often with distinct “root feet” and gray, smooth bark. The scientific name is Fagus Grandifolia but in North America, we know this as American Beech.

(more…)

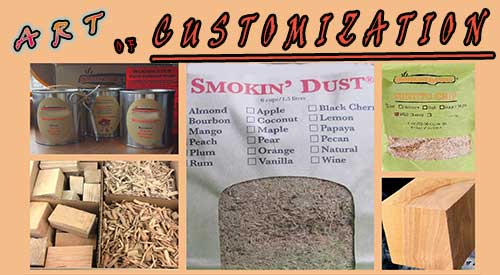
Customizing your cooking experience with our diverse selection of Smokinlicious Smoking Wood Products that Make a Difference with Equipment Efficiency and Taste

Customizing your cooking experience with our diverse selection of Smokinlicious Smoking Wood Products that Make a Difference with Equipment Efficiency and Taste

THE ART OF CUSTOMIZING YOUR COOKING EXPERIENCE

Listen to the audio of this blog

Why Not Build Your Own Wood-fired Ingredient Box?

I remember the days when purchasing a new car was very limited in terms of customizing. You didn’t get the opportunity to choose much more than the exterior color and even those choices were limited to a few! Today, you can go online and literally build your own car from the type of engine and fuel it will use, to the color, texture, and material of your interior and everything in between. This got me thinking about customizing when it comes to the wood-fired cooking experience. Why should cooking woods be any different than the car industry? Why not build your own wood-fired ingredient box when it comes to the smoking wood?

Since SmokinLicious®inception, we have offered a level of customization to the user purchasing our products that has been unmatched by any other company. We provide options that empower the user to combine various products as you would the ingredients to a homemade stew.

Why is this option of value and importance?

There are times that you need different products on hand to simply do specific functions. For instance, Grande Sapore® Wood Chips are a means of bringing the temperature of some equipment up quickly. Smokin’ Dust® provides for a sudden burst of smoke vapor due to its lower moisture level. Double filet smoker wood chunks tend to be the ideal sizing to place on diffusers/flavor bars of LP grills and achieve smoke vapor around foods being cooked.

I think one of the primary reasons that smoking wood should have a level of customer choice is that most of us don’t own just one piece of equipment. I think I’m safe to assume that all of us have a conventional stove top. That gives the opportunity to do stove top smoking. Many of us have newer models of LP grills that allow for the placement of woods chunks and/or wood chips. Then there are those that have the conventional stove top, the LP grill, the charcoal grill, and a dedicated smoker. Wouldn’t it be great to source all the products need for these different types of equipment from one supplier and even get the chance to purchase a combination of products for one price?

And the icing on the cake – Now that’s customization at its best!! That’s SmokinLicious®!

So now it’s time to make your wood-fired cooking experiences uniquely your own by starting with SmokinLicious® and our wide array of species and flavor options just waiting for your hand and imagination to take your wood-fired cooking memories to new heights! We hope you enjoyed the article- Customizing your Cooking Experience

For related reading:

THE TOP 8 MISTAKES TO AVOID WHEN COOKING & GRILLING WITH WOOD

SMOKE SIGNALS: LEARN WHAT THE COLOR MEANS WHEN COOKING WITH WOOD

Purchase products:

Wood Chunks- Double & Single Filet

Smoking Wood Chips- Grande Sapore®

Wood Chips- Minuto® & Piccolo®

Follow us on: Instagram, Twitter, Facebook, Pinterest, YouTube, Flipboard, Google+, Reddit, Medium, Blogger, BuzzFeed, Bloglovin’

Dr Smoke- “Don’t limit your cooking experience to one product; mixing and matching can only enhance your culinary flavoring. That’s why we provide a very diverse product base.”

Forest scene of alder wood the perfect wood for a very slight touch of smoke

Alder wood the safe bet for cooking wood- little in flavor!

ALDER WOOD THE SAFE BET!

Alder

I’m often asked if there is any hardwood that is a safe bet to use with any food item and equipment. One that won’t be too strong if over applied or hurt the equipment if too much wood is used. Well, as you’ve heard me mentioned before, we don’t provide descriptors of the woods we manufacture as we believe there are too many variables that affect the overall flavor of the hardwood. Instead, we offer a rating of our woods based on how bold they are. On the low end of that rating scale? Alder wood the safe bet.

Family of Trees- Alder Wood the Safe Bet

First, let me state that Alder is part of the Birch family of hardwood. It is a genus that is a flowering plant. Around the world, there are 35 species of both the tree and shrub form. Yes, that is correct. Alder is not always a tree but can be a tall growing shrub. In New York State, we have roughly 13 varieties with our Alder referred to as Eastern Alder. On the density side, this is a lighter hardwood and thus, it does not hold moisture long. This makes this hardwood ideal for very specific cooking applications.

Alder is very light in its stimulating flavor compounds. I’m sure you’ve read that Alder is ideal for fish but there are missed opportunities if you don’t go beyond the fish category. Given there are so many options to infuse smoke vapor, this can be a great wood choice when using a handheld food smoker or even a stove stop smoker or cold smoke generator. Contemplating chocolate, cheese, or fruits? Alder can be a perfect match.

Caution- Alder Wood the Safe Bet

Here’s my one caution. If you are planning to incorporate bolder ingredients with your food item, then alder may not be the first choice. Lots of bacon, chili or cayenne pepper – these will mask the flavor of the Alder wood. Instead opt for foods that have lighter ingredients like herbs, citrus, dairy components.

As mentioned, Alder or Birch will start with a moisture level that is higher but due to the composition of its cell structures, the water will evaporate faster in the hardwood. Using it on an LP grill or in a charcoal unit may require quicker replenishment than another denser hardwood so extra supply is always recommended.

Blending- Alder Wood the Safe Bet

Don’t forget, blending Alder with another hardwood works well too so if you do want a spicier kick to your ingredients, feel free to add Alder with a bolder wood like hickory, beech or oak.

The best part is always in the experimentation so have fun working with this hardwood that I call the safety net – it won’t let you fall flat if you select it for your smoke infusion.

Dr. Smoke Alder wood the safe bet when it comes to wood smoking with a lite taste

Dr. Smoke Alder wood the safe bet when it comes to wood smoking with a lite taste


See our other wood species blogs:

PUT A CHERRY ON IT!

DON’T PUT CULINARY QUALITY WOOD LAST!

Case Notes: A restaurant is preparing to open in a new location and made the decision to invest in an Italian made pizza oven that has an option for wood-fired cooking. This equipment would take 6 months to manufacture and deliver to the USA, which gave the owners time to complete renovations on their new building in preparation for the free-standing oven’s installation. During that time, menu development and plating options were reviewed and decided upon.

The one planning need that was left to the last minute – locating the supplier for the cooking hardwood and determining appropriate sizing for the new equipment! WHY???

It always surprises me that restaurateurs are willing to spend $50,000 and up for commercial equipment that does a specific function or technique, yet they don’t spend the time before that purchase ensuring they can obtain the quality accessory needs to get every benefit from that investment.

Here’s the best part: often these equipment lines tote that they can do all sorts of functions including wood-fired cooking techniques. The truth – they aren’t really promoting that function of their equipment line! They simply want to sell you the equipment and have you use standard fuel options like electric and gas. How did I come to this conclusion? By the content of the user’s manual.

Many do not reference:

  • size of wood product needed for the equipment
  • how to light the product
  • how much of the product to use
  • where to locate a supplier of the cooking wood
  • pictorials of the steps to do the technique
  • provide a troubleshooting guide.

Do you really want to spend $50,000, $60,000, $100,000 and be left to fend for yourself with that investment?

Take the appropriate steps when considering additions to or replacements in your equipment line. Research not only the equipment but what is needed to do the smoke infusion technique with that equipment. Yes, wood chips are readily available even though there is a high level of variation between products. But other products are not so easy to find like wood pieces larger than wood chips but smaller than split firewood logs.

In addition, wood-fired techniques can also require additional “tools” to be available in the kitchen that may not have been standard inventory before.

Such things as:

  • fire retardant gloves
  • fire grade tools like long-handled tongs and a wood poker
  • a MAP canister/torch for lighting the fire
  • an infrared thermometer for reading temperatures within the cooking chamber
  • an ash receptacle.

Prioritize the needs of a wood-fired equipment addition by first reviewing the best option in equipment for your business’ need and second, assessing all the requirements of the wood to be successful in bringing this technique to your kitchen!


Dr. Smoke- only manufacturers Culinary Quality wood- Nothing else!!

Dr. Smoke- only manufacturers Culinary Quality wood- Nothing else!!


Follow us on Instagram, Twitter, Facebook, Pinterest, YouTube, Flipboard, Google+, Reddit, Medium, Blogger, BuzzFeed

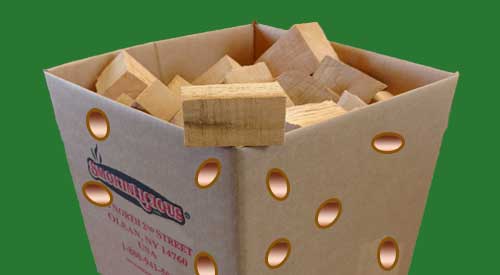
Smoker wood storage summer or as the winter months approach, you should pop some holes in the box to circulated the air!

Smoker wood storage summer or as the winter months approach, you should pop some holes in the box to circulated the air!

Smoker wood storage for chips or chunks Share on X

Listen to the audio of this blog

SmokinLicious® has the luxury of manufacturing every wood product we offer for sale. That means, our moisture rich wood is ready to use immediately. We certainly are not firewood as we work only with the heartwood of the hardwood trees and need proper storage to maintain our clean, fresh state. Plus, we want you to have a pleasant outcome to smoking your foods which is a direct result of the moisture level.

It’s Serious Business- Smoker Wood Storage!

We take wood storage seriously! Which is why when you purchase our products, you’ll receive a card educating you on the best storage containers and conditions. Simply put, any container that encourages air flow is ideal. We have found that some plastic containers can actual cause mold spores which is why materials made from wood, cardboard or metal are preferred. If you should encounter wood that has begun to develop evidence of mold, you may follow these steps to sanitize the wood for cooking:

1. Dilute 1 part white vinegar to 3 parts water (or 1.5 ounces of white vinegar to 3 gallons of water). Be sure the wood is completely submerged in the vinegar mixture.


2. Let the wood soak in the solution for a minimum of 2 minutes.


3. Remove the wood from the vinegar mixture and allow to air dry.


4. Store the wood as recommended above.


Prevent Sunburn

Just like your skin, wood can get too much sun and become sunburned, especially given we are bark-free product. It is best to select a location for storage that is away from direct sunlight. A cool, dry location is ideal. If you select a garage or basement area, be sure you don’t place any cardboard container directly on the cement surface or moisture will be drawn in through the carton to the wood and could result in appearance and aroma changes. If you do see the outside of the wood turn a bit gray, that likely is the result of some sun exposure.

Temperature and Humidity for Smoker Wood Storage

As a last point, keep temperature and humidity in mind when you select a storage location. Since our hardwoods are native to New York State, they are accustom to certain conditions including 4 seasons. Wood can be stressed especially when traveling in a truck to your location. Be sure to follow our directive sticker on the carton advising to get the carton open immediately upon delivery. Air is crucial to your wood remaining in the great condition it is in when we packaged it.

For those wanting to know if refrigeration is an option, our study shows refrigeration certainly doesn’t hurt the wood but you do need to rotate any unused wood periodically to prevent mold potential. Freezing the wood is not suggested. When you plan to use the wood for wood-fired cooking, be sure to remove the wood from a cold location and allow to come to room temperature in order to prevent a lengthy time waiting for combustion to take hold which is what produces smoke vapor.

More Related reading on this subject- More Related reading on this subject of cooking & Grilling with wood

More Related reading on smoker More


Products

Dr. Smoke- Smoker Wood Storage is an important part of your grilling practices! Follow our advice to get the most out of your wood purchase

Dr. Smoke- Smoker Wood Storage is an important part of your grilling practices! Follow our advice to get the most out of your wood purchase


Second Test Kitchen Results

The Smokinlicious®Test Kitchen conducted an additional test using the Technique® Cast Iron Skillet and Smoker which many of you purchased from QVC as the Special of the Day. This time, we used our flavor-infused wood product called the Woodscuit ® on the stovetop.

What We Cooked: Boneless Pork Tenderloin

How We Cooked: on the stovetop using medium-low heat on the gas range

What Wood We Used: Bourbon Flavored Woodscuit ® – 3 pieces

Length of Cook Time: 2-1/2 hours

Findings: Again, as our previous test cooks have demonstrated, the Technique® Cast Iron Skillet and Smoker provides for a very moist product. This time, we lined our drip pan in foil to decrease the amount of elbow-grease needed to clean up. Since our Woodscuit ® product has a moisture content of ~45 percent, these wood pieces did not display the charred look like the woods used in the previous test cooks (both the Wood Chips and Smokin’ Dust® were black by the end of the cooking time). However, once the tenderloin was finished, our panel of tasters did not find any significant smoke flavor to the end product. For those pieces that had been more to the center of the cast iron skillet, the tasters noted slightly more smoke flavor but overall, there was no distinguishable smoke flavor infused in the food.

Currently, our Test Kitchen has found that the Wood Chips used on the stovetop, provide for the greatest flavor infusion of the wood used. As always, we will continue to test this cast iron skillet with a plan to see if adding water to the smoke pan with the wood product, helps to keep the flavor infusion going.

Stay tuned!

Fingerling Potatoes are Next

Dr. Smoke- Cast iron skillet cooking and smoking is easy, affordable & offers great flavor results!

Dr. Smoke- Cast iron skillet cooking and smoking is easy, affordable & offers great flavor results! When using the Technique® Cast Iron Skillet, coupled our quality cooking wood, you can’t go wrong!

More Related reading on stove top smoking featuring a cast iron skillet:

For more reading on the Technique® Cast Iron Skillet & Smoker and how you can do stove top smoking from your own kitchen, check out these articles:

A Guide to Cooking the Perfect Steak

Infusing Wood Flavor to Brussels Sprouts Using a Cast Iron Skillet

The Kitchen Find – Easy, Convenient & Affordable Stove Top Smoking!

THE BEECHWOOD PRODUCTS

Beechwood Hardwood

Smokinlicious® is pleased to announce that we have added an eighth hardwood species to our product line. Beech is now available in wood chips, double and single filet wood chunk, wood blocks and heartwood logs for purchase!

(more…)

Thanks for the question regarding Mango wood.  Although limited in the
areas they can grow (India, Florida, Caribbean, Hawaii, etc.), Mango wood
is very popular for upper end wood products like bowls, vases, and even
some furniture.  However, you are correct.  Mango wood contains a sap
that is located at the base of the stem, branches, and trunk. As a result,
a recommendation is made never to burn mango wood as it emits a smoke
that is full of potent irritants.  Plus, Mango trees are highly
suseptible to a number of diseases and pest infestations,
including the fruit fly, black twig borer, sooty mold, and
southern green stink bug to name a few. Pesticide application
is generally necessary to maintain the health of these trees.
Because of the chemical application, Mango wood does not make
for good BBQ!
Stick to forest producing products for the safest woods for BBQ!
Use Smokinlicious® Mango Smokin' Dust®  instead!
Follow us on: Instagram, Twitter, Facebook, Pintrest, YouTube, Flipboard, Google+, Reddit, Medium, Blogger, BuzzFeed


« Previous Page