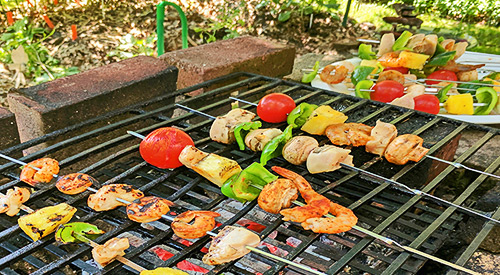
This bucolic photo can be yours if you follow our 6 TIPS FOR A HEALTHY OUTDOOR COOKING SEASON

Follow our 6 tips for a healthy outdoor cooking season in 2018!

Tips for Safe Outdoor Cooking- “6 TIPS FOR A HEALTHY SEASON”

listen to our blog


Everyone seems to be so much happier during the seasons that allow for outdoor cooking and entertaining. Whether it’s a planned cooking event or spur of the moment decision, these cooking events turn into an opportunity to relax, kick back and truly enjoy life.

There are steps you should take to ensure that the foods you enjoy outdoors remain safe. What follows are the top tips for safe outdoor cooking that will make for the best outdoor cooking season ever, no matter what you elect to cook.

Tips for Safe Outdoor Cooking

Tip #1

There are times when you want to marinate meats and poultry before cooking on your grill or smoker. Know that foods will only remain safe if you marinate in the refrigerator in a covered container, not with the marinated foods laying out on the kitchen counter. Also, if you plan to incorporate some of the marinades into a sauce, be sure to reserve some before it is applied to the raw foods. If there is marinade leftover from the raw food marination, be sure you boil it before using as anything that has contact with the raw food can carry bacteria.

Tip #2

You can grill a variety of foods on the same equipment but to know when everything is cooked, you will need to have thermometers. It’s best to use a different thermometer, marked by color, for each type of food: beef, pork, chicken, fish. The thermometer should be placed in the thickest part of the meat or poultry to get an accurate internal temperature reading. Here is a guide on temperatures:

  • Beef, Pork, Lamb, & Veal (steaks, roasts, and chops): 145°F/62°C
  • Ground meats & sausage: 160°F/71°C
  • Whole poultry, poultry breasts, & ground poultry: 165°F/74°C
  • Hot dogs: Cook until steaming hot

Remember, thicker cut meats and poultry will need to be placed closer to the fire or heat. Utilize the upper grill grate for those items that are more fragile like thinner fillets of fish, vegetables, fruit, or for heating sauces.

Tip #3

You cannot partially cook meats and poultry by parboiling or microwaving and then placing in the refrigerator for grilling the next day. Although you may think this will lessen the cooking time on the grill, what you’re doing is introducing the potential for everyone to become sick. The reason? Partial cooking does not eliminate all bacteria growth. The reality is, you would be allowing bacteria to continue to grow.

Tip #4

Take the time to properly clean your grill or smoker at the start of the outdoor cooking season. It’s common to close vents on the grill or smoker when you cover it up for the winter season but these aides in stimulating mold growth on the grill grate and/or inside cover and walls. For that reason, it’s important to scrub down the interior of the grill or smoker using a cleaning mixture; 1 part vinegar to 3 parts water or a bleach to water blend if you’re not opposed to the more toxic bleach.

Tip #5

Be sure you start with a hot grill or to cooking temperature smoker. That means, preheat. Preheat your grill 15 to 25 minutes before you start cooking to make sure it reaches the right temperature to ensure all bacteria is killed. Your grill should be 400-450°F for high, 350-400°F for medium-high, 300-350°F for medium and 250-300°F for low heat. By having a properly heated grill, you will guarantee a moist outcome for your meat and poultry.

Tip #6

There are many of us we prefer a good charcoal grill versus gas. It is important that you understand that there are many more influencers to altering the flavor of what you’re cooking when you cook over charcoal. Be sure to use an additive-free lump charcoal, which is charred wood. Conventional briquettes, which are easy to find, may contain wood scraps and sawdust as well as coal dust, sodium nitrate, borax and additives like paraffin or lighter fluid. As for lighter fluid, NO! Lighter fluid can release volatile organic compounds (VOCs) into the air, leave an unpleasant flavor to foods, and pose a serious danger if used improperly. Skip it altogether.

Without question, our 6 TIPS FOR A HEALTHY OUTDOOR COOKING SEASON should help you on your way to a healthy, memorable outdoor cooking season. Likely, the best ever!

Purchase products:

Wood Chips: Grande Sapore®, Minuto® & Piccolo®

Wood Chunks: Double & Single Filet

More Related reading on "What Wood for Smoking" and other great smoking and grilling tips and techniques

More Related reading on “What Wood for Smoking” and other great smoking and grilling tips and techniques

Additional reading:

-10 THINGS TO CONSIDER BEFORE PURCHASING WOOD FOR COOKING, GRILLING & SMOKING

-HOW TO TURN YOUR CHARCOAL GRILL INTO A SMOKER

-THINGS YOU DIDN’T KNOW YOU COULD SMOKE

-WHAT WOOD TO USE FOR SMOKING: A PRIMER

Dr. Smoke- please follow our blog 6 TIPS FOR A HEALTHY OUTDOOR COOKING SEASON!

Dr. Smoke- Food labeling is important for health and food safety. It should apply to all smoked foods!
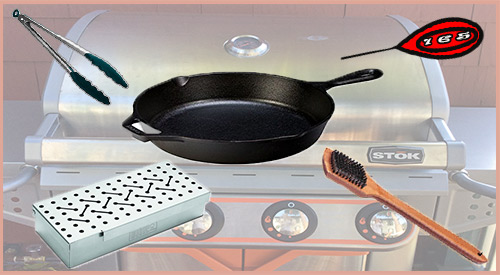
 

Smokinlicious® recommends "must have" gas grill tools

Smokinlicious® recommends “must have” gas grill tools


GAS GRILL TOOLS

Listen to the audio of this blog


There is no question that LP/Gas grills have changed tremendously over the past 10 years and now include some features standard that for many years, were options. Then there is the development of dual or multi-fuel options on a grill so you can have one unit that performs as a gas grill, charcoal grill, wood grill, and even electric or pellet grill, all in one unit.

Today, I’m focusing on the standard LP/Gas grill, independent of any other fuel source. This guide will focus on the basic tools that will provide for a better grilling experience and make you more efficient at the grill.

GAS GRILL TOOLS THAT YOU MUST HAVE:

Tool #1

I’m starting with a grill brush since most of us have the habit of thinking about cleaning off the grill grates when we start the grill for cooking, not when we finish. This tool is to ensure clean up the residual food bits and grease left from your previous grilled foods.

Now I’m aware of the controversy over the use of metal bristles but most of these brushes are made well. Simple inspection of the brush bristles each time you use it will allow you to identify if the bristles have come loose and have the potential to be transported to your foods. I prefer a brush with metal bristles, with a long handle to keep my arm away from the heat, as often you want to clean the grill when it’s hot. Remember, most of these brushes are under $10 so think about purchasing one a couple times per season to ensure the bristles stay put.

Tool #2

There are times when the grill grates and lid will become super coated in grease and pieces of food. You’ll need to break out the cleaning agents to ensure these surfaces are ready to go for the next grilling event. Two of my favorites are CLR BBQ Grill Cleaner and Mr. Clean MagicEraser. As a non-toxic, non-flammable, biodegradable product, CLR BBQ Grill Cleaner is not something you have to leave on for hours at a time. It quickly breaks through the issues and allows you to wipe clean to an almost new state. Keep in mind, the CLR brand also makes a stainless steel cleaner for the outside as well.

Tool #3

Long-handled tongs. Your standard tong length for the traditional kitchen just won’t work at the grill, as you need to keep some arm distance from the hot grill surfaces. I like the 20-inch length with silicone grips as well as silicone tips, as silicone can tolerate extremely high heat. If you grill multiple food items at the same time, think about purchasing tongs with different colored tips and/or handles as that will ensure use of one color for a specific food so there’s no transfer of flavors.

Tool #4

Like the tongs, a must have is long-handled spatula for those food items that need to be flipped. I prefer one that is made of solid steel and has a bit of a beveling to the edge. Again, the longer the handle the better for keeping away from high heat.

Tool #5

An easy to read, digital thermometer. It is a must when you grill or smoke. Look for one that has a longer probe for when your grilling larger roasts and thicker cuts of meats and poultry. Be sure the readout is easy to see and if you grill a lot at night, get one that has a back-lite to see more clearly. If you cook a lot of different animal proteins at the same time, try to have a thermometer dedicated to each food so you don’t cross-contaminate while bacteria may still be an issue. There are assorted colors available making it easy to dedicate one to red meat, pork, poultry, and fish. Most of the digital thermometers on the market today are under $18 with even more under $10.

Tool #6

If you’ve always been a person that cooks directly on the grill grates and only does the standard fare – hamburgers, sausage, chicken, perhaps ribs – you need to get out of that rut and learn to do more with your grill. Start by investing in one piece of quality cast iron. Able to withstand intense heat, cast iron can take you from the average griller to someone with skill. Now, you can enjoy recipes normally done on the indoor stove outside in the fresh air, with your cast iron skillet. Remember, there’s a whole line of cast iron cookware so as you expand your skills, you can add to your outdoor cookware.

Tool #7

Although I am a fan of the standard steam table disposable foil pan, any size, shape foil pan will do. These are perfect for use as a drip pan to prevent render juices from spiking flames and as water pans for a two-zone cooking set up. I won’t deny, that I also use these to cook in especially fragile items like fruit and specific vegetables. You certainly can invest in a grill pan but clean up becomes a snap with the disposable pan.

Tool #8

Although the smoker box was originally intended for use with wood chips on the grill, I always use small wood chunks in mine. I prefer a box made from high-grade stainless steel and one that has a hinged lid. My smoker box holds three Double Filet Wood Chunks from SmokinLicious® perfectly and provides for extended smoke vapor as compared with wood chips. Used directly on the grill grate or set under the grill grate on the heat shield, it produces smoke for hours. Although you can place wood chunks directly on the heat shields, as I’m known to do myself sometimes, they will become permanently marked from the wood ash and eventually need replacing. The smoker box allows you to avoid this.

There you have it! My TOP TOOLS NEEDED FOR GAS GRILLING for better results and help in extending the life of your investment!

SmokinLicious® products used in this blog:

Wood Chips

Wood Chunks- Double Filet

Charwood

More Related reading on this subject

More Related reading on this subject

Additional reading:

-HOW TO TURN YOUR LP/GAS GRILL INTO A SMOKER

-TOP TOOLS TO OWN FOR CHARCOAL GRILLING

-TOP 10 TIPS FOR GRILLING SAFETY

-WHY IS MY BARBECUE MEAT DRY??

Dr. Smoke recommends gas grill tools that are a must!

Dr. Smoke- Here’s our recommendations for “must have” gas grill tools.