DINING FOR SMILES 6 COURSE DINNER EVENT

DINING FOR SMILES 6 COURSE DINNER EVENT

DINING FOR SMILES 6 COURSE DINNER EVENT

Listen to the audio of this blog

Alliance For Smiles began in 2004 with the mission to repair cleft palate and lip deformities in under-served areas of the world.  In fact, over the years, various fund-raising concepts were instituted to offset the costs for highly expensive missions.  Most missions are easily over the $300,000 level in donated surgical and treatment protocols.

Why Portville, NY

Chef Carl Vahl, Board of Directors member for Alliance For Smiles, brought attention to his local community of the efforts for this organization by presenting the Dining For Smiles event, an event which featured a six course gourmet dinner for 18 privileged guests.  SmokinLicious® had the honor of preparing many of the components of the meal over a wood fire.

When hosting an intimate event like the Dining For Smiles dinner, organization and assignment of duties are key.  As such, Chef Vahl utilized the full volunteer staff regardless if the members had experience in a kitchen or not.   The event featured a wonderful six course dining experience with the following featured:

  • Tuna Crudo- Course One
  • Butternut Squash Soup- Course Two
  • Seasonal Salad- Course Three
  • Handmade Lobster Ravioli with Brown Butter Sage Sauce- Course Four
  • Wood Fired Lamb & Canadian Salmon served with Jasmine Rice and Wood Fired Brussels Sprouts- Course Five
  • Panna Cotta with Fresh Mango- Course Six

Additionally, wine pairings were presented with each course revealing an assortment of sparkling, rosé, red and white wines.

The Courses

The formal table is set for about to be pampered 18 guests!

As the 18 guests arrived and were seated at one of two tables, the first course is served – a Tuna Crudo featuring Sushi-grade tuna nestled in a Wasabi avocado cream, topped with pickled onion and finished with candied lemon peel.  This course was served in a martini glass and accompanied by Prosecco, an Italian sparkling wine considered the Italian champagne.

The second course of the Dining For Smiles dinner featured roasted organic butternut squash with the subtle flavor of White Gords was the serving bowl for the Butternut Squash Soup. The chef prepared the soup and the support team cut the tops on the gords. nutmeg and topped with a crisped sage leave and touch of maple syrup.  My favorite part of this dish was its serving bowl – a charred mini white gourd.  By retaining the top of the gourd, you can ensure that the soup stays hot until its placed in front of the guest.  Each gourd was hand cut and charred to ensure no off flavors transferred from the gourd to the soup.  Just a perfect vessel for this scrumptious soup.

Following the first two courses of Tuna Crudo and Butternut Squash Soup, the third course was the salad course featuring mixed greens of green and red leaf lettuce, spinach, and frisee; apple slices; candied walnuts; ember cooked red pepper slices; and a fresh vinaigrette.  This course helped to balance the stomach in preparation for the upcoming courses that would be richer and more substantial.  Paired with our salad course was a full-bodied chardonnay.

Chef prepared homemade lobster ravioli for the fourth course.  This was a decadently rich dish featuring a brown butter sage sauce and fresh grated Parmigiano-Reggiano cheese on top.  This course was paired with a beautiful Rosé, with both items being well received.  As a matter of fact, I don’t recall a plate coming back to the kitchen that wasn’t completely clean!

Main Course for the DINING FOR SMILES 6 COURSE DINNER EVENT

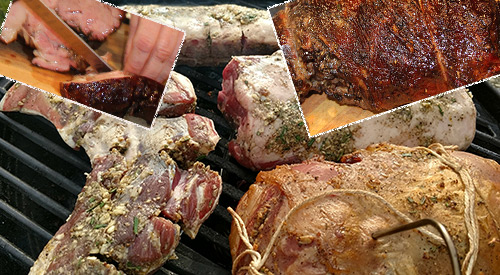
Halal leg of Lamb seasoned with garlic, rosemary, thyme and roasted over cherry wood for 2 hours then rested before slicing. Served medium rare Now, it’s time for the main course – course number five!  First came the proteins.  We produced a wood-fired leg of lamb and lamb rib loins cooked over charwood, ash, sugar maple, and wild cherry wood chunks.  The wood-fired cooking offered a fabulous color to the meat.

Our Canadian salmon enjoyed cooking over charwood and sugar maple and wild cherry wood chunks.  A combination of orange butter, olive oil, and smoke vapor produced that beautiful golden skin.  After resting a while, the lamb and salmon were sliced in preparation for full plating.

We start with Jasmine rice topped with wood-fired brussels sprouts and carrot.  Next to the plate, a slice of wood-fired lamb and a filet of salmon.  Served with a custom mixed wine of Sangiovese and Syrah.  Simply a perfect course!

Finally, we’ve reached the end of a fabulous meal – the final course – dessert.  Panna cotta with fresh mango, served with a German Reisling,Chef Cal lay’ home made Panna Cotta (italian cooked cream) topped with macedoine fresh Mango the perfect end to a fantastic evening.


A Meal that Stays in Memory

Chef Vahl’s vision for a flavorful, entertaining evening proved to be a realty as these 18 guests can attest to.  We are so thankful and honored to have been a part of it.

If you want to donate to the Alliance For Smiles mission, visit www.allianceforsmiles.org and view all the lives that have been touched by the commitment of so many.  Always remember to help others in need in any way you or your company can, just as SmokinLicious® was able to do with this Dining For Smiles event!

Glad we could share our DINING FOR SMILES 6 COURSE DINNER EVENT!

Purchase products:

Charwood

Wood Chunks- Double & Single Filet

More Related reading on this subject

More Related reading on this subject

Additional reading:

-DINING FOR SMILES EVENT PREPARATIONS

-WELCOME TO OUR BRAT PARTY-BRATWURST IN THE ORION SMOKER COOKER

-JUST BECAUSE YOUR SMOKING (FOOD THAT IS!) DOESN’T MAKE IT ALL BAD!
Dr Smoke- "This charity event was wonderful to do because it's such a great cause and makes a tremendous difference in people's lives around the world."

Dr Smoke- “This charity event was wonderful to do because it’s such a great cause and makes a tremendous difference in people’s lives around the world.”
The history of fire cooking part II

fire on the grill

the fire

listen to our blog

The history of fire cooking part II


In Part I, we covered the scientific theories on how cooking with fire began, including the scientific documentation that puts this method’s discovery approximately 2 million years ago.  In The history of fire cooking part II, we will present additional information on how our bodies developed from the introduction of cooking meat as well as the evolution of the wood fire to the oven.

The History of Fire Cooking Part II- A Change in Anatomy

Our ancestors were chimp-like creatures and thought to be the most advanced animals on earth.  These creatures had long arms, short legs, hand-like feet, large mouths and powerful jaws.  Covered in fur, they slept in the trees. That is, until they discovered fire and learned to cook.

Once fire cooking was founded, these ape-like creatures became erect, their brains enlarged, and their jaws became smaller.  Why?   Because cooked foods provide a higher caloric value.

Research has shown that weight loss is guaranteed to people who consume raw-food diets only.  In fact, the more raw food consumed, the more weight loss.  The only problem with this diet is it takes a lot of raw food to generate a caloric level to sustain an active animal.  Our primate ancestors had to graze all day to generate enough calories to keep going leaving time for nothing else.

With the discovery of fire and all its benefits, ape-men emerged.  Originally covered in fur, a few thousand years following fire’s discovery, the fur disappeared.  As a result, this helped to improve hunting skills as the weight of fur made ape-men faster.  Also with the discovery of fire, these creatures had no need to escape to the trees at night as fire provided protection from predators.  Without the climbing, long legs developed and feet that looked less like hands.

The Start of the Family Dynamic

Once animals were trapped and cooked within flames of forest fire and these creatures sampled cooked vegetation and meat; that changed everything.  They began to develop skills at designing knives for hunting.  This in turn developed some level of social skills and brain development, as the brain was being fed more nutrients.  Flint was discovered and used to produce sparks when rubbed against rocks, allowing for control of fire.

Hunting became a daily event.  The first gender structure was designed with males hunting and females cooking.  It was cooking that forced early humans to live by cooperation.  Both males and females relied on each other.  This was the start of family, and more socialized and calmer tempers.  With regular ingestion of cooked foods, the brain began to grow since cooked food takes less energy to digest, more energy defaulted to brain development.  Learning to cook gave these developing humans more time which allowed for more food discoveries and time management.

The Oven

Once fire was discovered and harnessed for the betterment of life, it was a slow transition to bring cooking from the outdoors into the indoors.  First, as mentioned in Part I of our series, it transitioned into cave dwellings.    We know that in ancient times, the period of 60,000BC to 650AD, ancient Egyptians, Jews, and Romans all used some form of stone or brick oven cooking, fired with wood, to produce breads.  In fact, that early design remains very much like the pizza/bread ovens of today.

Beehive-shaped brick ovens came about in Colonial America, the period of 1492 to 1763, and was the advent of learning to control the amount of wood to ash to regulate temperature.  If you’ve ever heard of or used “the hand test” to measure temperature of a grill or outdoor cooking fire, then you know how Colonial Americans tested their ovens.  Hold your hand about 5-inches from the cooking surface.

The number of seconds you can hold your hand there equals a temperature level:

High (450° to 550°F): 2 to 4 seconds

Medium (350° to 450°F): 5 to 7 seconds

Low (250° to 350°F): 8 to 10 seconds

Colonial Americans would add more wood to increase temperature or open the door to reduce it.

The invention of cast iron stoves began to replace wood hearth cooking in the 1700’s.  In 1795, Count Rumford invented a version of the cast iron stove that was different from earlier versions in that it had a single fire source that could be regulated individually for different pots being used at the same time.  Additionally, it could heat the entire room.  Unfortunately, it was extremely large making it difficult for most kitchens to accommodate it.

With the discovery of electricity, man continued to find new uses for this source of energy.  In fact, one of the keys was to incorporate it into the home and the electric stove was key to making home life easier.  In 1892, an entire meal’s preparation was demonstrated at the Ottawa Windsor Hotel in Canada, paving the way for sale to future homes.

Continued Discovery in The History of Fire Cooking part II

These early discoveries are what formed our continued thirst for finding the best methods of cooking in the fastest yet most flavor means possible, while feeding our brains to keep us developing.  Charcoal grills, brick and clay pizza ovens, gas grills, infrared grills, campfires were all shaped by the very first cooking event, even if the first event was by nature’s hand alone..  In conclusion, we hope you enjoyed the The History of Fire Cooking Part II. Finally, stay tuned for part III.

The history of fire cooking part II

The history of fire cooking part II we discuss the devlopment of fire and evolution of mankind


Purchase products:

Wood Chips- Grande Sapore®

Wood Chunks- Double & Single Filet

Additional Reading:

More Related reading on "What Wood for Smoking" and other great smoking and grilling tips and techniques

More Related reading on “What Wood for Smoking” and other great smoking and grilling tips and techniques

-OPEN PIT COOKING FIRE BUILDING: PART I

-GRILL-BUILDING THE PERFECT COOKING FIRE- PART II

-HOW TO TURN YOUR CHARCOAL GRILL INTO A SMOKER

-HOW TO TURN YOUR LP/GAS GRILL INTO A SMOKER


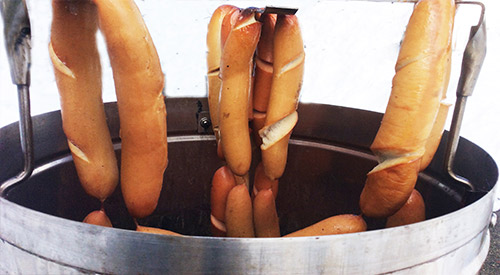
Bratwurst in the Orion Smoker Cooker nicely cooked plump and Juicy

Bratwurst in the Orion Smoker Cooker nicely cooked plump and juicy!

WELCOME TO OUR BRAT PARTY-BRATWURST IN THE ORION

SMOKER/COOKER

listen to our blog


I believe that wood fired foods can be enjoyed 365 days of the year regardless of the temperature/conditions outside.  To ease the challenges of wood cooking outdoors when the conditions may not be optimal, I look to my equipment options and make a selection that ensures the cooking is quick and as easy as possible.

I want to have bratwurst party!  Unfortunately, I’ve chosen a -2° day to do just that.  No problem!  I simply rely on my Orion Cooker to provide a fast, high heat method of cooking with my SmokinLicious® Minuto® Wood Chips.

Bratwurst in the Orion Smoker Cooker- There’s Nothing To It!

Preparing your bratwurst for the Orion Cooker couldn’t get any simpler than making a few cross cuts in the skins to ensure they don’t burst while cooking.

The reason bratwurst is so popular for entertaining and for summer days is just how quick it is to prepare.  When you smoke a casing containing product, you want to ensure that the juices don’t cause a pressure build up and result in your brats exploding all over the smoker.  I make 3 shallow knife cuts in each brat to ensure they can plump up without exploding out of their casing.  These German brats are made with a combination of pork and veal and have an all-natural casing meaning the casing is made from the intestine of an animal.  I specifically purchased brats that were on an uninterrupted casing line so I could hang my brats on the Orion Cooker rib hooks to ensure smoke vapor envelopes each link completely, just like commercial smokehouses do.

Before smoking my German bratwurst, I’ve prepared the Orion Cooker by adding SmokinLicious® Minuto® Wood Chips in Wild Cherry to inside of the cooker. The wood chips are placed in the space between the cooker’s wall and the drip pan.  I’ve lite a chimney starter full of briquettes which when grayed over will be poured into the fuel pan.  12 briquettes are also lit in the smaller fuel pan at that top of the unit.  I’ve loaded my strings of bratwurst to the rib hooks of the unit. Next, place the lid on and let these cook and smoke for 45 minutes untouched.

Done Before You Know It-BRATWURST IN THE ORION SMOKER COOKER

Here’s why I love cooking with the Orion Cooker.  On a -2° winter day, I can still use the convection heat from the Orion Cooker to finish the German bratwurst in just 45 minutes.  In fact, I don’t use a full fuel tray of briquettes for this smoke.  Just one chimney starter full of coals plus about 15 unlit briquettes placed on top of the lit coals.  Great smoke flavor is added using Minuto® Wood Chips in wild cherry from SmokinLicious®.   I’ve hung over 24 brat links on the three rib hooks of this unit so I can feed plenty of hungry people.

Fix It Your Way

Now comes the best part!  Fixing your bratwurst the way you love it.  Put out a variety of toppings to stimulate creativity at the brat table.  I’ve included raw chopped onion, sweet pickle relish, sauerkraut, hot Hungarian pepper rings, BBQ sauce, beer brat mustard, kimchi, horseradish sauce, just to name a few choices.  Whether you slice your brat down the middle or leave it whole, anything goes.  German bratwurst done over SmokinLicious® wild cherry wood chips and hung on the hooks of the Orion Cooker, for that old school, smokehouse flavor. Bratwurst in the Orion Smoker Cooker!

Purchase products:

Wood Chips- Minuto®

More Related reading on "What Wood for Smoking" and other great smoking and grilling tips and techniques

More Related reading on “What Wood for Smoking” and other great smoking and grilling tips and techniques

Additional reading:

-GIVING AN EDGE TO SMOKY COCKTAIL SAUCE

-SMOKED BEEF SHORT RIBS


Dr Smoke "If you're looking for something different to cook on your Orion, brats are perfect and yummy!"

Dr Smoke “If you’re looking for something different to cook on your Orion, brats are perfect and yummy!”

The history of fire cooking part I

THE HISTORY OF FIRE COOKING: PART I

Grill fire

the fire

listen to our blogthe history of fire cooking part I


For thousands of years, it was the only way to cook.  Many believe that this discovery separated man from the other animals.  Fire.

Estimated to have been discovered some 2 million years ago, the discovery of fire and more importantly, the discovery of how to tame fire, resulted in man’s brain development, value of food, changes in our body, and social structure.  It gave us survivability.  It extended our life by improving daily calories and nutritional needs by allowing us to cook poisonous plants and meats.

So how did fire cooking get discovered?  That is the million dollar question.  Here are some of the hypotheses out there regarding the discovery of fire for cooking:

The History of Fire Cooking Part I- Nature Provides Ignition

There are some scientists who believe that fire cooking was found by accident.  A lightning strike or grass fires that sprung up due to the excessive dry conditions exposed to the hot sun.  Many don’t feel man did anything to “discover” fire other than observe the characteristics of fire: it produces abundant heat, light, and when it traps an animal within its flames, it produced a more tender meat, easier to digest food source, and more pleasing aroma to the meat.

Tool Construction

There are others who believe that early humans realized the importance of tools.  By sharpening stones to produce spears, cutting tools, etc., these early beings observed spark.  Either through intention or perhaps with Mother Nature’s assistance, these sparks caught twigs, brush, fruit, and/or grains on fire.  Remember, early human life did not involve a developed brain.  A discovery of fire, however, would help advance not only our brains, but our bodies into the erect beings we are today.

The Earliest Cave Cooking

In South Africa’s Northern Cape province, a dwelling known as Wonderwerk Cave, contains the earliest evidence that our ancestors and apelike ancestors were using fire.  Compacted dirt showed evidence of ashes, carbonized leaf and twig fragments, and burnt bits of animal bones.  Scientists were then able to analyze this material and determine that the fragments were heated between 750 and 1300°F, which is the heat level of a small fire made of twigs and grasses.

If indeed our earlier species learned to harness fire for cooking, this would account for the advancement of our brains and our ability to become erect beings walking on two legs.  Cooking on fire allowed for easier chewing and digestion and produced extra calories to fuel our brains. Fire also warded off nighttime predators, allowing for sleep on the ground or in caves rather than in the trees.

It’s All About Energy

Raw food diets have been popularized as a method of losing weight and of being healthier.  However, only a fraction of the calories in raw starch and protein are absorbed by the body via the small intestine.  As a result, the remainder passes into the large bowel, where it is broken down by the organ’s high population of microbes, which consume the majority for themselves.  However, cooked food is mostly digested by the time it enters the colon. For the same amount of calories ingested, the body gets roughly 30 percent more energy from cooked oat, wheat or potato starch as compared to raw, and as much as 78 percent from the protein in an egg.  In experiments, animals given cooked food gain more weight than animals fed the same amount of raw food.

Cooking breaks down collagen (connective tissue in meat) & softens the plants’ cell walls to release their storage of starch & fat.  The calories to fuel the bigger brains of successive species of hominids came at the expense of the energy-intensive tissue in the gut, which was shrinking at the same time.  If you look at early imagery of apes, you’ll see how we morphed into narrow-waisted Homo sapiens.– the history of fire cooking part I

Coming up in The History of Fire Cooking: Part II, learn more about why cooking foods by fire made us who we are today.  In conclusion, did we provide you with new information you didn’t know?  Additionally, leave us a comment and subscribe as we bring recipes, tips, techniques, and the science behind the fire and smoke.

Purchase products:

Wood Chips- Grande Sapore®

Wood Chunks- Double & Single Filet

More Related reading on "What Wood for Smoking" and other great smoking and grilling tips and techniques

More Related reading on “What Wood for Smoking” and other great smoking and grilling tips and techniques

Additional reading:

-OPEN PIT COOKING FIRE BUILDING: PART I

-GRILL-BUILDING THE PERFECT COOKING FIRE- PART II

-IS WOOD-TAR CREOSOTE THE ‘MONSTER’ TO WOOD-FIRED COOKING

I hope you enjoyed the the history of fire cooking part I

I hope you enjoyed the history of fire cooking part I

Smokinlicious is proud to be a F2C company- meaning a manufacuter to Consumer Sales Organization

Smokinlicious is proud to be a F2C company


SMOKINLICIOUS® IS AN F2C

listen to our blog


In today’s age of selling products and services, there are acronyms that are common to marketing and sales strategies.  First, there is B2B which refers to business to business relationships.  This means that a product or a service is sold from one business to another.  An example of each would be windshield wiper fluid being sold to gas stations and attorney services to large corporations.

B2C is shorthand for business to consumer.  This is selling a product or service directly to a customer that is not necessarily a business.

Now, you may automatically assume that SmokinLicious® would fall under both these sales types, and you would be right.  But there is another acronym you likely aren’t familiar with: F2C.

F2C- Making a Better Connection

F2C refers to factory to consumer or more specifically, manufacturer to consumer.  There are many reasons why this is a plus to both businesses and consumers doing business with a specific manufacturer.  Let’s examine the major advantages from the perspective of doing business with SmokinLicious®:

Advantage #1 Details

As the manufacturer of all the products sold under the brand SmokinLicious®, we can provide the specifics on where the hardwood comes from, the age of the wood, the handling of the product, the treatment the wood is exposed to, and the details on packaging.  You don’t have to wait on answers to your product questions like with a supplier who is simply a re-seller of the wood.  We give answers immediately!

Advantage #2 Intimate Knowledge

When you are committed to manufacturing a specific product, you tend to know that product thoroughly.  For SmokinLicious®, that equates to us knowing not only about wood fired cooking techniques like hot smoking, ember cooking, and cold smoking but we know the science behind hardwood; molecular biology of the wood as well as for combustion.  We know why smoke gives flavor and how to respect and control it.

Advantage #3 Availability

We aren’t simply selling a product to move it out of inventory.  As a manufacturer, we are committed to answering questions whether on email, via phone, or social media platforms.  No, we don’t operate the phones 24/7.  But we do get back to anyone who contacts us, usually within 24 hours.  We are available to everyone!

Advantage #4 Passion

Sometimes I feel the word “passion” is overused but that word really does describe the people who make up the SmokinLicious® Team.  We are passionate about cooking with fire and the smoke it produces.  We simply love to offer our perspective on cooking with wood.  Remember, just because someone sells a specific product doesn’t mean it was a dream of theirs.  It simply may be the “thing” to do with no real commitment.  Who wants to commit to that type of supplier!

Advantage #5 Skilled

We have a test kitchen/patio and we use it – all the time!  That’s the only way you can know all the different applications for the product we manufacture and sell.  We possess the skills to guide you on what might be causing bitter flavors, poor color, equipment failures, and so much more.  Plus, we offer daily postings on recipes, tips, techniques, and the science behind cooking with fire and smoke.

Advantage #6 Global

We can be everywhere because we know our commodity and the regulations that relate to our products.  We don’t cut corners because we are as concerned about our environment and forests as the agricultural agencies around the world.  You won’t ever need to worry about having your supply cut off because a regulation or law wasn’t followed.

Advantage #7 Exclusivity

You’re purchasing smoking wood to cook with.  That means, food is exposed to the wood’s components.  Don’t you want assurance that it’s clean?  We only sell hardwoods for cooking and culinary use!  That’s it!  We don’t take waste product from some other wood process and sell it off under a new label or brand.  We don’t buy woods from anyone who can’t document on paper where the smoker wood is from and if exposure to chemicals is possible.  SmokinLicious® is exclusively a culinary wood product!

These are just some of the advantages to working directly with and purchasing directly from a manufacturer, or F2C.   When you want assurances that any question you have can be answered, that any product need can be met, that your equipment will be protected, then seek a direct manufacturer first and eliminate a middle man that may only be in it for dollars and cents.  Or one day you could simply find they’re no longer in business or they no longer can ship product throughout North America or other continents, leaving your Company with a big problem.

Purchase products:

Wood Chips- Grande Sapore®

Wood Chunks- Double and Single Filet

Smoker Logs- Full & Quarter Cuty

More Related reading on "What Wood for Smoking" and other great smoking and grilling tips and techniques

More Related reading on “What Wood for Smoking” and other great smoking and grilling tips and techniques

Additional reading:

-SMOKIN’ DUST®: A SPICE FOR YOUR EQUIPMENT

-WHAT’S IN THE SMOKINLICIOUS® WOOD CHUNK BOX?

-WHEN A FLOP COULD HAVE BEEN A SUCCESS!

Our primary focus is on the consumer of our products. Our culinary team provides support to all chefs!

Our primary focus is on the consumer of our products. Our culinary team provides support to all chefs!

Alto-Shaam® logo

Alto-Shaam®

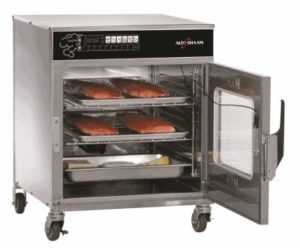
Alto-Shaam® oven with open door viewing the cooking trays

Guest Blog Post

listen to our blog

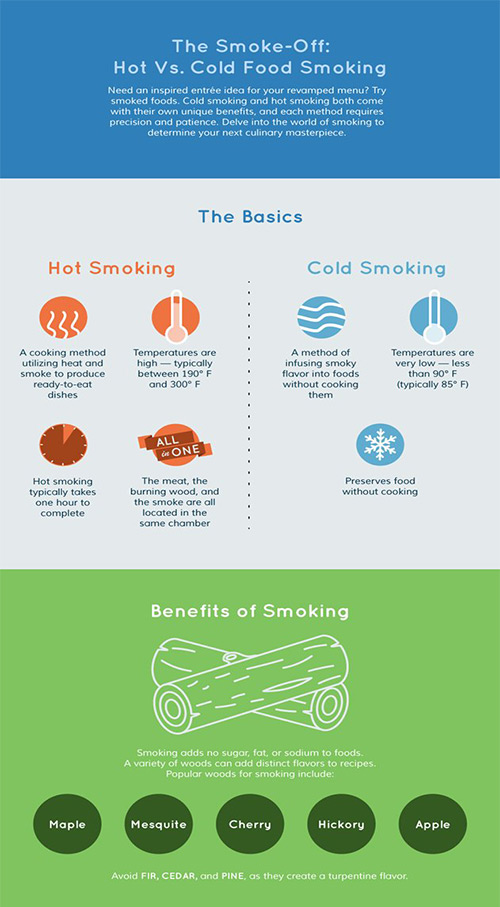
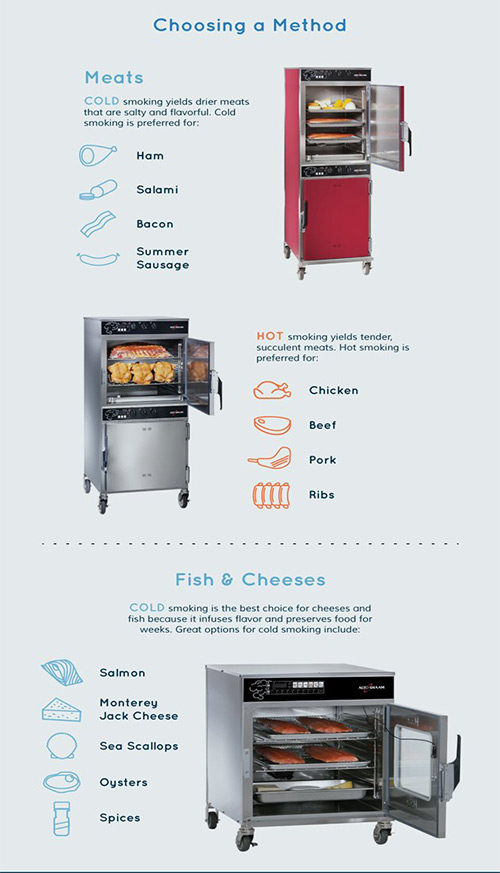
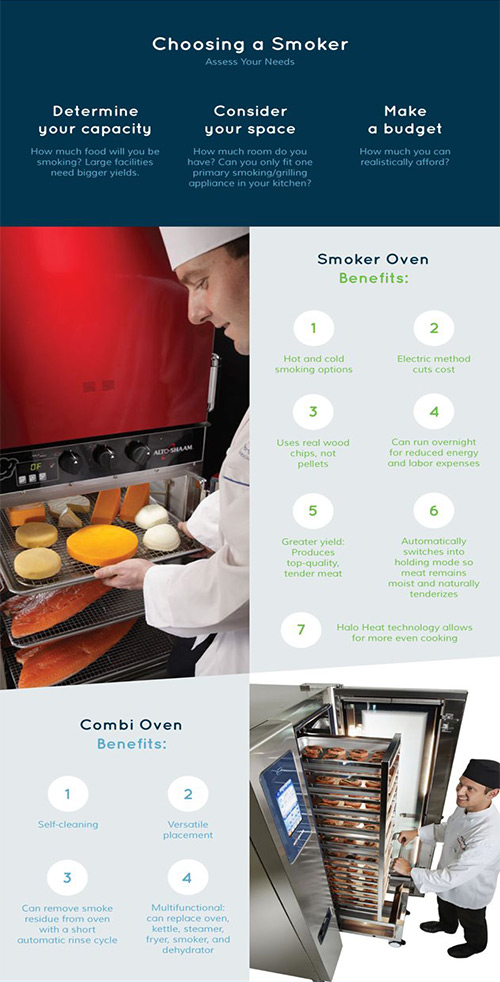
Smoked foods can lend an inspired touch to the menu of almost any restaurant, regardless of the type of cuisine it serves. Today, it’s easier than ever to smoke food quickly and efficiently whether in a restaurant setting or at home. The first step is to choose a hot or cold smoker. Both types of smoking devices come with their own benefits, and each is ideally suited for different types of food. Both hot and cold smoking can be used to infuse foods with different flavors; and both can be used to preserve otherwise perishable foods. The infographic below can help you decide whether hot smoking, cold smoking, or a combination of the two is right for you

Discussion of hot vs. cold smoking techniques

Chosing a method for meats, poultry, fish and cheeses

Choosing a smoker

Sources

Alto-Shaam®

Originally posted this on January 11, 2017 on their web site.  The Alto-Shaam® Social Marketing Team made a request to have us post this to our Blog.  We felt the content was a great value to our readers/followers!   Please note that the wood chips outlined in this article are limited to only those that Alto-Shaam® has available.  SmokinLicious® produces 8 species of smoker wood chips compatible to the Alto-Shaam® equipment. (Note: we do not produce Mesquite or Apple).

Purchase products:

Wood Chips- Grande Sapore®

Dr Smoke- "We like the Alto-Shaam equipment especially when cooking/smoking with wood chips."

Dr Smoke- “We like the Alto-Shaam equipment especially when cooking/smoking with wood chips.”

In Smokinlicious customers’ houses, not a creature was stirring, not even a mouse. The stockings were hung and filled with charwood with visions of great barbecue to come.

In Smokinlicious® customers’ houses, not a creature was stirring, not even a mouse. The stocking was hung and filled with charwood with visions of great barbecue to come.

When it comes to Santa’s ‘Nice & Naughty List,’ Dr. Smoke of SmokinLicious® has this explanation for those that cook with wood- “If you’re fortunate to get Charwood® in your Christmas stocking, it’s a great cooking wood product and shouldn’t be confused with the message being sent by a stocking filled with coal!”

Why?

Whether you prefer a wood-fired oven, grill, or smoker, efficiency should be the key consideration. Higher quality materials, insulation, heat retention, and radiant heat, result in more efficient function of the appliance. Likely the most important consideration though, is the type of fuel you plan to use in the appliance. That is where efficiency takes on a whole new meaning.

So why do we call our product Charwood? In short, because our product is not standard charcoal. Our method of production is based on the Japanese direct method which removes pyroligneous acid during the charcoal making process. The difference is, when burning, there are almost no stimulating smells or smoke. We produce our Charwood in small batches, carbonizing at temperatures between 400 and 700 degrees Celsius. The Charwood is then smothered using a non-chemical procedure to cool it down. Plus, we produce a wood specific charwood for those that understand that every component used in wood-fired grilling, smoking, and cooking affects the outcome of overall taste in the food. As with ALL our products, we manufacture our Charwood with premium, heartwood that is 100% bark-free, not from recycled or waste wood by-products.

Happy Holidays from all of us at SmokinLicious®!!

Dr Smoke- "You better watch out, you better not cry, you better not pout, if Santa puts charwood in your stocking."

Dr Smoke- “You better watch out, you better not cry, you better not pout, if Santa puts charwood in your stocking.”

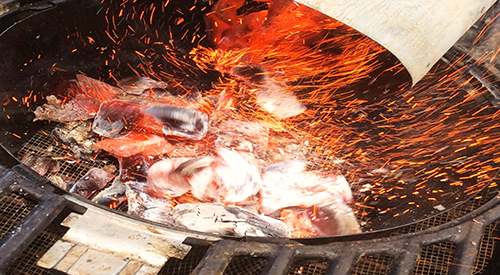
Building the perfect fire for cooking! Our chimney starter full of flaming hot charcoal being poured into our kettle grill.

Building the perfect fire for cooking! Our chimney starter full of flaming hot charcoal being poured into our kettle grill.

Listen to the audio of this blog

In Part I of our series on lighting an outdoor fire for cooking, I addressed fire production for the outdoor fireplace or fire pit cook, known as open fire appliances.  In Part II, I’ll address the needs for kettle, drum and box grills’ fire set up.

The Wood-Fired Environment

There are many choices in equipment for working with a wood fire but each has different material components that determines how much work would be involved to cook on the unit.  Here is the primary point when you’re selecting equipment for live fire: how will you cook on that equipment?

If your plans are to always do indirect cooking whereby the source of heat (fire, coals) will be on one side and you will cook on the non-heat side (in my opinion, the preferred method for all cooking), then know that most any equipment selected will work.   However, the time for the equipment to heat up may play a factor, as the heating time is directly related to the insulation of the grill. Plus the amount of radiant heat it can hold.

If a unit is manufactured from heavy metal, brick, clay, or ceramic housing, then it will perform exceptionally by giving radiant and retained heat.  Why is that important?  Because producing retained and radiant heat means less fuel consumption and even cooking results.

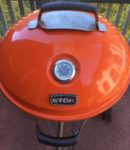
Our orange Stok kettle grill was used for our demonstration.The Kettle Grill

For thinner material grills like the traditional kettle grill which are very popular, low cost, and preferred

by many, you can compensate for the potential heat loss and improve efficiency by adding fire bricks to the walls and floor of the grill.  You will simply start your live fire directly on the fire bricks rather than the charcoal grate.  Fire bricks will work well in any grill that could improve on its insulation.

Drum/Barrel Grill

The overall cooking space in a drum/barrel grill is larger than that of a kettle grill.  However, just like any metal material, there are different grades so quality can be variable.  Same rule applies to these grills: if the insulation is not great, add fire brick to improve the performance.

Box Grills

These units are traditionally made of high heat metal with a deep, metal charcoal pan that includes grid and vents.  A grilling grate is suspended above and there often is a lid to the unit.

Fire Set Up

As I’ve stressed before, a good fire needs 3 elements: fuel (wood, charcoal), oxygen (air intake vents), and heat.  As with any fire cooking, a small, hot fire is ideal.

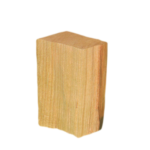
Our bark free Double Filet smoker wood chunk is the perfect size for the small kettle grill and box grills.

Double Filet Wood Chunk

To start your fire in one of these pieces of equipment, first open the air intake vents at the base of the charcoal firebox area.  This will ensure that oxygen can stimulate the start of the fire.  Since this is an enclosed firebox area, the size of the wood pieces may need to be adjusted from what you would commonly use in a fireplace or fire pit/fire ring.

I like to use the log cabin method of starting a fire with this equipment.  Lay 2 longer pieces of hardwood parallel to each other with about 3 inches of air space between them.  Lay 2 more hardwood pieces on top perpendicular to the first pieces.  Place the last 2 in position to match the base woods’ alignment.  In the center, add a pile of tinder which can be hardwood chips, pine cones, even newspaper if need.  Again, I like to use wood in its natural form as much as possible.  Pile some kindling size wood pieces on top of the tinder pile.  You can drizzle vegetable oil on top of the kindling and tinder to assist with ignition which proves helpful if you plan to light with a long wooden match.  I prefer to lite my fire using a MAP torch.

Don’t Rush It

It is imperative that you allow the fire to go through the full stages of combustion before you introduce foods to the cooking grate.  Too much flame and smoke will ruin the foods.  The ideal is to wait until the fire burns down to glowing embers.  If your equipment has the room in the firebox, rake or shovel some of the hot embers to one side and add just a small quantity of additional hardwood to keep the heat steady.  The rest of the hot embers are what will be used to cook with.

Position the foods based on the heat needed for the cooking.  Meats will require more of the heat while vegetables and one pot dishes will take the medium to low heat.  An infrared thermometer will aide with knowing heat levels in your equipment or you can use the hand test: hold your hand over the coals the distance your foods will be.  If you can only hold your hand for a count of 2 seconds before you need to pull it away, that is high heat.  3-4 seconds is medium-high, 5-6 seconds is medium and 7-8 seconds is low heat.

Be sure you visit Part I of this series so you can view the list of recommended tools to have when you wood-fire cook.

I hope you gained some new information on lighting a fire. Whether you plan to cook over/in your kettle, barrel or box grill.  Leave us a comment and subscribe so you don’t miss anything concerning wood fired cooking, flavors, and the science behind the fire.

Purchase products:

Wood Chunks- Double & Single Filet

Wood Chips- Grande Sapore®

More Related reading on this subject

More Related reading on this subject

Related reading:

-OPEN PIT COOKING FIRE BUILDING: PART I

-EMBER FIRED FRESH ZUCCHINI

-BEYOND PRICING: THE TOP THINGS TO CONSIDER WHEN PURCHASING COOKING WOOD


Dr Smoke says "The key to any success in grilling and smoking outdoors is building the fire with the proper materials and patience to develop the right base before you attempt to cook the food."

Dr Smoke- “The key to any success in grilling and smoking outdoors is building the fire with the proper materials and patience to develop the right base before you attempt to cook the food.”

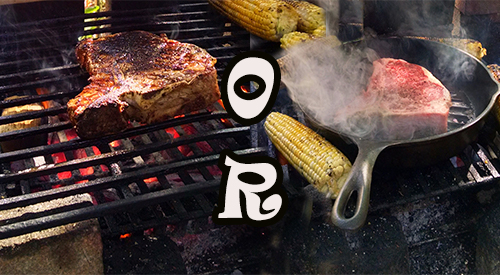
Cooking steak on the grill or in the grill pan is a universal question. Read more below to understand some of the techniques for cooking the perfect steak.

Cooking steak on the grill or in the grill pan is a universal question. Read more below to understand some of the techniques for cooking the perfect steak.

A GUIDE FOR COOKING THE PERFECT STEAK

Being able to successfully cook a steak is a skill that most people aspire to have. Pay attention to these details and you’ll see that it’s not that difficult to pull off.

To begin, you need to understand the basics of the different cuts of beef and how to choose the right one. From there, we’ll get into how to cook it to your desired level of doneness.

Choosing a Steak

Examining the butcher shop cases can be overwhelming. There are so many different cuts available—big steaks, skinny steaks, huge roasts, small roasts, and more. If your goal is to cook a good steak at home, I recommend sticking with the rib-eye, T-bone, New York strip, or Filet Mignon. These are the most expensive cuts, but in steaks, you get what you pay for and these are the most tender when grilled or pan-fried. The differences in tenderness come from the cow having stability muscles (think the lower back), which are less powerful and thus tender, and load-bearing muscles, which are tough. Price is directly correlated to these qualities. A tender steak will cost a lot more than a tough steak (though with the right treatment, you can successfully turn a tough cut like brisket into a tender, flavorful meal).

If the sheer volume of beef cuts still overwhelms you, check out our easy-to-read guide to steaks and their tenderness, price, and ideal preparation.

The seasoning requirements differ based on the cut. A tougher steak requires more seasoning because your eating experience is mostly about tasting the seasoning, rather than enjoying the tenderness of the cut. For example, you can get away with simple salt and pepper on a perfectly cooked filet mignon, while a flank steak used for fajitas should have some sort of spicy rub all over.

Tips for Cooking the Perfect Steak

So, you’ve purchased steaks that fall on the tender side and you’re ready to cook them. First, let them rest at room temperature for about 30 minutes to take the chill off. This results in more even cooking. Pro tip: If you are cooking for someone who likes a well-done steak and you like yours rare, leave yours in the fridge until the absolute last minute; your steak will cook less than your guest’s in a similar amount of time.

If you’ll be cooking on the stovetop, a cast iron or stainless-steel pan will work best. Nonstick coating can’t handle the high heat required for cooking a steak. Before you place the skillet over high heat, lightly season the steaks with a mild rub or just salt and pepper. While the skillet is warming, pour in a few tablespoons of peanut, canola, or other high-smoke-point oil. When the oil is shimmering and the pan is hot, place the steaks in the pan and loosely cover it with foil to prevent oil from splattering. Now is also the time to turn on any kitchen fans, as this will generate some smoke. If your steak is less than 1 inch thick, you can plan on cooking it in the pan the entire time. If your steak is thicker than an inch, do the searing on the stovetop and then move the entire pan to a preheated, 400-degree oven to finish cooking it without overly charring it.

When the steak hits the hot pan, start your timer. In general, 2 to 5 minutes per side is sufficient for medium doneness on a hot skillet. This range is flexible because, among other variables, everyone’s heat is slightly different, as is the steak’s starting temperature (depending, for example, on when you pull it from the fridge). For a thickness of an inch or less, I like to sear for about 3 minutes on each side, after which you should let it rest. If you have a thicker steak, you would put it in the preheated oven after the two 3-minute turns and let it cook for another 2 to 5 minutes until you achieve the desired doneness.

When you are finished cooking the steak, add a tablespoon of salted butter on top and a fresh herb – thyme works well – to get that expensive steakhouse-style flavor pop.

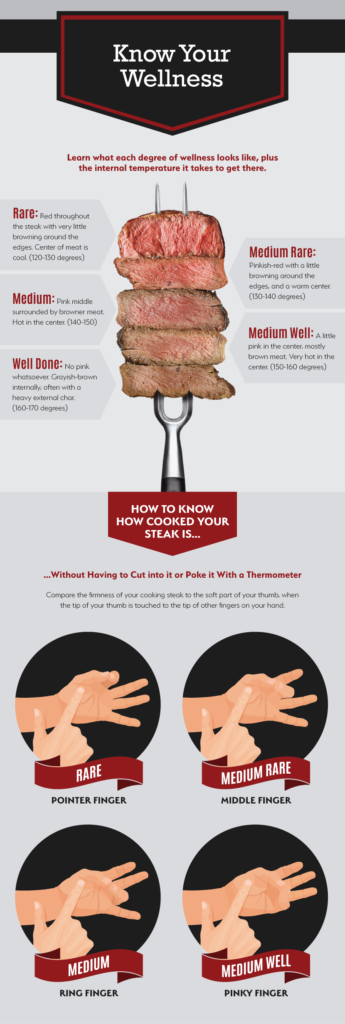
You have two methods for determining doneness. One is to use an accurate digital cooking thermometer. If you are aiming for a rare steak, you’ll need to pull it off the heat when the internal temperature is between 120 and 130 degrees F. On the opposite end of the spectrum, if you want a well-done steak, you should pull it off the heat when the internal temperature is between 160 and 170 degrees. The illustration below shows varying levels of doneness. The steaks will continue to cook slightly while resting, so take that into account as well.

Is this all a bit much to remember? Bookmark our illustrated guide to steak doneness and keep those temperatures in mind next time you’re trying to achieve the perfect level of doneness.

Don’t have a fancy digital cooking thermometer? No problem—you can use your hand! By positioning your thumb and fingers in various ways, you can mimic what a steak should feel like at various levels of doneness. The tenderness of a steak will roughly correlate to the feeling of the thick part of your palm, below the thumb, when your thumb sequentially touches the index, middle, ring, and pinky finger. Touch that part of your hand with the index finger of your other hand while moving your fingers from index to pinky, and you’ll feel that part of your palm getting firmer. If this seems daunting at first, simply use both methods. Get used to using a thermometer and at the same time touch the steak and see what it feels like. Don’t understand what we mean? Check out this guide to using your fingers to check a steak for doneness.

Is this all a bit much to remember? Bookmark our illustrated guide to steak doneness and keep those temperatures in mind next time you’re trying to achieve the perfect level of doneness. Also practice touching the meat, as we show below, and learn to feel your way to the perfect steak using your touch and chef’s intuition.

Grilling Tips for Cooking the Perfect Steak

Would you rather cook your steaks on the grill? You can easily apply most of the above methods to a hot grill, cooking the steaks directly on the grate. The same searing times apply, and if you have a steak that is thicker than 1 inch, simply finish cooking it over indirect heat (so in an area with no charcoal or with the gas burner turned off). You should get the same great results, but with the added bonus of grilled, smoky flavor.

To sum up, successfully preparing a steak is all about cut selection and cooking time. If you stick with a tender cut of beef and cook on high heat, then you can confidently start with the 2 to 5 minutes of sear time on each side and then finish it off in the oven.

Remember to hit it with a little bit of butter and a fresh herb, and you’ll find that you can easily prepare a fancy steakhouse-quality dinner at home.


Author: John Thomas

Source: eReplacementParts Blog


Dr. Smoke- hope you enjoyed our guest blog on cooking the perfect steak!

Dr. Smoke- hope you enjoyed our guest blog on cooking the perfect steak!


The grand ole tree beech hardwood adds a very European flavor to smoked foods, especially sausage style products.

The grand ole tree beech hardwood adds a very European flavor to smoked foods, especially sausage style products.

Listen to the audio of this blog

With 10-13 Beech varieties available throughout the world, this is a hardwood tree that can age to some 300 years.  Visually, they are quite impressive often with distinct “root feet” and gray, smooth bark.  The scientific name is Fagus Grandifolia but in North America, we know this as American Beech.

(more…)

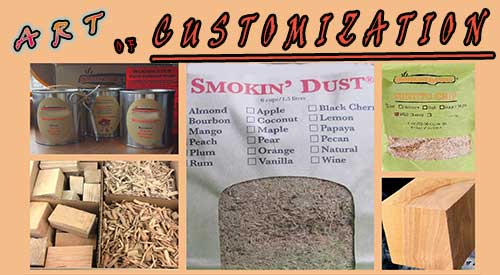
Customizing your cooking experience with our diverse selection of Smokinlicious Smoking Wood Products that Make a Difference with Equipment Efficiency and Taste

Customizing your cooking experience with our diverse selection of Smokinlicious Smoking Wood Products that Make a Difference with Equipment Efficiency and Taste

THE ART OF CUSTOMIZING YOUR COOKING EXPERIENCE

Listen to the audio of this blog

Why Not Build Your Own Wood-fired Ingredient Box?

I remember the days when purchasing a new car was very limited in terms of customizing.  You didn’t get the opportunity to choose much more than the exterior color and even those choices were limited to a few!  Today, you can go online and literally build your own car from the type of engine and fuel it will use, to the color, texture, and material of your interior and everything in between.  This got me thinking about customizing when it comes to the wood-fired cooking experience.  Why should cooking woods be any different than the car industry?  Why not build your own wood-fired ingredient box when it comes to the smoking wood?

Since SmokinLicious®inception, we have offered a level of customization to the user purchasing our products that has been unmatched by any other company.  We provide options that empower the user to combine various products as you would the ingredients to a homemade stew.

Why is this option of value and importance?

There are times that you need different products on hand to simply do specific functions.  For instance, Grande Sapore® Wood Chips are a means of bringing the temperature of some equipment up quickly.  Smokin’ Dust® provides for a sudden burst of smoke vapor due to its lower moisture level.  Double filet smoker wood chunks tend to be the ideal sizing to place on diffusers/flavor bars of LP grills and achieve smoke vapor around foods being cooked.

I think one of the primary reasons that smoking wood should have a level of customer choice is that most of us don’t own just one piece of equipment.  I think I’m safe to assume that all of us have a conventional stove top.  That gives the opportunity to do stove top smoking.  Many of us have newer models of LP grills that allow for the placement of woods chunks and/or wood chips.  Then there are those that have the conventional stove top, the LP grill, the charcoal grill, and a dedicated smoker.  Wouldn’t it be great to source all the products need for these different types of equipment from one supplier and even get the chance to purchase a combination of products for one price?

And the icing on the cake –  Now that’s customization at its best!!  That’s SmokinLicious®!

So now it’s time to make your wood-fired cooking experiences uniquely your own by starting with SmokinLicious® and our wide array of species and flavor options just waiting for your hand and imagination to take your wood-fired cooking memories to new heights! We hope you enjoyed the article- Customizing your Cooking Experience

For related reading:

THE TOP 8 MISTAKES TO AVOID WHEN COOKING & GRILLING WITH WOOD

SMOKE SIGNALS: LEARN WHAT THE COLOR MEANS WHEN COOKING WITH WOOD

Purchase products:

Wood Chunks- Double & Single Filet

Smoking Wood Chips- Grande Sapore®

Wood Chips- Minuto® & Piccolo®

Follow us on: Instagram, Twitter, Facebook, Pinterest, YouTube, Flipboard, Google+, Reddit, Medium, Blogger, BuzzFeed, Bloglovin’

Dr Smoke- “Don’t limit your cooking experience to one product; mixing and matching can only enhance your culinary flavoring. That’s why we provide a very diverse product base.”

Attention Women Chefs: The Woman's guide to manning the grill!

Attention Women Chefs: The Woman’s guide to manning the grill!

Listen to the audio of this blog


Part one of the Audio:

Part two of the Audio:

It’s long been the equipment associated with the guys.  Perhaps it’s due to the primal start of cooking over the live fire which initially was a man’s skill.  Hunt the animal and cook it on fire and hot coals.

Recently, the trend has begun to turn around in favor of more women chefs cooking components of a meal on the grill.  In fact, it’s not just the traditional LP/gas grill but charcoal grills as well, as women chefs take their new recipe and technique finds out of the traditional indoor kitchen and to the outdoors.

Just Because It’s Outside Doesn’t Change The Purpose

There is no question that outdoor grilling equipment has evolved into something of a fantasy.  We now have choices beyond the standard LP, natural gas, charcoal, and electric grills.  Many brands are now featuring dual fuel cooking, meaning they may have gas or electric assist but use wood and/or charcoal for heat and flavor!

What does this mean for the ladies who want to do the more outdoor cooking on the grill?

 Versatility!  It is so easy to cook an entire meal on the grill without it taking several hours or more.

Accessorize!

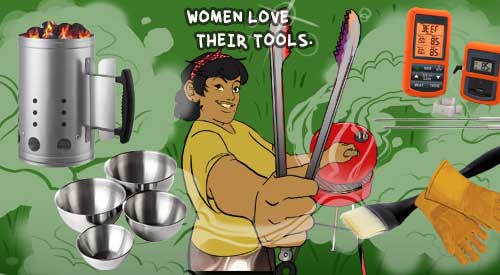
The key to ensuring that an entire meal can be cooked on the grill is to have the right tools and that includes some accessory items.  Let’s look at each recommended item and answer the question why it’s important to the woman’s full meal grill event.

#1 Grill Grate Accessories:

First up, the grill pan, grill basket or grill topper.  These are perfect for vegetables and fruits making it so easy to ensure that the food doesn’t stick to the grill grates and that every piece gets cooked evenly.  Plus, since many grills are now sold with a side burner, you can always steam or parboil tougher vegetables first, then transfer to the grill pan/basket/topper.  Or, use that side burner to make rice for a healthy starch side.  Don’t have a side burner on your grill or are using a charcoal grill?  Then buy a butane burner!  These are so inexpensive yet give you another cooking option to get everything ready at the same time.

#2 Easy Charcoal Lighting:

If you don’t know what a chimney starter is, time to learn.  The charcoal chimney starter is the best way to light a charcoal fire.  Although these traditionally use newspaper at the bottom (for ignition) and load charcoal chunks (can be briquettes or lump) into the body of the unit, I take a simple method of lighting my chimney.  I load with my favorite charcoal and use a butane torch under the unit to light – no newspaper needed.  This allows me to leave the butane on auto fire for a few minutes to ensure the lower coals are lit.  Simply pull the torch out, shake the chimney while wearing fire gloves, and return to a heat safe surface until the top coals turn white-gray.  Oh, and you can always light the chimney off that side burner too!

#3 Purchase 2 Thermometers

Stop guessing at when things are done!  You need to invest in 2 quality thermometers; one for the grill/smoker and one instant-read for the food.  Be sure the thermometers you invest in can take a reading in 5 seconds or less, have at least a 4-inch probe for thicker cuts of meat, and have cables that are durable (if you don’t go with a wireless), especially for equipment thermometers that are placed through venting holes or under lids.

#4 Silicone

Anything made from silicone will become a lifesaver at the grill.  Silicone pot handles covers, spatulas, heat resistant tongs – you get the idea.  This material can handle the high heat of grills so stock up on those items you’ll need and use the most.  Suggestions? Tongs, pot handle covers, spatulas, spoons, mat.

Diversify!

Grilling does not necessarily mean you must put all foods on the grill grates.  Use high heat cookware to help you out.  Think cast iron or high heat clay and enamels meant for the grill.  These are perfect for starting one-pot wonders like legumes, pasta dishes, even sauces.  With a roomy enough grill, you can fit many different items – grill pan/basket, Dutch oven, and rib racks.  Don’t forget most grills come equipped with a lower and upper grill rack so more fragile items that need less heat can go to the top.  Here are some tips on food to cooking equipment match:

Tip #1: Cast Iron and Charcoal

Cast iron is, without question, the best material for cooking directly in the coals.  Here’s a tip – if you have an outdoor fireplace or even a fire pit that uses wood, you can do this method of cooking by placing your cast iron skillet or Dutch oven directly in the coals.  Keep in mind, I said coals, not flame.  Coals have a very high BTU rating and can cook foods within cast iron as if they are in the oven.  Just be sure to pack the hot coals around the cast iron after placing the pan in the coal bed.  Perfect items to try: vegetable medley, roasted potato, curry dishes, au gratin dishes.

Tip #2: Cast Iron and LP/Gas Grill

Just like having the side burner on a grill, cast iron on the grill is like having an extra pot on the stove.  Cast iron comes in lots of sizes and cookware type: saucepan, skillet, Dutch oven.  Anything you would traditionally make in cookware on the stove can be done on the grill.  The key is to ensure that you have this on a section of the grill that isn’t set to “high”, as cast iron holds heat.

Tip #3: The Upper Grill Rack

Though small in overall size, the upper grill rack is designed for those fragile items or for items that require simple warming.  Think melting butter for vegetables, heating sauces, warming bread and rolls.  Use it!  It can be of great value to keep you from needing anything indoors.

Tip #4: The Rotisserie

If you have a grill with a rotisserie, use it!  Keep in mind, as that item turns on that rod, the meat or poultry renders some fantastic juices.  Catch them!  Put a high heat pan under the food item with some great vegetables and use the drippings to add superb flavor to the cooking process.

Women Chefs- “Flavor It Up!”

Now, let’s be clear!  Unless you’ve invested in a dual fuel or hybrid grill, one that allows you to use charcoal and/or smoking wood, most standard LP grills are just that: grills not smokers.  If you don’t have a hybrid but want to get some smoking woods flavoring to your foods, then start thinking of adding charcoal and wood chunks!  Yes, you heard me right.  Wood Chunks vs. woodchips which was the product of choice for years with LP grills.

Why Smoking Wood Chunks?

Most grills today are designed with covers for the gas burners to diffuse the heat more evenly.  They go by a lot of names: heat distributors, flame tamers, heat plates, burner shields, flavorizer bars.  The addition to the traditional LP grill is the reason why you can use smoking wood chunks.  Simply place a few small wood chunks under the grill grate right on top of the heat diffuser.  Be sure you only put chunks on a burner you will ignite.  Replace the grill grate and you’re ready to go!  And, yes, you will get real wood smoke vapor to flavor whatever you’re cooking on the grill.  I promise!

Final Points Especially for Our Women Chefs

“Manning” the grill is no different than planning a meal in your conventional kitchen.  Pick out the components of the meal and decide what needs to cook were on the grill: directly on the grate, on the rotisserie, in cast iron, on the coals.  If doing a meat, be sure to marinate 6 hours or best, overnight, to ensure a moist outcome and to reduce cooking time.

Have everything prepped including the grilling tools you will need and this is a walk in the park for all women chefs planning daily meals for the family.  The best part, you can enjoy more of those great warm days and not sweat in the confines of the hot summer kitchen!

More Related reading on this subject-

For our women chefs, check out these articles for more reading on grilling and food smoking tips & techniques:

-HOW TO USE CHARCOAL WITH WOOD IN COOKING

-HOW TO TURN YOUR CHARCOAL GRILL INTO A SMOKER

-HOW MUCH WOOD TO ADD WHEN SMOKING

Purchase products:

Wood Chunks- Double & Single Filet


Dr. Smoke- women chefs are grilling and smoking food more and more.

Dr. Smoke- “More and more, women chefs are taking up the art and science of grilling and smoking food! We’ve developed this specially prepared guide to offer helpful tips to the ladies!”


Picking the proper cooking wood can only lead to success versus a flop- for the wood fired grill

Menu board found in most restaurants- highlighting wood-fired grill

WHEN A FLOP COULD HAVE BEEN A SUCCESS WITH THE WOOD-FIRED GRILL!

Listen to the audio of this blog

There is no question that being in the franchise restaurant business is a challenge especially given that there is a national menu dictated by the brand you partnered with.  I am amazed at the risks brands will take when it comes to making a major capital investment in marketing strategies, equipment upgrades, and personnel training for single concepts.  Case in point: the obsession with wood-fired grilling to get customers in or coming back!

(more…)

Forest scene of alder wood the perfect wood for a very slight touch of smoke

Alder wood the safe bet for cooking wood- little in flavor!

ALDER WOOD THE SAFE BET!

Alder

I’m often asked if there is any hardwood that is a safe bet to use with any food item and equipment.  One that won’t be too strong if over applied or hurt the equipment if too much wood is used.  Well, as you’ve heard me mentioned before, we don’t provide descriptors of the woods we manufacture as we believe there are too many variables that affect the overall flavor of the hardwood.  Instead, we offer a rating of our woods based on how bold they are.  On the low end of that rating scale?  Alder wood the safe bet.

Family of Trees- Alder Wood the Safe Bet

First, let me state that Alder is part of the Birch family of hardwood.  It is a genus that is a flowering plant.  Around the world, there are 35 species of both the tree and shrub form.  Yes, that is correct.   Alder is not always a tree but can be a tall growing shrub.  In New York State, we have roughly 13 varieties with our Alder referred to as Eastern Alder.  On the density side, this is a lighter hardwood and thus, it does not hold moisture long.  This makes this hardwood ideal for very specific cooking applications.

Alder is very light in its stimulating flavor compounds.  I’m sure you’ve read that Alder is ideal for fish but there are missed opportunities if you don’t go beyond the fish category.  Given there are so many options to infuse smoke vapor, this can be a great wood choice when using a handheld food smoker or even a stove stop smoker or cold smoke generator.  Contemplating chocolate, cheese, or fruits?  Alder can be a perfect match.

Caution- Alder Wood the Safe Bet

Here’s my one caution.  If you are planning to incorporate bolder ingredients with your food item, then alder may not be the first choice.  Lots of bacon, chili or cayenne pepper – these will mask the flavor of the Alder wood. Instead opt for foods that have lighter ingredients like herbs, citrus, dairy components.

As mentioned, Alder or Birch will start with a moisture level that is higher but due to the composition of its cell structures, the water will evaporate faster in the hardwood.  Using it on an LP grill or in a charcoal unit may require quicker replenishment than another denser hardwood so extra supply is always recommended.

Blending- Alder Wood the Safe Bet

Don’t forget, blending Alder with another hardwood works well too so if you do want a spicier kick to your ingredients, feel free to add Alder with a bolder wood like hickory, beech or oak.

The best part is always in the experimentation so have fun working with this hardwood that I call the safety net – it won’t let you fall flat if you select it for your smoke infusion.

Dr. Smoke Alder wood the safe bet when it comes to wood smoking with a lite taste

Dr. Smoke Alder wood the safe bet when it comes to wood smoking with a lite taste


See our other wood species blogs:

PUT A CHERRY ON IT!

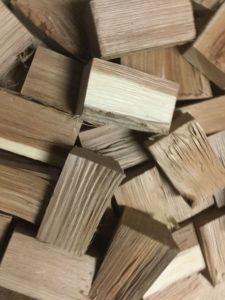
Smokinlicious pristine wood blocks is a great back drop to the 10 things to consider when purchasing cooking wood

Smokinlicious® wood blocks are a pristine backdrop for the 10 things to consider when purchasing wood for cooking!!

Listen to the audio of this blog

Many of you who reside in the Southern and Western States have the advantage of being able to engage in wood-fired cooking pretty much whenever you want, regardless of the calendar.  You may do so on an LP grill, a charcoal grill, charcoal/wood smoker, or electric grill or smoker.  Those of us living in the North and to the East – though we could continue cooking outdoors all year – usually elect to restrict our outdoor cooking methods until temperatures climb above 55°F!

Soon, it will be an even playing field when it comes to enjoying the outdoors for all of us so what better way to get prepared than to start thinking about replenishing supplies for our outdoor living and cooking.

Today, I’m going to give you a guide on the top 10 things to consider when purchasing wood for cooking, grilling or smoking in general.

#1 Is the wood native to the USA?

If the wood comes from outside the United States, it doesn’t necessarily make it a bad choice but you do need to understand that importing wood products into the USA is highly regulated.  Mostly, the wood needs to be certified that it has been treated in some way to ensure no insects are hitching a ride in!  Remember, that treatment could be with chemicals or by heat only, so be sure you check the label.  This product may turn out to only be ideal for hot temperature cooking like searing and grilling due to the dryness of the wood, or if chemicals were used, it shouldn’t be used at all.

#2 Is the wood 100% hardwood?

It is imperative that any wood you use to cook with, wood chips, wood chunks, logs or dust be only hardwood.  Look for labeling that attest to the fact that only hardwood was used as some companies will use a mix of softwood and hardwood or include press woods.

The Pristine, Clean, Bark Free Double Fillet SmokinLicious Wood Chunks Displayed

SmokinLicious® Double Fillet Chunks

#3 How does the company get the wood?

Many of the companies who supply wood chips for cooking have another manufacturing process that produces a scrap or waste product.  Not Smokinlicious®!  Often, those leftovers are used in this secondary business of BBQ woods, smoking woods, or cooking woods, to name a few of the labeling names.  Check packaging for the source or origin location of the wood and if that company name matches the one on the front of the packaging label.

#4 Are you getting the wood named on the label?

 This seems like a no brainer but honestly, wood is no different than olive oil or cheese.  You may not be getting 100% of the wood species listed on the label just as we’re finding extra virgin olive oils may not be extra virgin or grated cheese isn’t 100% cheese!  If you find packaging that simply states “hardwood” or “mixed hardwoods” then you don’t know what you’re getting.  Be sure to read the entire label and check for a reference to 100% of a species.

#5 Is the brand name the actual manufacturer of the wood or just the distributor?

It is very common for brands to be in a business that they don’t participate in from a manufacturing point.  Check the small print on the label to see if the manufacturer of the product is listed or if the label simply states who the product is distributed by.  Distributors don’t have a lot of history on the product in the box or bag.

#6 Does the seller make claim to a certain cooking method for the wood?

 This is key to ensuring you don’t end up with a disaster.  If the packaging clearly states the product is for grilling, then don’t try to use it in your smoker or stove top smoking pan.  Compatibility of a cooking wood to equipment should factor in the moisture level of the wood.  Too dry, and it will just catch fire.  Too wet and you won’t be able to grill with it.

#7 Are there any terms such as “naturally cured” or kiln dried on the label?

The terms generally mean that the wood has been air dried for an extended period, much like you do with firewood before using it in your fireplace, or the wood has been exposed to low temperature drying in an enclosed area.  Either method means the wood will usually have a moisture level of 4-13% which will not make it ideal for hot smoking techniques.  Again, these woods are best for high heat level cooking as dry wood produces a lot of heat.  Woods with a moisture level ~20% are ideal for hot smoking.

#8 Does the wood have bark?

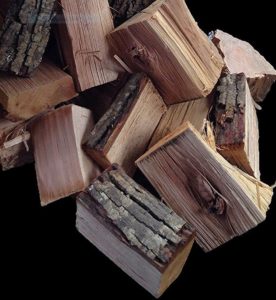
Photo shows the nasty bark on products sold by our competitors

Our competitors’ bark on product

 Bark is the protector of the tree and so it is like a sponge, absorbing anything that isn’t healthy to the tree.  When bark-on wood is exposed to heat, you will get a lot of separation or weakness to the cell structure of the bark.  This can loosen during exposure to heat and burn separately causing flare ups in temperature control, sparks, and leave a coating on your equipment.  If you have an option, go bark-free!

#9 Does the packaging label reference cooking or merely say “firewood”?

If you planning on going camping and setting up an elevate cooking grate over the fire, or using a Dutch oven for cowboy-style of cooking, then I don’t have a problem with using split firewood for the cooking part.  This is in the great outdoors where there is a lot of area to handle the smoke vapor.  But if you are using any kind of equipment that has a contained firebox area, please use something other than firewood to cook with.  You simply don’t know where the wood has been or what it may contain so cooking within a confined chamber is not the ideal.  Firewood can have a lot of resin, sap, and spark.

#10 Does the brand sell the product by weight?

 Wood is a commodity that has a lot of variance when it comes to weight due to differences in density, moisture level, and variety of the species.  It is the reason why wood cannot be sold by weight legally.  Look at the packaging and be sure there is a reference to cubic inches, cubic feet, liters, centimeters, etc.  Anything but weight.

 There you have it!  A guide for your upcoming outdoor cooking season using a variety of cooking/grilling woods like wood chips, chunks, logs or dust.  Take a bit of time to check the packaging and examine all the information on a website before making your decision.  Most importantly ask yourself: Do I want to eat anything cooked over this?

Dr. Smoke- Before purchasing wood for cooking, it's important to know the many factors!

Dr. Smoke- Before purchasing wood for cooking, it’s important to know the many factors!


More Related reading on purchasing wood for cooking:

More Related reading on purchasing wood for cooking:


Wood Chips Grande Sapore

Wood Chunks- Double or Single Filet

Smoker Logs- Full & Quarter Cut

Smoking Dust- Spice for Your Equipment

« Previous PageNext Page »